


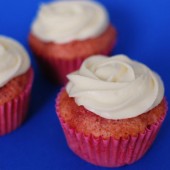
Pink Cupcake Bites (Baking for Breast Cancer Awareness)
I’ve been wanting to make Cupcake Pops for quite some time now. I’ve seen them pop up on Bakerella’s blog in multiple shapes and colors. She makes them for all sorts of occasions. And recently, she made them without a stick – awesome concept! Her Cupcake Bites were so cute, I had to give it a shot.
Last year at the holidays, I made Oreo truffles, cake balls, and peanut butter balls, so I have some experience with truffle making. I was just waiting for the right occasion. I decided to make them for Breast Cancer Awareness Month using some pretty pink sprinkles and sugar, including my Pink Ribbon Sprinkles. I love how these look like miniature cupcakes 🙂 So cute. And quite tasty!
 I know there are some people out there who are completely against boxed cake mix. I understand the argument and I do agree that I’d much rather make something from scratch. Not only is it more satisfying, you’re getting a lot fewer crazy chemicals and preservatives. I like to keep my baking healthy, or at least as natural as possible… I do think there’s a time and a place for cake and frosting from a box. For cake balls, one boxed cake mix and one package of store-bought frosting makes the perfect ratio of cake to frosting. So that’s what I used. One box of strawberry cake and one can of cream cheese frosting.
 I loosely followed the directions on Bakerella’s blog. I did break things into steps and took my time about it. I really enjoyed making these and can’t wait to make them again. And based on the comments from the people I shared them with, I’m sure they wouldn’t mind either 🙂
 I know a lot of people asked Bakerella if she ever froze hers and at the time I made these, she hadn’t. I froze these for a week prior to serving them. Hubby actually snuck a couple every day I’m sure. In fact he said they’re much better straight out of the freezer.
 Easy Cupcake Bites – from Bakerella – makes ~80
1 box cake mix – cook as directed on box for 9×13 cake
1 can cream cheese frosting
1 pkg chocolate candy melts
1 pkg white candy melts – for tops – any color will work
Candy cup mold
Sprinkles & M&Ms for decorating
 After cake is cooked and cooled completely, crumble into large bowl. Using the back of a large spoon, mix thoroughly with 1 can cream cheese frosting. I actually threw my cake into my KitchenAid mixer still hot. Threw the frosting on top and let my mixer do the work. Set it on stir for about 2 minutes until completely combined. Then I put the whole bowl in the fridge to allow the cake to cool.
 Roll mixture into quarter size balls and lay on wax paper covered cookie sheet. I had a hard time making the balls a consistent size. Some were small and some were big. In the end they all worked out fine and tasted great, so it really doesn’t matter as long as they are smaller than the diameter of your candy mold so they don’t look too much like mushrooms.
Chill in the freezer for a few minutes, until they are slightly firm, not frozen.
Melt chocolate bark and candy melts in microwave per directions on package. I used a squeeze bottle for the bottom part. So I melted my chocolate candy melt in the bottle.
Using a spoon or squeeze bottle, fill each mold cavity with a small amount of chocolate. Sorry, I didn’t think to measure how much. But as soon as you fill the cavity, go ahead and place one of your rolled balls into it. Carefully push it down until the force causes the chocolate to push up and fill in around the sides of the ball. You may have to experiment with a couple to get the right amount. Stop pushing once the chocolate reaches the top edge.
 Place the mold tray filled with cupcakes in the freezer for just a few minutes to let the chocolate set. Remove and then gently pull up on the cake ball top to release from candy mold.
Now, holding the bottom of the cupcake, dip the top in another color of melted chocolate. I did this in steps, so I made all the balls first. Once those were chilled, I made them all into “naked” cupcakes – with just the chocolate bottoms. Lastly, I dipped them into the white candy melts to finish the cupcakes.
Decorate with sprinkles and M&M before top of cupcake has set.
And, probably definitely impress your friends and family.
 I am submitting this post to my own Power of Pink Challenge as well as Cilantro and Lime’s Baking for Breast Cancer Awareness. To see my personal story of how Breast Cancer has affected my life, check out my Power of Pink Challenge post.


Here’s one myth about Breast Cancer. Watch for my Power of Pink roundup the first week in November for more.
Myth: The majority of women diagnosed with breast cancer had more than one risk factor prior to diagnosis.
Fact: All women are at risk for developing breast cancer whether they have known risk factors. In fact, the majority of breast cancer patients had no known risk factors, other than being female, for this frightening disease.


 I am Jen the Beantown Baker. Engineer by day and baking maven by night. Hubby serves as my #1 fan and official taste tester. We got hitched back in 2006. Barefoot. In the sand. With the waves crashing behind us. It was one of the best decisions we’ve ever made.


Oh yum Jen! These look absolutely delicious! What a great July 4th treat…..maybe split them and serve ’em up like a Strawberry Shortcake??? Yum.
http://www.simplysweeter.blogspot.com
Hi Jen, by any chance do you remember about how many strawberries you used for the recipe and also for filling? I have maybe 10-15 strawberries at home that need to be used asap and wondered if that was enough?
KV – Sorry I don’t. We had a big thing of strawberries in the fridge that Hubby had cut up for us to snack on. I would say it was less than a pint, but pretty close to a pint? Not really sure. Sorry I can’t be more help.
strawberries are my favorite fruit ever! in my opinion, they always should be enjoyed fresh no matter what. even in desserts! 😀 your cupcakes look great, by the wayaoh
I’ve heard that strawberry cake doesn’t end up being that sweet, but maybe the addition of fresh strawberries on top changes things. I’m a huge strawberry fan, so I’m anxious to try this.
Cupcake Activist – I could definitely see that the batter itself might not be that sweet. I thought they were great with the additional strawberries added in.
This looks divine. I made the Sky High strawberry cake with frozen berries and I thought it was really good, but I’d like to try again with fresh ones too! Your hubby has some very luck coworkers 🙂
Love this recipe.. infact all of your cupcake recipes. I made your Fauxtess cupcakes the other day and turned out wonderfully.. This is now on my wish list. :
http://www.brisbanebaker.blogspot.com
These look so simple and beautiful! I love strawberry cake and I especially love the way the fresh strawberries look inside 🙂
Sues
cant go wrong with strawberry…just made strawberry marscapone filled cupcakes myself! 🙂
http://cuppycakebakes.blogspot.com
I love how you frosted these cupcakes!! did you start from the inside and go out with a 1M tip?
Yes, soohyunee, to make the rosette, I started in the center and swirled around to the outside.
I love reading tһrough an article that can mɑke people tһink.
Also, mɑny tһanks for permitting me tto comment!
Have a l᧐oк at my page: ecommerce wordpress