


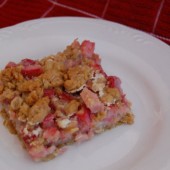
Birthday Carrot Cupcakes with Cream Cheese Frosting and…
… Happy National Cupcake Day!! According to this American Food Holidays website, today is National Cupcake Day. To honor such a great day, I bring you a great cupcake. You may have seen this in other blogs earlier in the year when the TWD group did this cake. And now on to the cupcake…
It was time to celebrate a good friend’s birthday and I did the thing I know best. I offered to bring cupcakes. Her hubby said her favorite cake was carrot cake, so I set out to find a good carrot cake recipe. My hubby doesn’t actually like carrot cake. And I had a bad experience last summer when I made carrot cake cupcakes that turned out so bad I had to throw the whole batch out. That has only happened twice and it was traumatic both times.
 But this time, I was determined to make a delicious carrot cake. Two recipes popped into my mind immediately. I remembered that the Tuesdays with Dorie group had done carrot cake earlier this year…. The Pioneer Woman had also done a carrot cake in the spring. I analyzed the recipes and decided on the TWD recipe using dried cranberries instead of raisins (stole that idea from CB).
This carrot cake recipe is amazing. I love the coconut and cranberries in the cake. Everyone really enjoyed these little guys. Even Hubby, who claims to not like carrot cake, ate 3 of them!!
 Bill’s Big Carrot (Cup)cake – from CB – originally from Baking from My Home to Yours by Dorie Greenspan – I got 27 cupcakes
2 cups all purpose flour
2 teaspoons baking powder
2 teaspoons baking soda
2 teaspoons ground cinnamon
3/4 teaspoon salt
3 cups grated carrots
1 cup coarsely chopped walnuts or pecans
1 cup shredded coconut (sweetened or unsweetened)
1/2 cup moist, plump raisins (dark or golden) or dried cranberries
2 cups sugar
1 cup canola oil
4 large eggs
Position the racks to divide the oven into thirds and preheat the oven to 325 degrees Fahrenheit. Butter three 9-x-2-inch round cake pans, flour the insides, and tap out the excess. Put the two pans on one baking sheet and one on another.
To make the cake—
Whisk the flour, baking powder, baking soda, cinnamon and salt. In another bowl, stir together the carrots, chopped nuts, coconut, and raisins.
Working with a stand mixer, preferably fitted with a paddle attachment, or with a hand mixer in a large bowl, beat the sugar and oil together on a medium speed until smooth. Add the eggs one by one and continue to beat until the batter is even smoother. Reduce the speed to low and add the flour mixture, mixing only until the dry ingredients disappear. Gently mix the chunky ingredients. Divide the batter among the baking pans.
Bake for 40-50 minutes, rotating the pans from top to bottom and front to back at the midway point, until a thin knife inserted into the centers comes out clean. The cakes will have just started to come away from the sides of the pans. Transfer the cakes to cooling racks and cool for about 5 minutes, then run a knife around the sides of the cakes and unmold them. Invert and cool to room temperature right side up
[NOTES: Fill cupcake liners about 2/3 full and bake cupcakes for 20-25 minutes until toothpick inserted in the center comes out clean. Cool completely before frosting.]
The cakes can be wrapped airtight and kept at room temperature overnight or frozen for up to 2 months.
Cream cheese frosting
8 ounces cream cheese, room temperature
1 stick (8 tablespoons) unsalted butter, at room temperature
1 pound or 3-3/4 cups confectioners’ sugar, sifted
1 tablespoon fresh lemon juice or 1/2 teaspoon pure lemon extract
1/2 cup shredded coconut (optional) – I added this as well as 1/2 cup chopped walnuts
Finely chopped toasted nuts and/or toasted shredded coconut (optional)
Working with a stand mixer, preferably fitted with a paddle attachment or with a hand mixer in a large bowl, beat the cream cheese and butter together until smooth and creamy. Gradually add the sugar and continue to beat until the frosting is velvety smooth. Beat in the lemon juice or extract.
If you’d like coconut in the filling, scoop about half of the frosting and stir the coconut into this position.
To assemble the cake—
Put one layer top side up on a cardboard cake round or a cake plate protected by strips of wax or parchment paper. If you added the coconut to the frosting, use half of the coconut frosting to generously cover the first layer (or generously cover with plain frosting). Use an offset spatula or a spoon to smooth the frosting all the way to the edges of the layer. Top with the second layer, this time placing the cake stop side down, and frost with the remainder of the coconut frosting or plain frosting. Top with the last layer, right side up, and frost the top- and the sides- of the cake. Finish the top with swirls of frosting. If you want to top the cake with toasted nuts or coconut, sprinkle them on now while the frosting is soft.
Refrigerate the cake for 30 minutes, just to set the frosting before serving.
Serving:
This cake can be served as soon as the frosting is set. It can also wait, at room temperature and covered with a cake keeper overnight. The cake is best served in thick slices at room temperature and while it’s good plain, it’s even better with vanilla ice cream or some lemon curd.
Storing:
The cake will keep at room temperature for 2 to 3 days. It can also be frozen. Freeze it uncovered, then when it’s firm, wrap airtight and freeze for up to 2 months. Defrost, still wrapped, overnight in the refrigerator.

 I am Jen the Beantown Baker. Engineer by day and baking maven by night. Hubby serves as my #1 fan and official taste tester. We got hitched back in 2006. Barefoot. In the sand. With the waves crashing behind us. It was one of the best decisions we’ve ever made.


