


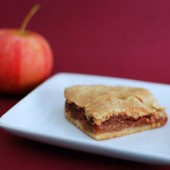
Apple Slab
Hubby and I did some apple picking a couple weeks ago. We didn’t want our bounty to go to waste, so I immediately remembered this recipe which I had saved off. I’m not sure if you remember me mentioning this, but the lovely people at King Arthur Flour have a baking hotline. Now I’d say I’m a pretty confident baker. But that’s mostly because I know how to follow a recipe. The minute I change things up, I lose some of that confidence. That’s where the hotline comes in.

I wanted to make this apple slab while I had the delicious apples on hand, but I wanted to freeze it and bake it later. I figured I’d shoot the KAF Baking Hotline an email to see what they recommended. I was shocked how quickly they got back to me. Within a few hours, they confirmed that I could assemble the slab and freeze it. Then they said when I go to bake it, just put it straight into the oven from the freezer and add 15-20 minutes to the baking time. Just like that, I had input from an expert and all my worries went away. I love how they got back to me so quickly! Definitely give them a try next time you’re in a baking pickle.
Now back to the slab. No surprise here, this tastes just like apple pie. But I think it’s better than apple pie. Why? For one, it’s portable. You don’t need a fork and plate to eat a piece, just use your hands. Second, it’s less of a committment than a slice of pie. Around the holidays, I often have the issue where my eyes are bigger than my stomach. The smaller pieces let you try some of the apple slab without committing to a big piece. And if it’s your favorite dessert of the day, you can go back for another piece.

I’m going to be making another one of these real soon to throw in my freezer. Then I’ll have a perfect holiday dessert for the upcoming parties, potlucks, and get-togethers. One note though, the crust was much crispier the first day it was baked. It did get a bit soggy the next day. Be sure to leave off the glaze until you are going to serve it.
Also, I didn’t have panko bread crumbs or corn flakes. I planned to sub oats, but didn’t have those on hand either. Instead I used graham cracker crumbs and they worked just fine.
One Year Ago: Pumpkin Spice Cookies
Two Years Ago: Chocolate Marshmallow Krispy Bars


Apple Slab
Yield: 24
Ingredients:
For the Crust
2 1/2 cups flour
1 tsp salt
1 tsp baking powder
2 Tbsp confectioners' sugar
2 Tbsp buttermilk powder
1/4 cup vegetable shortening
10 Tbsp very cold unsalted butter
1 tsp vinegar, cider or white
6 to 10 Tbsp ice water
For the Filling
1 cup Panko bread crumbs, cornflakes, or graham crackers
8 cups peeled, cored, and sliced Granny Smith or other tart, firm apples, about 6 large apples
2/3 cup cinnamon sugar
For the Glaze
1 1/2 cups confectioners' sugar
1/3 cup boiled cider or honey
small pinch of salt
1/2 tsp ground cinnamon
1 tsp milk or cream, optional, if necessary to thin the glaze
Directions:
For the Crust
Whisk together the flour, salt, baking powder, confectioners' sugar, and buttermilk powder.
Add the shortening, working it in till the mixture is evenly crumbly.
Cut the butter into small (about 1/2") cubes. Add the butter to the flour mixture, and work it in roughly with your fingers, a pastry cutter, or a mixer. Don't be too thorough; the mixture should be very uneven, with big chunks of butter in among the smaller ones.
Add the 1 teaspoon vinegar and 4 tablespoons water, and toss to combine. Toss with enough additional water to make a chunky, fairly cohesive mixture. It should hold together when you gather it up and squeeze it in your hand.
Divide the dough into two pieces; one should represent about 40% of the dough, the other, about 60%. If you have a scale, this is easy; the smaller piece of dough should weigh about 8 3/4 ounces, the larger piece, about 13 1/4 ounces (if you've used about 7 to 8 tablespoons of water in the dough). If you don't have a scale and/or aren't good at math, eyeball it: the bottom crust needs to be larger than the top crust.
Shape each piece of crust into a rectangle; you're going to be rolling them into rectangles, so might as well give yourself a head start. Cover with plastic wrap, and refrigerate for 30 to 60 minutes, till thoroughly chilled.
Take the larger piece of pastry out of the fridge, and put it on a floured work surface. Roll it into an 11" x 15" rectangle. Don't worry about the ragged edges; they'll disappear under the top crust.
Place the crust in an ungreased 9" x 13" cake pan. Patch up any holes by pushing the pastry together with your fingers, or adding a pinch from the excess on the sides. Push the pastry up the sides of the pan a bit, to make a shallow pastry container for the apples.
Put the crust in the fridge while you get the apples ready. Start preheating your oven to 350°
To Assemble
Spread the bread crumbs evenly over the crust.
Spread the sliced apples atop the crumbs.
Sprinkle the cinnamon sugar over the apples.
Roll the remaining piece of pastry into a 9" x 13" rectangle. Again, don't worry too much about ragged edges.
Lay the top crust over the apples. Yes, apples will poke through. Seal the edges of the two crusts as well as you can. There'll be places where they don't quite meet. That's OK. If the whole thing has become warm and sticky and hard to work with, pop it in the fridge for 15 minutes to firm it up.
Just before baking, slash the crust 6 or 8 times to allow steam to escape.
If freezing for later, freeze at this point. When ready to bake, place frozen slab directly into oven and bake for an addition 15-20 minutes.
Put the slab in the preheated 350°F oven, and bake it for an hour. Remove it from the oven; it'll be golden brown, and the filling should be bubbling. Remove it from the oven, and allow it to cool completely before glazing.
For the Glaze
Combine the confectioners' sugar, boiled cider, cinnamon, salt, and enough milk or cream to make the mixture "drizzlable." Don't have boiled cider? Use plain milk or cream, maple syrup, honey, or thawed apple juice concentrate. Start with 1/4 cup of any of these; if you've made this kind of icing before, you know it's easier to add more liquid, than to try to take it away. Add enough liquid to make the glaze pourable.
Drizzle the glaze atop the slab.
Recipe from King Arthur Flour
Don’t forget to enter into my I Can’t Believe It’s Not Butter Holiday Bakeoff Giveaway by 8AM EST on Friday.
![]()
Boston area readers, don’t forget that I’m selling pies for Pie In the Sky. The cost of your pie will feed someone in need for an entire week! Please consider buying a pie for a good cause.

 I am Jen the Beantown Baker. Engineer by day and baking maven by night. Hubby serves as my #1 fan and official taste tester. We got hitched back in 2006. Barefoot. In the sand. With the waves crashing behind us. It was one of the best decisions we’ve ever made.


I just love the combination of white chocolate and fruit. Cherry sounds like a great addition to these cookies!
Creamy white chocolate is perfect with cherries. Those two together in a chewy cookie sound wonderful.
My brother is the same way – he loves maraschino cherries and will take any extras that he can get his hands on. I’m sure he would adore these!
beantownbaker — February 11th, 2013 @ 11:22 am
I’m sure he would too!
What a great combination for a cookie! They look delicious.
Salted or unsalted butter?
beantownbaker — July 30th, 2013 @ 5:49 pm
I always use unsalted butter in my baking.
I was thinking about putting this in a cake as a filing then frosting and covering with fondant. Would I then be able to leave the cake out on the counter for two nights before the party?
Thank you!
The articles you create are always interesting to watch and read is very useful. Always passion and success continues.