


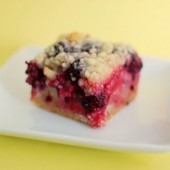
Blackberry Raspberry Pie Bars
It’s still summer right? The weather here in Boston keeps having mood swings, but as I’ve said multiple times these past few weeks, I’m literally grasping to the last minutes of summer this year. The second I saw these bars come up in my Google Reader, I knew I wanted to make them.

You see, I’m not really a pie person. Don’t get me wrong, I love a good pie, I just don’t enjoy making them. Just look at my blog. I’ve posted over a hundred cupcake recipes, more than 60 brownies and bars recipes, nearly 70 cookie recipes, and only 15 posts in my pies and tarts tag. Pathetic, right? I’m hoping to find some pie mojo this fall, but for now these pie bars more than do the job.

In fact, they’re almost too perfect of a replacement for an actual pie. For starters, you don’t have to deal with rolling a pie crust. Add to that the fact that these little guys are portable. I don’t know about you, but my desserts are always leaving the house with me to go somewhere. Whether it’s work or a friend’s house, if all these desserts didn’t leave the house, Hubby and I would each be about 200 pounds heavier than we are…

I decided to use fresh raspberries and blackberries in the recipe but I love that it actually calls for frozen berries. That means you could make these bars any time of the year! And you can bet that I’ll be making these come February when I’m so sick of winter and craving a taste of summertime.

I ended up baking mine for about 15 extra minutes and the center pieces were still a bit underbaked. Turns out those underbaked pieces were my favorites though!


Blackberry Raspberry Pie Bars
Yield: 24 bars
Ingredients:
Crust and Topping
3 cups flour
1 1/2 cups sugar
1/4 tsp salt
1 1/2 cups (3 sticks) unsalted butter, chilled
Fruit Filling
4 eggs
2 cups sugar
1 cup sour cream
3/4 cup flour
pinch salt
zest of 1/2 lemon
1 tsp almond extract
32 oz total of a mix of fresh or frozen berries, thawed and drained if using frozen
Directions:
To make the crust and topping, preheat the oven to 350 degrees. Grease a 9x13 inch baking pan.
Combine the flour, sugar, and salt in the bowl of a food processor. Pulse a few times to mix. Cut the butter into 1/2-inch cubes, and add to the flour mixture. Process until the butter is evenly distributed but the mixture is still crumbly, 30-60 seconds.
Reserve 1 1/2 cups of the mixture to use as the topping. Press the remaining mixture into the bottom of the pan, and bake 12-15 minutes. Cool for at least 10 minutes.
To make the filling, whisk the eggs in a large bowl, then add the sugar, sour cream, flour, salt, lemon zest, and almond extract. Gently fold in the berries and spoon the mixture over the crust. Sprinkle the remaining flour mixture evenly over the filling, and bake 45 to 55 minutes.
Cool at least 1 hour before cutting into bars, or scoop out of the pan to serve cobbler-style.
Recipe from The Pastry Queen, as seen on Pink Parsley


 I am Jen the Beantown Baker. Engineer by day and baking maven by night. Hubby serves as my #1 fan and official taste tester. We got hitched back in 2006. Barefoot. In the sand. With the waves crashing behind us. It was one of the best decisions we’ve ever made.


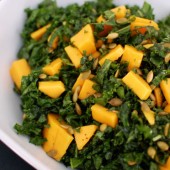
I’m so glad you posted this! Aarti’s kale salad is on my list of dishes to make, and it’s good to know that you guys enjoyed it.
I saw this on the first episode of Aarti Party and it looked so good to me! Kale is something I’ve also never worked with in our kitchen so I definitely want to give this recipe a try!
I love kale, and I was intrigued by this as well – I really want to try it now! Great picture!
I picked up all of the ingredients this morning to make the salad, and it is now sitting in my fridge waiting to be devoured for lunch. It’s GREAT! Who knew raw kale could be so good?!
Kale is one of my favorite foods but I haven’t had it raw yet. I am bookmarking this!
Wow sounds interesting! I’m very curious to try it myself. I love kale.
I saw this on Aarti Party too – looks good – glad you tried it!
I love kale and am on a new-found mango kick, so I’m sure this is absolutely wonderful 🙂
Sues
I don’t know if I could get anyone in my family to try this, but it looks so interesting! I have never tried kale, but I would like to!
I made a massaged kale salad once but it was just “eh”. I don’t think I massaged enough. But I might have to try it again, and do it the right way, since you both loved it!
I LOVE massaged kale – love, love, love it. It tastes completely different than “regular” – not as “green” if that makes sense. 🙂
I also love the next food network star. I should check out Aarti’s show since this recipe sounds like it’s right up my alley. 🙂