


Cookies-N-Cream Cupcakes – Take 2
After making Cookies-N-Cream cupcakes with my sister only a few weeks prior, I was still thinking about how they could be better and wanted to give them another shot.
Oh my goodness – these cupcakes are amazing. My hubby said they were the best thing I’ve ever made. Intern boy at work said they were the best baked good he had ever had. And I have to admit they’re pretty damn good. I think it’s the Oreo on the bottom that makes them so good. Cookies-N-Cream Cupcakes – Take 2
(Recipe adapted from here, Original recipe from: Cupcakes! By the Cake Mix Doctor by Anne Byrn)
24 paper liners for cupcake pans
30 Oreo cookies – I used Double-Stuffed
1 pkg plain white cake mix
1 cup sour cream – I used low-fat plain yogurt
1/2 cup vegetable oil – I used ¼ c oil and ¼ cup unsweetened applesauce
3 large eggs – I used egg-beaters for 1 egg and 2 regular eggs
1 tsp vanilla extract
Preheat your oven to 350 and line the pans with paper liners. Count out 12 Oreos and separate the top and bottom wafers. Make sure each half has some icing on it. Place one wafer, icing side up, in the bottom of each paper liner. (I had a hard time opening them and getting frosting on both sides, so I just put the side with frosting in the cupcake paper and put the other side in a bowl to crush and put in the batter).
Crush the remaining Oreos by any means you like. I put them in a Ziplock and smash them. Set the crumbs aside.
Place the cake mix, oil, sour cream, eggs and vanilla in a large mixing bowl and blend with an electric mixer on low for 30 seconds. Scrape down the sides and beat again on medium about 1.5 minutes more. Measure out 1 1/2 cups crushed Oreos and fold these into the batter. Set the rest of the crumbs aside for garnish.
Fill your liners 3/4 full with batter and place the pans in the oven.
Bake the cupcakes for about 18-20 minutes until they are golden and spring back when lightly touched with your finger. Cool in the pan on wire racks for about 5 minutes and then remove cakes from pans and cool completely on wire racks.
Oreo Cream Cheese Frosting
I used frosting out of the freezer that I had from previous cupcakes. I stirred in some crushed Oreos and frosted cooled cupcakes. Garnish with Oreos.
 Nutritional Information coming soon.


 I am Jen the Beantown Baker. Engineer by day and baking maven by night. Hubby serves as my #1 fan and official taste tester. We got hitched back in 2006. Barefoot. In the sand. With the waves crashing behind us. It was one of the best decisions we’ve ever made.


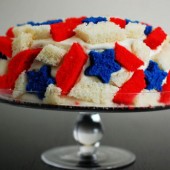
For sure, one of the coolest cakes I have ever seen! I am really horrible at frosting cakes, too and I’m always looking for more creative ways to decorate instead. Fabulous!
beantownbaker — January 5th, 2013 @ 4:30 pm
Decorating the outside of cakes is tough. I am definitely looking forward to making this again for another occasion. I think it would be cute for valentine’s day with pink and red hearts or X’s and O’s.