


Cornmeal and Parmesan Seed Crackers from The Apron Archives
As promised, I’m bringing you guys some great posts from some fellow bloggers while I’m away. To kick things off, I have Aimee from The Apron Archives. Thanks Aimee for posting in my absence!
When it comes to sweet versus salty, I am firmly in camp salt. Some of my favorite snacks involve pairing crackers with things like hummus, cheese, or peanut butter. There are some things that are so convenient to buy that we never think we can make them ourselves at home, but all it takes is one try to realize how much we’ve been missing in quality and flavor.
Like homemade Cornmeal and Parmesan Seed Crackers.
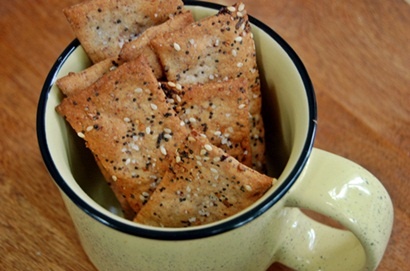
Customizations for homemade crackers are endless, but the combination of the coarse cornmeal, tangy parmesan, nutty seeds, and sea salt pushed these into “crackers from heaven” territory for me.
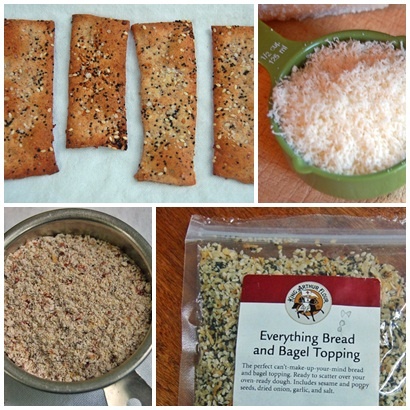
I picked up some stone-ground Vermont cornmeal at the Brattleboro Farmers’ Market, and I think the “rustic” quality contributed to the crackers’ heft. Freshly grated parmesan and a liberal dose of King Arthur Flour’s stellar “Everything Bread and Bagel Topping” rounded out the flavors.
After chilling, the dough was easy to handle and the crackers crisped to perfection. I’ve been enjoying them all week with soup, extra sharp cheddar, and sometimes just on their own. Try a batch and see for yourself how easy homemade crackers are!
Cornmeal and Parmesan Seed Crackers
Adapted from The Kitchn and D.I.Y. Delicious: Simple Food from Scratch
Ingredients
1 cup unbleached all-purpose flour, plus more as needed
1 cup stone-ground cornmeal
3/4 cup cool water
1/2 cup lightly packed finely grated Parmesan cheese
3 tablespoons unsalted butter, softened
3/4 teaspoon sea salt
2 tablespoons total poppy seeds, sesame seeds, or a mix
Salt for topping
Put the flour, cornmeal, water, cheese, butter, and salt in a food processor and pulse until the mixture forms a ball, 2 to 3 minutes.
Remove from the processor (it will be soft – don’t worry), wrap in plastic wrap, and refrigerate for at least 30 minutes or up to 2 hours.
Preheat the oven to 400 degrees F and line 2 baking sheets with parchment.
Divide the dough into 2 equal portions. On a lightly floured work surface, roll out the dough evenly, flipping it from time to time and adding more flour as needed when the dough sticks. Roll to about 1/8 inch thick.
Sprinkle the dough lightly with the seeds and salt and continue to roll just to press the salt and seeds into the dough. Using a pizza wheel, cut into desired shapes and poke the dough evenly in several places with the tines of a fork. If you forget this step you’ll have large air bubbles in your crackers!
Carefully arrange the dough on the prepared baking sheets, leaving space between them. Bake until they begin to brown and become crisp, around 15 to 18 minutes.
Let the crackers cool completely and store in an airtight container. They’ll stay crisp for up to 2 weeks.


 I am Jen the Beantown Baker. Engineer by day and baking maven by night. Hubby serves as my #1 fan and official taste tester. We got hitched back in 2006. Barefoot. In the sand. With the waves crashing behind us. It was one of the best decisions we’ve ever made.


Marriage is all about compromise. be it food, tv program, it can’t be his or hers alone…Love your recipe.Thanks!