


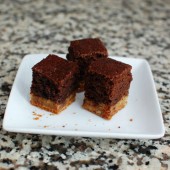
Black and Tan Brownies
It’s Secret Recipe Club time again. This group has been so much fun because it’s so low pressure and I get to meet new bloggers and try new recipes. My matchup this month is Itzy’s Kitchen.

Back when we were dating, Hubby would order a Black and Tan on a regular basis. He was the first person I had ever seen order one. I’m not a huge fan of the original black and tan (made with Bass and Guinness), but I do enjoy some of the variations, especially mixing Blue Moon and Guinness Some places call this a Black Moon or a Black and Blue. Although be careful when you order a Black and Blue. Some places will mix blueberry beer with Guinness. Weird!

When I saw the pictures on Itzy’s Kitchen the bars looked a little thin and I definitely enjoy thicker blondies/brownies. I decided to make the entire recipe but use a smaller pan. I definitely got a thicker bar, but the ratio of batter wasn’t 50:50 like I was expecting. I double checked the ingredients and I definitely put everything in, so it’s a mystery why the tan layer was so thin.
Even with the thin tan layer, these were delicious. The Guinness keeps the black layer very moist and the nuts in the tan layer provide a nice crunch.


Black and Tan Brownies
One of Hubby's favorite drinks in a brownie!
Yield: 24 brownies
Ingredients:
For the Tan Brownies
6 Tbsp butter, softened
1 1/2 cups brown sugar
2 eggs
1 tsp vanilla
1 cup flour
1 tsp baking powder
1/4 tsp salt
1/2 cup chopped pecans
For the Black Brownies
3 ounces unsweetened chocolate, finely chopped
4 Tbsp butter
1 cup sugar
2 eggs
1 tsp vanilla
1 cup Guinness Stout
1 cup flour
1/4 tsp salt
Directions:
For the Tan Brownies
Preheat oven to 350F. Grease a 9x9 or 8x8 pan.
Cream the butter and brown sugar at medium speed until light and fluffy. Beat in eggs and vanilla.
In a separate bowl combine flour, baking powder, and salt. Mix flour mixture and pecans into sugar mixture, beating until just combined.
Spread evenly into prepared pan. Bake for 20 minutes.
For the Black Brownies
Melt chocolate and butter in large microwave-safe bowl for 1 minute. Stir after every 20 seconds until smooth.
Add sugar, stirring until well combined. Add the eggs, vanilla, and Guinness.
In a small bowl, combine the flour and salt. Add the flour mixture to the chocolate mixture, stirring to combine.
Pour evenly over Tan Brownies.
Bake for 30 minutes or until a toothpick inserted into the center comes out almost clean. Cool in pan on a wire rack; cut into squares.
Recipe from Cooking Light as seen on Itzy's Kitchen


 I am Jen the Beantown Baker. Engineer by day and baking maven by night. Hubby serves as my #1 fan and official taste tester. We got hitched back in 2006. Barefoot. In the sand. With the waves crashing behind us. It was one of the best decisions we’ve ever made.


so there’s no cocoa or chocolate in it whatsoever or is that a typo? wondering how it gets that rich chocolate color! 🙂
beantownbaker — January 10th, 2014 @ 10:43 am
You’re right. Sorry about that – it’s a typo… I have updated the recipe. It calls for a heaping 1/2 cup of cocoa.
I just discovered your blog after looking up a recipe for Butterbeer 🙂 I love your photos and, most importantly, I want to eat them all! Looking forward to following your blog!
beantownbaker — January 10th, 2014 @ 10:43 am
Glad to have you!
I believe you have forgotten to add the chocolate part of this recipe.
beantownbaker — January 10th, 2014 @ 10:43 am
You’re right. Sorry about that. I have updated the recipe. It calls for a heaping 1/2 cup of cocoa.
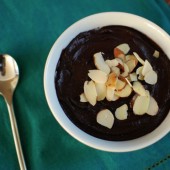
i looove chocolate avocado pudding! i make mine with maple syrup and almond butter instead of honey, but i’ll have to try and mix it up from time to time 🙂
beantownbaker — January 12th, 2014 @ 2:54 pm
Oh I’ll have to try it your way too!
Thanks!! Now I gotta try this…. Can’t wait!
If some one wishes expert view concerning blogging then i recommend him/her to
go to see this blog, Keep up the fastidious work.
Thanks. An abundance of info!
Howdy! This is my first visit to your blog! We are a team of volunteers and starting
a new project in a community in the same niche. Your blog provided us useful information to work on.
You have done a wonderful job!
you are truly a just right webmaster. The web
site loading speed is incredible. It sort of feels that you’re
doing any unique trick. Furthermore, The contents are masterpiece.
you have performed a magnificent task on this topic!
Thanks so much for this recipe! It’s awesome and tastes really good. I wrapped it inside of a dark chocolate shell and they made the most perfect chocolate truffles. Everyone loved them for Christmas! Thanks again.