


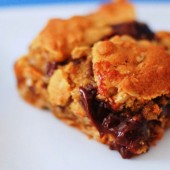
Chewy Fudgey Oatmeal Bars
I recently started a new job at work. Still with the same company, just doing different work. It has been keeping me BUSY (some of you might notice that I haven’t been around as much recently). While I do miss my time chatting on the internet with lots of you, I’m loving my new job and learning a ton. The days are flying by, which is a nice change of pace for me. During one of my first days in the new group, I wanted to bring in some goodies.

I chose these bars because they are easy to transport and I’ve had them starred in my Google Reader forever. Wow! I wish I had made these sooner. The oatmeal layers are soft and chewy, but still sturdy enough to hold the amazing fudge layer in the middle.

One guy did say they were too sweet for him, but everyone else in my new group gobbled them right up. One of my coworkers commented she was so happy that I had joined the group. I hope it’s only partially because of my baking!


Yield: ~40
Ingredients:
1 cup butter, softened
2 cups brown sugar
2 eggs
2 tsp vanilla
2 1/2 cups flour
1 tsp baking soda
1 tsp salt
3 cups oats
2 cups chocolate chips
1 can Sweetened Condensed Milk (15 oz.)
2 Tbsp butter
1 tsp salt
2 1/2 tsp vanilla
Directions:
Preheat oven to 325. Grease and flour a 9×13 pan
In a large bowl sift together flour, soda and salt. Set aside.
In large mixing bowl, beat together softened butter and brown sugar until light and fluffy.
Add eggs, one at a time and beat until combined. Add vanilla and mix well.
Slowly add the sifted flour mixture and mix until combined. Stir in oatmeal.
Gently spread 2/3 crust into bottom of prepared pan. Reserve the rest for topping.
Make the filling:
Over Medium-Low heat, melt together chocolate chips, sweetened condensed milk, 2 tablespoons butter, and salt. Stir until smooth. Remove mixture from heat and stir in vanilla and nuts if using.
Evenly pour filling mixture of crust but keeping filling about a 1/4 inch away from side of pan so it does not stick to side while baking. Evenly dollup top of filling with remaining oat mixture. Bake for 30-35 minutes or until topping is light brown and fudge layer set but not solid. Don’t overbake these bars or they can become dry.
Cool in pay on rack until set before cutting. Can chill to set faster. Keep stored in airtight container either room temp or in fridge.
Recipe from Baking Blonde


 I am Jen the Beantown Baker. Engineer by day and baking maven by night. Hubby serves as my #1 fan and official taste tester. We got hitched back in 2006. Barefoot. In the sand. With the waves crashing behind us. It was one of the best decisions we’ve ever made.


i love the idea of having the oreo on the bottom!
Ohh yes yes YES! They are so delicious!!!
These look wonderful!!! Great job. My husband would love them.
Those are so cute! I love the oreo on the bottom. :o)
These are so good! I was a little afraid when I saw how thick the batter was but the cupcakes aren’t heavy at all. We’ll see if they’re a hit at Thanksgiving!