


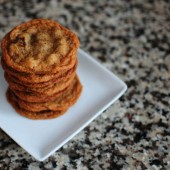
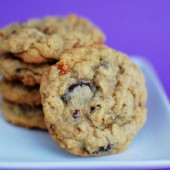
Chewy Molasses Chocolate Chip Cookies
I knew these cookies would be a big hit in our house. They’re a combination of my favorite cookie (Alton Brown’s The Chewy) and Hubby’s favorite cookie (Lumberjacks). As predicted, Hubby really enjoyed these cookies. I had mixed emotions about them though. As I have mentioned more than once, I really like chewy cookies.

But I’ve also come to realize that I like chewy, puffy cookies. I’m not a big fan of flat cookies. So while these cookies were in fact chewy, I wasn’t a huge fan since they were flat. They were good, but not my favorite. Then again, I’m weird about my cookies, because literally I got so many comments about how amazing they were at the party I took them to.

One Year Ago: Extra Counter and Cabinet Space in our Kitchen


Chewy Molasses Chocolate Chip Cookies
Yield: 3 dozen
Ingredients:
2 sticks unsalted butter
2 cups plus 2 Tbsp bread flour
1 tsp kosher salt
1 tsp baking soda
1 1/2 cups sugar
1/4 cup plus 1 tsp dark molasses, not blackstrap
1 egg
1 egg yolk
1 1/2 tsp vanilla
2 cups dark chocolate chips or chunks
sea salt for sprinkling on top of cookies just before baking
Directions:
Heat oven to 350 degrees F.
Melt the butter in a heavy-bottom medium saucepan over low heat. Sift together the flour, salt, and baking soda and set aside.
In a medium sized bowl, mix the granulated sugar and molasses until no large molasses clumps remain.
Pour the melted butter in the mixer’s work bowl. Add the sugar mixture. Cream the butter and sugar on medium speed for about 3 minutes.
Add the egg, yolk, and vanilla extract and mix until well combined. Slowly incorporate the flour mixture until thoroughly combined. Stir in the chocolate chips.
Chill the dough for about 20 minutes, then scoop onto parchment-lined baking sheets. Lightly sprinkle each dough ball with a few flecks of sea salt. It really brings out the chocolate flavor.
Bake for 8 to 10 minutes or until golden brown, checking the cookies after 5 minutes. I like these cookies to be just a bit under-done. Rotate the baking sheet for even browning. Cool completely and store in an airtight container.
Recipe from Joy The Baker


 I am Jen the Beantown Baker. Engineer by day and baking maven by night. Hubby serves as my #1 fan and official taste tester. We got hitched back in 2006. Barefoot. In the sand. With the waves crashing behind us. It was one of the best decisions we’ve ever made.


I think that my raspberry cream recipe didn’t call for enough raspberry. Oh well. Yours looks fantastic! Such pretty colors.
Thanks!! The raspberry cream was a lot runnier than the vanilla, but it was tasty.
The raspberry cream has such a wonderful color! So bold against the neutral eclair.
Your eclairs turned out really well! I love the pink of the raspberry pastry cream against the glaze.
Wow… Your eclairs are adorable and look amazing!