


S’mores Brownies
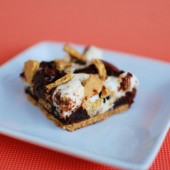
 Imagine what a s’mores would taste like if you used a fudgey brownie instead of a small piece of chocolate. That’s what these little guys taste like. You get a nice crunch from the graham cracker on the bottom, then a fudge like brownie layer, topped with more chocolate, chunks of graham crackers, and mini marshmallows.

As I mentioned the other day, I like my marshmallows to be charred when I make s’mores. So when I made these brownies, I had to toast the marshmallows. I busted out my kitchen torch and charred the toppings. It was a lot of fun to come up with another excuse to use my kitchen torch. It’s just so fun!

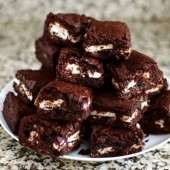
I read some reviews that the brownie layer was a bit dry, so I was extra careful not to let that happen. In the end I think my brownies were a bit underbaked, but that gave them a gooey fudge like consistency that was perfect for these brownies.

Everyone at work LOVED these guys. And they were so easy to throw together. If you’re in the mood for smores, give these a shot!


S'mores Brownies
Yield: 36
Ingredients:
10 graham crackers, broken in half (20 squares), divided
3/4 cup butter
4 oz unsweetened Chocolate
2 cups sugar
3 eggs
1 tsp vanilla
1 cup flour
2-1/2 cups miniature marshmallows
1 cup semi-sweet chocolate chunks
Directions:
Heat oven to 350°F.
Line 13x9-inch pan with foil; spray with cooking spray. Place 15 grahams in pan, with sides overlapping slightly. Break remaining grahams into pieces.
Microwave butter and chocolate squares in large microwaveable bowl on high 2 min.; stir until chocolate is completely melted. Add sugar, eggs and vanilla; mix well. Stir in flour. Pour over grahams in pan.
Bake 30 to 32 minutes or until toothpick inserted in center comes out with fudgy crumbs. Do not overbake.
Sprinkle with marshmallows and chocolate chunks. Bake 3 to 5 min. or until marshmallows begin to puff. Press reserved graham pieces gently into marshmallows.
(Optional) Using your kitchen torch, toast the marshmallows.
Cool. Use foil to lift brownies from pan before cutting to serve.
Recipe from Kraft

Don’t forget about my Power of Pink Challenge – make something PINK by the end of the month to raise Breast Cancer Awareness!

 I am Jen the Beantown Baker. Engineer by day and baking maven by night. Hubby serves as my #1 fan and official taste tester. We got hitched back in 2006. Barefoot. In the sand. With the waves crashing behind us. It was one of the best decisions we’ve ever made.


those look good too. Are homemade butterfingers next? I have a recipe I’m going to try out soon.
Butterfingers would be tasty, but I’ve got something else coming on Friday…
OH YUM! I really want to try these but I’m horrible at dipping things too.
This is exactly what my son’s been asking me to do. You’re making it hard to say no – they look perfect!
Why do you tempt me so? Milky Ways are my favorites. This is so worth trying 🙂
Yum these look delicious! I love Milky ways
Well they look pretty perfect to me! And super delicious too.
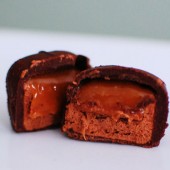
I’m so intrigued by the cool whip/chocolate mixture for the filling! These look so yummy and addicting!
These look so cute and much easier than the milky ways and snickers I made a few months ago. I made mine in muffin wrappers so I didn’t dip them, just layered the chocolate, nougat, caramel, and chocolate! They came out pretty tasty but was a lot of work!
I just tried these and they didn’t come out as I’d hoped. The chocolate and whipped cream mix was too sticky and wouldn’t harden. Did I do something wrong? Also what if you can’t find kraft caramel?
Rachael – Sorry to hear they didn’t turn out for you. The center part was a bit sticky while dipping and wasn’t super hard… Any caramel would work for this recipe, I just use the Kraft kind that comes individually wrapped.
I would put melted chocolate in the pan first, freeze, then the chocolate mixture, then the caramel. Then you can spoon melted chocolate on top. Would this work? (It solves the dipping problem too!)
beantownbaker — November 3rd, 2013 @ 12:36 pm
That could definitely work… The caramel might ooze out when you gut them though… Let me know how it goes if you try it.
I hope you are not using Cool Whip which is all trans-fat and high fructose corn syrup. I’m looking for a healthier alternative to the store bought Milky Way. Perhaps a recipe for homemade whip ?
These were a DISASTER. I wasted my morning and a lot of ingredients. The chocolate mixture was so sticky when cutting into squares. The directions did not state whether to add water to the caramels when melting so I didn’t…the caramels ended up thick and so sticky, I had trouble putting it on the chocolate layer. Dumped the whole mess out since I didn’t want to waste a bag of milk chocolate chips to coat them. I have been baking my entire life (60 +) and never had a recipe go like that.
Very rapidly this website will be famous amid all
blog visitors, due to it’s good articles or reviews