


Pita Bread
There are SO MANY things out there that just taste better when you make them at home. It’s especially nice when you can say that about something that’s really easy to make as well. These pitas fit into both of those categories. They taste amazing and they’re surpringly easy to make.

I’ve made these a couple times in the past year and every time I do, I say that I should make them more often. I would love to make them with whole wheat flour too. We love to fill these guys with anything you would normally put in a pita. I like to make sandwiches with them for our lunches.

If you want to make these into pita chips, just cut them up and bake them at 350 for about 10 minutes or until browned. You can also spread some olive oil and seasoning on the chips before you bake them if you want.
Two Years Ago: Fourth of July Layered Cookie Cake
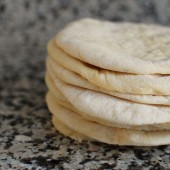


Pita Bread
These homemade pitas are easy to make and delicious! You'll never want to buy them at the store again.
Yield: 8 pitas
Ingredients:
3 cups flour
1 1/2 tsp salt
1 Tbsp sugar or honey
1 packet yeast (or, if from bulk, 2 tsp yeast)
1 1/4 to 1 1/2 cups water, at room temperature
2 Tbsp olive oil, vegetable oil, butter, or shortening
Directions:
If you are using active dry yeast, follow the instructions on the packet to active it. Otherwise, mix the yeast in with the flour, salt, and sugar. Add the olive oil and 1 1/4 cup water to the flour mixture and stir together with a wooden spoon. All of the ingredients should form a ball. If some of the flour will not stick to the ball, add more water.
Once all of the ingredients form a ball, place the ball on a work surface, such as a cutting board, and knead the dough for approximately 10 minutes. If you are using an electric mixer, mix it at low speed for 10 minutes.
When you are done kneading the dough, place it in a bowl that has been lightly coated with oil. Form a ball out of the dough and place it into the bowl, rolling the ball of dough around in the bowl so that it has a light coat of oil on all sides. Cover the bowl with plastic wrap or a damp kitchen towel and set aside to rise until it has doubled in size, approximately 90 minutes.
When it has doubled in size, punch the dough down to release some of the trapped gases and divide it into 8 pieces. Roll each piece into a ball, cover the balls with a damp kitchen towel, and let them rest for 20 minutes. This step allows the dough to relax so that it'll be easier to shape.
While the dough is resting, preheat the oven to 400 degrees. If you have a baking stone, put it in the oven to preheat as well. If you do not have a baking stone, turn a cookie sheet upside down and place it on the middle rack of the oven while you are preheating the oven. This will be the surface on which you bake your pitas.
After the dough has relaxed for 20 minutes, spread a light coating of flour on a work surface and place one of the balls of dough there. Sprinkle a little bit of flour on top of the dough and use a rolling pin or your hands to stretch and flatten the dough. You should be able to roll it out to between 1/8 and 1/4 inch thick. If the dough does not stretch sufficiently you can cover it with the damp towel and let it rest 5 to 10 minutes before trying again.
Open the oven and place as many pitas as you can fit on the hot baking surface. They should be baked through and puffy after 3 minutes. If you want your pitas to be crispy and brown you can bake them for an additional 3 to 5 minutes, but it isn't necessary.
Recipe from The Fresh Loaf

 I am Jen the Beantown Baker. Engineer by day and baking maven by night. Hubby serves as my #1 fan and official taste tester. We got hitched back in 2006. Barefoot. In the sand. With the waves crashing behind us. It was one of the best decisions we’ve ever made.


honey and thyme sound like amazing additions! and i had to laugh at 50 granules of yeast 🙂 will definitely have to try this!
beantownbaker — May 23rd, 2013 @ 9:03 pm
Yea, it’s definitely comical. I feel bad for the people who didn’t read the comments to find out that you really shouldn’t try to count out 50 granules of yeast!
This sounds awesome 🙂 I’ll have to pass this recipe on to my husband!
beantownbaker — June 10th, 2013 @ 1:08 pm
It’s seriously so spicy and awesome. I can’t wait to try more flavor combinations.
Hi, I hope I’m not too late to receive a response. I read just about every post on Jeffrey’s blog and I’m a bit confused. Are the given quantities weight or volume (i.e. fluid ounces). I’m used to ml and grams… :-S
Thanks Susan
beantownbaker — September 14th, 2013 @ 1:32 pm
I can’t comment on what is in Jeffrey’s blog. The recipe in this post is referring to liquid ounces.
CAUTION!!! I made my first two bottles this past Monday and followed the instructions exactly. I even purchased the flip top bottles recommended on this site from Amazon. Tonight, after exactly 48 hours, I pulled them out of my kitchen cabinet and placed them in the fridge. Not 10 seconds after I shut the door, I heard a loud pop. Both bottles had exploded in the fridge! There was glass and ginger beer everywhere. My fridge walls are dented from the explosion. If those bottles had been in my hand when they exploded, I would be in the ER right now. I STRONGLY RECOMMEND THAT ANYONE MAKING THIS RECIPE USE PLASTIC BOTTLES. DO NOT TAKE A CHANCE WITH GLASS.
beantownbaker — May 12th, 2014 @ 4:52 pm
Oh wow. Sorry to hear that. I have only made this ginger beer twice and both times I used glass bottles with no issue.
Hey friends!
So how much raw ginger did you end up needing to extract 2 oz of juice?
Also in relation to the glass bottles, you could do this in a glass wine making carboy container with a valve on the top to allow the fermentation a little release. Then transfer to glass bottles and refrigerate to avoid explosion. Check at the wine shops, these materials aren’t too pricey, but can save some disasters!
Thanks!
beantownbaker — September 2nd, 2014 @ 7:01 pm
I really can’t remember how much ginger I needed. It was quite a bit though.
A couple tips for those of you wanting to make this in glass bottles. Use only flip top bottles ( I use a dark green bottle of Trader Joe’s ginger brew- good stuff by the way). Also, during the 48 hours, open the cap a few times which let’s a little bit of the carbonation out (even just every 12 or 16 hours should be enough)Then shake it gently a few times before storing on the fridge. This way, they is much less chance of any explosions.