


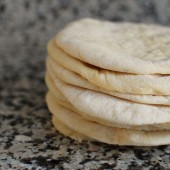
Pita Bread
There are SO MANY things out there that just taste better when you make them at home. It’s especially nice when you can say that about something that’s really easy to make as well. These pitas fit into both of those categories. They taste amazing and they’re surpringly easy to make.

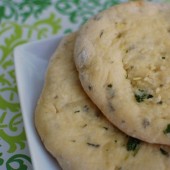
I’ve made these a couple times in the past year and every time I do, I say that I should make them more often. I would love to make them with whole wheat flour too. We love to fill these guys with anything you would normally put in a pita. I like to make sandwiches with them for our lunches.

If you want to make these into pita chips, just cut them up and bake them at 350 for about 10 minutes or until browned. You can also spread some olive oil and seasoning on the chips before you bake them if you want.
Two Years Ago: Fourth of July Layered Cookie Cake


Pita Bread
These homemade pitas are easy to make and delicious! You'll never want to buy them at the store again.
Yield: 8 pitas
Ingredients:
3 cups flour
1 1/2 tsp salt
1 Tbsp sugar or honey
1 packet yeast (or, if from bulk, 2 tsp yeast)
1 1/4 to 1 1/2 cups water, at room temperature
2 Tbsp olive oil, vegetable oil, butter, or shortening
Directions:
If you are using active dry yeast, follow the instructions on the packet to active it. Otherwise, mix the yeast in with the flour, salt, and sugar. Add the olive oil and 1 1/4 cup water to the flour mixture and stir together with a wooden spoon. All of the ingredients should form a ball. If some of the flour will not stick to the ball, add more water.
Once all of the ingredients form a ball, place the ball on a work surface, such as a cutting board, and knead the dough for approximately 10 minutes. If you are using an electric mixer, mix it at low speed for 10 minutes.
When you are done kneading the dough, place it in a bowl that has been lightly coated with oil. Form a ball out of the dough and place it into the bowl, rolling the ball of dough around in the bowl so that it has a light coat of oil on all sides. Cover the bowl with plastic wrap or a damp kitchen towel and set aside to rise until it has doubled in size, approximately 90 minutes.
When it has doubled in size, punch the dough down to release some of the trapped gases and divide it into 8 pieces. Roll each piece into a ball, cover the balls with a damp kitchen towel, and let them rest for 20 minutes. This step allows the dough to relax so that it'll be easier to shape.
While the dough is resting, preheat the oven to 400 degrees. If you have a baking stone, put it in the oven to preheat as well. If you do not have a baking stone, turn a cookie sheet upside down and place it on the middle rack of the oven while you are preheating the oven. This will be the surface on which you bake your pitas.
After the dough has relaxed for 20 minutes, spread a light coating of flour on a work surface and place one of the balls of dough there. Sprinkle a little bit of flour on top of the dough and use a rolling pin or your hands to stretch and flatten the dough. You should be able to roll it out to between 1/8 and 1/4 inch thick. If the dough does not stretch sufficiently you can cover it with the damp towel and let it rest 5 to 10 minutes before trying again.
Open the oven and place as many pitas as you can fit on the hot baking surface. They should be baked through and puffy after 3 minutes. If you want your pitas to be crispy and brown you can bake them for an additional 3 to 5 minutes, but it isn't necessary.
Recipe from The Fresh Loaf


 I am Jen the Beantown Baker. Engineer by day and baking maven by night. Hubby serves as my #1 fan and official taste tester. We got hitched back in 2006. Barefoot. In the sand. With the waves crashing behind us. It was one of the best decisions we’ve ever made.


Looks like these turned out great! I’m surprised they didn’t call for brushing some egg on top of the biscuits before cooking, that might get that top a little crispier…I totally want to make some of these Saturday morning.
These look very good to me. I have a favorite biscuit recipe, but want to give these a try because of the buttermilk.
Have been following your blog for a while. Nice blog!
I agree Steph. Or maybe just melted butter to give it the color.
If you want to compare even more recipes from many of the popular sites, take a look at RecipeComparison.com. Just search for “buttermilk biscuits” and you’ll see all the ingredients nicely laid out in a table with a link to jump directly to each recipe.
I worked at a KFC in the mid-90s. I had privy to the ingredients lists and methods. The biscuits came frozen and had egg in the dough. We brushed the tops after baking with butter-flavored oil that is commonly used in the restaurant industry. I remember thinking that the egg was unusual; I hadn’t seen many biscuit recipes calling for egg, and I have been baking since I was 8.
kfc.com does not list eggs in their food allergy listing for the biscuits, just an fyi
I, too, worked at a KFC when I was a teenager. The biscuits were not frozen. It was a bag mix and we mixed it with a large tub of shortening. Then mixed, rolled, cut and baked. We topped with a “liquid butter” substance fresh from the oven. They may make them frozen now, but they didn’t in the early 90’s.
Oh, and there are NO eggs in the mix. Otherwise, it would be a cake, not a biscuit. That is common baking “science”.