


Strawberry Rhubarb Pie
 My dad came to visit a couple weeks ago to meet his first grandchild, baby B. It was a fun weekend with great weather. Since I rarely see my dad, I decided to bake him something special while he was here.
Now my dad loves rhubarb. Absolutely LOVES it. So naturally, I decided to make something with rhubarb. Another thing my dad loves is pie. I’m actually not a huge fan of pies. And I’m not really sure why. Maybe it’s because you can’t really taste test it before putting it out for everyone to enjoy. I definitely get a boost of confidence when I can actually taste something first.

But even without the taste testing, this pie turned out amazing. I baked it a couple days before we served it and just left it at room temperature covered in foil. I served it with vanilla ice cream and everyone enjoyed it. The only substitution I made was to use 1/4 tsp cardamom instead of the orange peel since I didn’t have any oranges on hand.

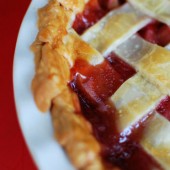
This was my first lattice pie crust and I have to admit I think it turned out pretty darn nice looking! I just rolled out the pie crust and used a sharp knife to cut strips. Then I started in the middle and worked my way out.

Be sure that you don’t overlook the step where you let the strawberries and rhubarb sit in a colander for an hour. It will release a lot of juice from the fruit. If that juice was in the pie, it would make the bottom crust very soggy and the pie would probably be a soupy mess. Sorry for not having any pics of a slice of this pie, I took it over to my brothers and we ate it there. You’ll just have to make it yourself to see what the insides look like! It would definitely be worth the effort.
Check out my SECOND week of Strawberry Recipes HERE


Strawberry Rhubarb Pie
Yield: serves 12
Ingredients:
1 recipe basic pie dough
2 cups diced fresh rhubarb stalks
3 cups diced fresh hulled strawberries
1 cup sugar, divided
1/2 cup packed brown sugar
1/2 tsp ground cinnamon
1/4 tsp ground cardamom
1/4 cup cornstarch
very small pinch of salt
1 beaten egg
Directions:
In large bowl, combine rhubarb, strawberries, and 1/2 c. sugar. Toss to combine well and set into colander over sink or bowl and let drain for 1 hour.
Preheat oven to 350 degrees and prepare pie plate. Roll out 1/2 recipe of dough and line bottom of pie plate.
In large clean bowl, combine strawberry and rhubarb that have been drained with remaining sugar, brown sugar, cinnamon, cardamom, pinch of salt and cornstarch. Toss to combine well and add to pie shell, smoothing out evenly.
Roll out remaining pie dough and lattice top the pie filling.
Brush lattice with beaten egg and place pie into oven. Let cook for 20 minutes, then place a piece of tinfoil loosely over the top. Continue cooking until filling is cooked through and bubbling, about 50 more minutes. Remove from oven and let cool on wire rack.
Recipe adapted from Good Things Catered


 I am Jen the Beantown Baker. Engineer by day and baking maven by night. Hubby serves as my #1 fan and official taste tester. We got hitched back in 2006. Barefoot. In the sand. With the waves crashing behind us. It was one of the best decisions we’ve ever made.


