


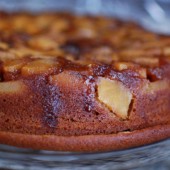
Gingerbread Apple Upside Down Cake
Hubby and I have been hosting quite a few dinner parties since our kitchen is finished. It’s nice to not be embarrassed to have people over because of our kitchen. For one of these dinner parties, I let Hubby choose the dessert. I gave him a few to choose from and he said he was in the mood for gingerbread. Hubby even offered to help by peeling and cutting the apples for me.

I didn’t have a 10″ pan, so I used a 9″ pan. The cake didn’t overflow, but you can see that I have a nice little foot on the bottom of my cake due to using a smaller pan and not adjusting the recipe. That’s ok it was still amazing.

I must have cooked my caramel too long because it was not as gooey and flowy as the original pictures show on Smitten Kitchen. I served this at room temperature with some fresh whipped cream on top. Everyone really enjoyed it.


Gingerbread Apple Upside Down Cake
Yield: 12
Ingredients:
For the Topping
4 tablespoons butter, plus extra for greasing pan
1/2 cup dark brown sugar
Pinch of salt
4 apples (about 1 3/4 pounds), peeled, cored and cut into 1/4-inch wedges
For the Batter
1/2 cup butter, at room temperature
1/2 cup sugar
1 large egg
1/3 cup dark molasses
1/3 cup honey
1 cup buttermilk
2 1/4 cups flour
1 teaspoon baking soda
1/2 teaspoon salt
1 teaspoon ground ginger
1 teaspoon cinnamon
Very softly whipped cream
Directions:
Make the Topping
Preheat the oven to 325°F. Grease a 10-inch cake pan. Melt butter in a small saucepan. Add brown sugar and simmer over moderate heat, stirring, four minutes, then swirl in salt. Remove from heat and pour into the bottom of your cake pan. Make circles of overlapping apple slices on top of the caramel. Chop any remaining slices and place them in the gaps.
Make the Batter
Using a mixer, blend 1/2 cup butter and the sugar on medium-low speed. Increase the speed to high and cream until light and fluffy.
In a medium bowl, whisk together the egg, molasses, honey and buttermilk. In a separate bowl, sift together the flour, baking soda, salt, ginger and cinnamon. Alternate mixing the flour and molasses mixtures into the butter mixture, adding the next once the last has been incorporated.
Pour the batter into the pan. Bake at least 45 to 50 minutes or until a wooden tester inserted into the center of the cake comes out clean. Let cool on a rack for 10 to 15 minutes, then turn out onto a platter.
Recipe from Smitten Kitchen
![]() Don’t forget – I’m offering a chance to win a cute tote if you donate $5 or more to my Avon Walk by the end of January. See details here.
Don’t forget – I’m offering a chance to win a cute tote if you donate $5 or more to my Avon Walk by the end of January. See details here.


 I am Jen the Beantown Baker. Engineer by day and baking maven by night. Hubby serves as my #1 fan and official taste tester. We got hitched back in 2006. Barefoot. In the sand. With the waves crashing behind us. It was one of the best decisions we’ve ever made.


This looks great! After apple picking last year, I was desperately searching for ways to use the apples in savory ways. Now one of my favorite recipes is a calzone filled with apples, proscuitto, brie and sage. SO good!
My husband used to laugh at me when I told him that as kids we would do apple pie filling and cheese in the hobo pie maker. It was fabulous…I’m going to show him this post to prove that I’m not crazy. We’re apple picking this weekend, so I’ll be sure to try this out!
I definitely need to think of some savory ways to use up all of the apples we pick every fall, and stop making sweets! This looks like a great recipe!
http://www.madeinmelskitchen.com
What a great apple treat. I’ve got loads of apples this years from my trees and am looking for yummy recipes to use them up. After all, a girl can only eat so much apple sauce LOL.
*kisses* HH
I didn’t realize this was going to be a sweet sandwich. It looks so yummy! I once had a grilled cheese sandwich with thinly sliced apples in the middle and it was delicious!
I love what you did with your leftover apples! This looks incredible…love the apple and cheese combinations!
This recipe looks really tasty! I tried a similar flavor combo, but it was apple, cheddar omelete. I needed as apple with more flavor- the one I used wasn’t tart enough!
What a great way to use up apples…yum!
This made my mouth water. I have to make this soon.
Looks delicious Jen! I love the combination of apples and gouda! After my apple picking adventures I am definitely seeking lots of good apple ideas as well!
This looks like a great comfort food sandwich! I spent yesterday baking apple pies and snacking on cheese and crackers. I snuck in a few apple slices on my cheddar & crackers – yum!
Um YES please! ps. everyone in the office loved your brownie recipe- it has totally become my go-to 🙂
I love making grilled cheese with a really great goat’s milk gouda–it’s our new favorite grilled cheese–but I think I’d die and go to heaven if I made it this way! thanks for sharing.
This looks delicous! I love the combination of apples and cheese. It is great to see a savory apple recipe…I have lots too!
HUSH! oh my…looks amazing!!
I HAVE to try this!!!