


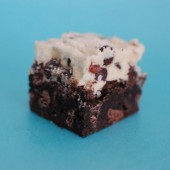
Cookie Dough Brownies
I’m one of those people who loves to eat raw cookie dough. Not quite as much as my brother A who has been known to eat a whole package of cookie dough without baking any of it, but I definitely like to take a swipe every time I’m making cookies. And of course, Hubby loves cookie dough. He actually prefers chocolate chip cookie dough raw vs baked into a cookie. Being a good wife, I always let him lick the beater.

If you’re a raw cookie dough lover like most of the people in my life, you have to make these brownies. I’m serious. As in, tonight, make these brownies. You won’t regret it.
Imagine taking a great chocolatey brownie with chocolate chips, topped with raw chocolate chip cookie dough. They’re simply amazing. In fact, looking back at these pictures really makes me want to make them again tonight.

And don’t worry the cookie dough topping has no raw eggs in it, so it’s completely safe to eat. It’s basically like a cookie dough frosting that I could literally eat with a spoon. I used regular chocolate chips in the cookie dough layer because I’m not a fan of mini chocolate chips. I’m not sure if it’s just in my head, but I feel like they have a different flavor than the regular sized chips.


Cookie Dough Brownies
Ingredients:
For the Brownies
1 cup (2 sticks) unsalted butter
2 1/4 cups sugar
4 large eggs
1 1/4 cups Dutch-process cocoa
1 teaspoon salt
1 teaspoon baking powder
1 teaspoon espresso powder, optional
1 tablespoon vanilla extract
1 1/2 cups all-purpose flour
2 cups chocolate chips
For the Cookie Dough
3 sticks butter, softened
1 1/2 cup brown sugar
2/3 cup sugar
9 tbsp milk
3 cups flour
3 cups mini chocolate chips - I used regular chips
Directions:
Prepare Brownies
Preheat the oven to 350°F. Lightly grease a 9" x 13" pan
In a saucepan set over low heat, melt the butter, then add the sugar and stir to combine. Return the mixture to the heat briefly, just until it's hot, but not bubbling; it'll become shiny looking as you stir it. Heating this mixture a second time will dissolve more of the sugar, which will yield a shiny top crust on your brownies.
Transfer the sugar mixture to a medium-sized mixing bowl, if you've heated it in a saucepan. Stir in the cocoa, salt, baking powder, espresso powder, and vanilla.
Whisk in the eggs, stirring until smooth.
Add the flour and chips, again stirring until smooth.
Spoon the batter into a lightly greased 9" x 13" pan.
Bake the brownies for about 30 minutes, until a cake tester inserted into the center comes out clean, or with just a few moist crumbs clinging to it. The brownies should feel set on the edges, and the center should look very moist, but not uncooked. Remove them from the oven and cool completely on a rack.
For cookie dough
Cream the butter and sugars until light and fluffy. Beat in milk. With mixer on low, add flour and mix until well combined. Stir in mini chocolate chips.
To assemble
Spread the cookie dough onto the cooled brownies (I put the pan into the freezer for about 30 minutes).
Chill the brownies until the cookie dough is firm. Cut into bars and serve.
Cookie dough recipe from Lovin' from the Oven
Brownie recipe from King Arthur Flour


 I am Jen the Beantown Baker. Engineer by day and baking maven by night. Hubby serves as my #1 fan and official taste tester. We got hitched back in 2006. Barefoot. In the sand. With the waves crashing behind us. It was one of the best decisions we’ve ever made.


Love these! Isn’t it amazing how anything that’s been dipped in chocolate can bring rave reviews??
http://www.simplysweeter.blogspot.com
What a phenomenal sweet/savory treat!
I like the white with the red B – nice Red Sox feel to it!
Can’t believe you used Ritz crackers! What a great idea!
http://ajscookingsecrets.blogspot.com/
I was just talking about making chocolate dipped oreos. They sound fantastic!
Mmm, these look amazing! Must try these!
http://www.madewithpink.com