


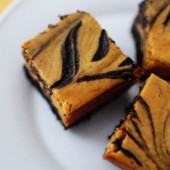
Pumpkin Spice Cheesecake Brownies
Fall has definitely arrived! With all the delicious soups, chili, and baking with apples and pumpkin, it’s by far the most fun food season. These bars have popped up all over the Internet after showing up in Cara’s blog two years ago. Hubby has been asking for these bars for about two weeks now. With the shortage of canned pumpkin going on right now, I couldn’t make these until now because I just couldn’t find canned pumpkin!

I made these when we had some overnight guests and everyone loved them. We got impatient and cut them after they had cooled for about a hour. They hadn’t been chilled so they were still a bit gooey and warm. They’re delicious at this point and also after they’ve been chilled (the pumpkin flavor really shines once they’ve chilled).
I made a few adjustments to Cara’s recipe. One of the bloggers who made these said she wished there was more of the pumpkin mixture, so I upped that part of the recipe. Cara’s original recipe called for 6 oz of cream cheese and since a block of cream cheese is 8 oz, I just adjusted the other ingredients of the cheesecake portion so that it would use a full block of cream cheese. My adjustments are shown below.

I also don’t tend to think of pumpkin and chocolate together. It seems to me that white chocolate or cream cheese frosting are natural partners with pumpkin. The more I thought about it, the more I thought that dark chocolate would pair with pumpkin better than milk chocolate. So in the brownie portion of these bars, I used some dark cocoa.


Pumpkin Spice Cheesecake Brownies
Yield: 16 bars
Ingredients:
For the Brownie Batter
3/4 cup butter, melted
1 cup sugar
1 tbsp pure vanilla extract
2 eggs
1/2 cup all purpose flour
1/2 cup dark cocoa powder
1/4 tsp salt
2 tsp cinnamon
For the Cheesecake Batter
8 oz cream cheese, softened
1 egg
1/2 cup sugar
2 Tbsp + 2 tsp flour
2/3 cup pumpkin puree
1/3 tsp pure vanilla
2/3 tsp cinnamon
1/3 tsp ground ginger
1/3 tsp ground cloves
Directions:
Preheat oven to 350F. Grease an 8x8" square metal baking pan.
Beat together melted butter, sugar, and vanilla, then beat in eggs one at a time. Combine dry ingredients and then gradually stir into butter mixture with a wooden spoon. In separate bowl, beat together cheesecake batter ingredients.
Spread about 2/3 of chocolate batter into prepared pan, and spoon cheesecake batter over. Dollop remaining brownie batter over cheesecake batter. Swirl the batters together by running a butter knife back and forth through the pan.
Bake for 40 minutes, or until center is set. Cool completely on wire rack and chill before cutting and serving.
Original Beantown Baker Recipe, inspired by Cara's Cravings


 I am Jen the Beantown Baker. Engineer by day and baking maven by night. Hubby serves as my #1 fan and official taste tester. We got hitched back in 2006. Barefoot. In the sand. With the waves crashing behind us. It was one of the best decisions we’ve ever made.


I love it! Where did you get the jars? Now I totally wanna do this for xmas gifts!
/Clara
I looked everywhere and just couldn’t find them. I ended up ordering them from Amazon. They weren’t very cheap so that was a bummer…
Ah bummer. What size are the jars? I wonder if Ikea would have them? Whats the amazon link?
/Clara
I ordered them from here. You want the wide mouth jars so the cupcakes fit and the 1/2 pint size is perfect.
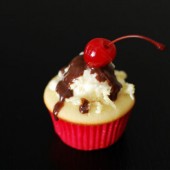
The yellow cupcakes didn’t rise much so I added more frosting to fill the jar and the chocolate ones rose quite a bit so they had less frosting. My sister said that the chocolate one had the perfect amount of frosting or could use a smidge more, so you want a cupcake that has at least a small dome.
haha, i’ve never seen that before 🙂 love it!
OH FUN! I’ve seriously always thought about doing this and never did. I’m starring this post to remind myself at Christmas. Too cute!!
I have been dying to try this ever since I saw it last year on someone else’s blog. They actually baked the cake in the jar and then iced it like a cupcake. I am going to have to order some of those iddy jars! Too cute!
Hmmm…might have to do this for Christmas instead of those “ingredients in a jar” thing we were thinking of.
I really want to try this, but I keep reading online that you shouldn’t put frosting in the jar because it will get moldy by the time it reaches its destination. I’m sure you would have heard if it was moldy when it got to your friend right? I would just be so embarrassed if that happened. Any help?
Renee – I’ve done this twice and both times haven’t heard of any mold. I froze the cupcakes/frosting in the jars prior to shipping them. I also shipped in the winter. My one sister even didn’t go get her package from the office until a week after it arrived and it was still good. I would guess she ate her cupcakes about 10 days after I sent them. I’m not sure if shipping in warm weather will have an impact on potential mold…
Alright I’ll definitely give it a try then. It will make for a very good Easter present for my faraway friends =)
Oh that’s a good idea!! I might have to order some more jars and do the same myself…
What a clever idea! I would love to get a cupcake in the mail! 🙂 Maybe I’ll send out Valentine’s Day Cupcakesnext year!
This comment has been removed by the author.
Love these!! We have featured you on our blog. http://cutecupcakesallthetime.blogspot.com
Did you freeze them before shipping? The jars looked frosted…
beantownbaker — February 24th, 2013 @ 10:21 am
I did freeze them. They defrosted as they were shipped. I’ve done it with and without the freezing depending on the weather and whatnot.
What shipping method did you use? Overnight or Express???