


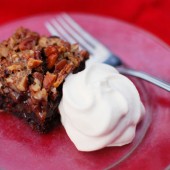
Samoas Bars
Hubby loves girl scout cookies. Specifically Samoas. I grew up in the Midwest, and we always called them Caramel Delights. Whatever you call them, everyone loves them. I saw this recipe come up and I knew I had to make these.
 These bars do take a little bit of time because each step requires some wait time before you can move on to the next step. In the end, they’re definitely worth the effort. Hubby did comment that the cookie part tasted a bit off. I think there’s just a higher ratio of the cookie part than in the girl scout version.
 Homemade Samoas Bars – from Baking Bites – makes 30 barsCookie Base:
1/2 cup sugar
3/4 cup butter, softened
1 large egg
1/2 tsp vanilla extract
2 cups all purpose flour
1/4 tsp salt
First, make the crust.
Preheat oven to 350F. Lightly grease a 9×13-inch baking pan, or line with parchment paper.
 In a large bowl, cream together sugar and butter, until fluffy. Beat in egg and vanilla extract. Working at a low speed, gradually beat in flour and salt until mixture is crumbly, like wet sand. The dough does not need to come together. Pour crumbly dough into prepared pan and press into an even layer.
Bake for 20-25 minutes, until base is set and edges are lightly browned. Cool completely on a wire rack before topping.
Topping:
3 cups shredded coconut (sweetened or unsweetened) – I used sweetened
12-oz good-quality chewy caramels – I used the Kraft caramel bits
1/4 tsp salt
3 tbsp milk
10 oz. dark or semisweet chocolate (chocolate chips are ok)
Preheat oven to 300. Spread coconut evenly on a parchment-lined baking sheet (preferably one with sides) and toast 20 minutes, stirring every 5 minutes, until coconut is golden. Cool on baking sheet, stirring occasionally. Set aside.
Unwrap the caramels and place in a large microwave-safe bowl with milk and salt. Cook on high for 3-4 minutes, stopping to stir a few times to help the caramel melt. When smooth, fold in toasted coconut with a spatula.
 Put dollops of the topping all over the shortbread base. Using the spatula, spread topping into an even layer. Let topping set until cooled.
When cooled, cut into 30 bars with a large knife or a pizza cutter.
 Once bars are cut, melt chocolate in a small bowl. Heat on high in the microwave in 45 second intervals, stirring thoroughly to prevent scorching. Dip the base of each bar into the chocolate and place on a clean piece of parchment or wax paper – I used a spoon to spread some melted chocolate on the bottom of each bar. I then laid them chocolate side up to set the chocolate.
Transfer all remaining chocolate into a piping bag or a ziploc bag with the corner snipped off and drizzle bars with chocolate to finish.
 Let chocolate set completely before storing in an airtight container.
Makes 30 bar cookies.


 I am Jen the Beantown Baker. Engineer by day and baking maven by night. Hubby serves as my #1 fan and official taste tester. We got hitched back in 2006. Barefoot. In the sand. With the waves crashing behind us. It was one of the best decisions we’ve ever made.


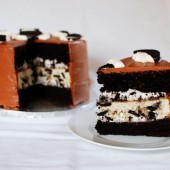
This look absolutely FABULOUS! 🙂 I love oreo’s… They could quite possibly be my favorite snack food.! I’m defientely adding this recipe to my collection of cakes to bake! Thanks for sharing.
Megan♥
http://urbakinmecrazyy.blogspot.com/
that is one of the MOST impressive cakes I’ve ever seen! You always amaze me with your creativity! very inspirational.
OMG – I want!!! 😀
hi is it ok to use regular coffee?like maxwell?how many teaspoon of maxwell should i use?thanks
This looks AMAZING! What did you use to hold the Oreos in place on the top? Is that Oreo filling?
Love this cake – made it for my hubby’s 30th! Just a quick question as I had a little trouble with the Oreo filling. It was a bit thin. I think the problem might be the type of cream I used as we don’t have heavy cream in Australia (at least it’s not called heavy cream) so does anyone know what type of cream I should use? Thanks heaps 🙂
This cake turned out amazing! I omitted the coffee from the frosting and it was perfect without but im sure it would have been prefect with. It was a process to make it but well worth it! Just as good if not better than a bakery cake!
beantownbaker — December 24th, 2012 @ 5:48 pm
Yes, it’s definitely a lot of work, but worth the effort! Glad you enjoyed it.
Found you on Carole’s Chatter Food on Friday link-up. This cake looks like perfection!! I definitely need to try it soon:)
beantownbaker — June 10th, 2013 @ 12:33 pm
Thanks and welcome! You should definitely make this cake if you like Oreos at all.
OMG, I love oreo so much!!! I will try to make this cake someday! Thank you for the delicious recipe!
beantownbaker — July 22nd, 2013 @ 1:13 pm
It definitely takes a little bit of extra effort, but it’s so worth it!
What size pkg of Oreos? I just came home with one that only has 3 rows, ugh? It’s 14.3 oz. is that the same size? Thanks!!
beantownbaker — September 2nd, 2014 @ 7:09 pm
Did that work for you? I will have to check next time I am at the store. I just get the standard size with 3 rows.
Just wanted you to know that after all these years I keep coming back to this recipe
!! My 17 year old requested it for his birthday, he was 4 the first time I made it for his birthday.