


Taste & Create: Lemon Curd Cookies
 Taste & Create is a blogging event in which you are randomly paired up with another particpant, and each of you try a recipe from the other’s food blog. I was paired with the talented Cherrapeño. I immediately started looking for a recipe I wanted to try. Everything looks so good!! Hubby has a coworker who loves lemon, so the Lemon Curd Cookies caught my eye. I made my first lemon curd back in January and loved it.
Lemon Curd Cookies – from Cherrapeño – Adapted from The Guardian Weekend by Dan Lepard – makes ~2 dozen
I used this calculator to get my grams to cups/Tbsp conversion.
 Topping:
50g (10 Tbsp) rolled oats
50g (4 Tbsp) double cream
100g good lemon curd – I made my own using this recipe – I used 1/2 cup
Base:
100g (1/2 cup) caster sugar
100g (8 Tbsp) unsalted butter, softened
zest of 1 lemon
150g (1 1/2 cup) plain flour
25g (2 tbsp) ground rice – I used organic brown rice flour
Measure the oats, cream and lemon curd into a small bowl and mix until combined. Cover the bowl with clingfilm until ready to use.
Mix the sugar and butter with the lemon zest for a couple of minutes until fluffy, then add the flour and ground rice, mix until you have a soft dough.
Roll into a cylinder about 5cm by 20cm long and wrap in cling film. Chill for at least an hour until firm.
Heat the oven to 180C/350F/Gas 4-5, line a large baking sheet with baking parchment and slice the dough into 1½cm discs. They may crumble as you cut them but you can just press the dough back together again. Space them well apart as they will spread a bit.
Spoon a teaspoon of the oaty/lemon mixture on each circle of dough and spread it to the edges.
Bake for 20-30 minutes or until the cookies have just risen and the tops are browning. Cool for a few minutes until placing on a wire rack to go cold.
 I had some problems with the cookie dough. I’m not sure if it was because my conversions were off or what. When I followed the directions, after the dough came out of the fridge for an hour, it crumbled horribly. I couldn’t get it to stick together at all. It was quite crumbly when I wrapped it up but I thought it would solidify while chilling.
 I ended up adding 1/2 cup soy milk to the mixture and mixed it up and re-chilled it. This helped tremendously. I was able to slice the dough once it was chilled for another hour.
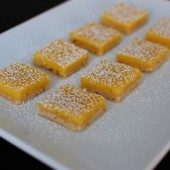
My cookies didn’t spread or rise too much. But they did taste great. They also aren’t that pretty. I’m convinced that desserts that look good taste better. It’s a mental thing. Hubby even commented that the bad thing about these cookies is that they’re kinda dull looking. BUT, everyone at our family get together loved these cookies and I didn’t bring any home.
 The lemon curd recipe was also taken from Cherrapeño. This lemon curd recipe was very simple to make. It was very lemony and tangy. This recipe was easy to make since it used whole eggs.


 I am Jen the Beantown Baker. Engineer by day and baking maven by night. Hubby serves as my #1 fan and official taste tester. We got hitched back in 2006. Barefoot. In the sand. With the waves crashing behind us. It was one of the best decisions we’ve ever made.


Everytime I make anything out of this book I screw up a step. I’m starting to blame the book – maybe it has too many steps? I’ve had it for years, and I don’t mess up other recipes. But with this book. . . everytime I look at the recipe while whatever I’ve made is in the oven I go “oh no.”
Let us know what else you cook and like out of the book. Love your blog.
These look so DELICIOUS! My mouth is watering!! Thank you!!
http://www. simplysweeter.blogspot.com
These are my favorite type of bars! And I agree, I could eat lemon curd all day!
I also often don’t have the right size pan for a recipe, I guess I need to stock up 🙂
I love lemon bars and yours look absolutely delightful! I’m a huge fan of the entire Cook’s Illustrated brand and have been meaning to pick that book up for a while!
Sues
You’re so lucky to have won that cookbook!! If I would have known about that giveaway, I would have signed up for sure. I’ve been coveting that book for a long time.
These lemon bars look so yummy!!! I love lemon bars. I really enjoyed this bar series! Thank you.
Oh you saved the best for last with lemon bars, yum!
You are so right about spring teasing us. Very annoying!
hı
I lıke lemon bars !!
wonderfull lemon bars
happy weekens.
I’ve been in a lemony mood as of late. This helps take some of the edge off.
What delicious bars! I’m so glad you like the book. Now I need to own it…haha.