


It’s good to be back in the kitchen!! Martha Stewart’s Buttermilk Cupcakes with Chocolate Swiss Meringue Buttercream
It was a very exciting night in our house. We came home to a fully functioning kitchen AND I got some belated birthday gifts in the mail (thanks Dad!). Included in the package from my dad was Martha Stewart’s new cupcake book. I knew it was a sign that I needed to make cupcakes to break in my new stove.
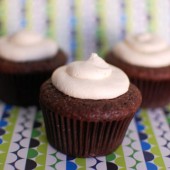
 I decided to go with the buttermilk cupcakes since I had buttermilk in the fridge. These cupcakes might become my go-to non-chocolate cupcake. They are very tender and have a great flavor.
I topped them with the chocolate Swiss meringue buttercream. I’m a huge fan of SMBC, and have never tried the chocolate variation before. This frosting has a very subtle chocolate flavor that paired nicely with the cupcake (this frosting would also be great on chocolate cupcakes).
 I decided to use some of my colored cupcake liners to brighten things up a bit. I ended up getting 3 dozen cupcakes from this recipe. I made a half batch of the frosting and it frosted 31 of my cupcakes. That’s ok though because we just “taste tested” the naked ones.
I also wanted to share my new cupcake container. I used to have the Wilton one which is somewhat big and awkward and it only holds 12 cupcakes. The bigger problem is that it wouldn’t fit into our new cabinets (before the renovation, I just kept it on top of the cabinets). But I found this double decker one at Container Store and it’s perfect. Not only does it fit in our cabinets, it also holds two dozen cupcakes. And since the layers snap together, if you only had 1 dozen cupcakes, it would work great for that too. We both agree this cupcake carrier is much better than the old one.
 Yellow Buttermilk Cupcakes – from MarthaStewart.com (the same recipe is in the cookbook) – makes 36 cupcakes
3 cups cake flour (not self-rising)
1 1/2 cups all-purpose flour
3/4 teaspoon baking soda
2 1/4 teaspoons baking powder
1 1/2 teaspoons coarse salt
1 cup plus 2 tablespoons (2 1/4 sticks) unsalted butter, room temperature
2 1/4 cups sugar
5 large whole eggs plus 3 egg yolks, room temperature
2 cups buttermilk, room temperature
2 teaspoons pure vanilla extract
Preheat oven to 350 degrees. Line standard muffin tins with paper liners. Sift together both flours, baking soda, baking powder, and salt.
With an electric mixer on medium-high speed, cream butter and sugar until pale and fluffy. Reduce speed to medium. Add whole eggs, one at a time, beating until each is incorporated, scraping down sides of bowl as needed. Add yolks, and beat until thoroughly combined. Reduce speed to low. Add flour mixture in three batches, alternating with two additions of buttermilk, and beating until combined after each. Beat in vanilla.
Divide batter evenly among lined cups, filling each three-quarters full. Bake, rotating tins halfway through, until cupcakes spring back when lightly touched and a cake tester inserted in centers comes out clean, about 20 minutes. Transfer tins to wire racks to cool 10 minutes; turn out cupcakes onto racks and let cool completely. Cupcakes can be stored overnight at room temperature, or frozen up to 2 months, in airtight containers.
 Chocolate Swiss Meringue Buttercream – from MarthaStewart.com – I made a 1/2 batch of this since I had 3 egg yolks left from the cupcakes. Here is the full batch recipe which makes 4 cups
5 large egg whites
1 1/4 cups sugar
2 cups (4 sticks) unsalted butter, room temperature
1 teaspoon vanilla extract
4 1/2 oz semisweet chocolate, melted and cooled
1/4 teaspoon coarse salt
Combine egg whites, and sugar in the heatproof bowl of an electric mixer. Set bowl over a pan of simmering water. Whisk constantly until sugar has dissolved and whites are hot to the touch, 5 to 7 minutes.
Transfer bowl to the electric mixer. Using the whisk attachment, mix on low speed, gradually increasing to high speed, until stiff, glossy peaks form, about 10 minutes.
At low speed, add butter to egg whites, and beat until smooth. Add vanilla, chocolate, and salt, and continue mixing until incorporated.


 I am Jen the Beantown Baker. Engineer by day and baking maven by night. Hubby serves as my #1 fan and official taste tester. We got hitched back in 2006. Barefoot. In the sand. With the waves crashing behind us. It was one of the best decisions we’ve ever made.


I went to that other blog but still did not find the recipe? Am I missing something?