


12 Days of Cookies – Chocolate Covered Cherry Cookies
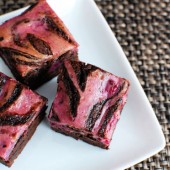
 I let Hubby chose the last cookie for the 12 Days of Cookies. I gave him a list of 5 that came out of my Google Reader. He chose these chocolate covered cherry cookies. Like I have been doing recently, I made a 1/2 batch of these cookies. Hubby and I have started putting on holiday weight and it’s not even the holidays yet! This blog could be the death of me… I did only got 14 cookies out of my half batch. I used my cookie scoop to portion the dough, so apparently I made mine bigger than the original poster did.
These cookies are very good. I love the two textures of chocolate on them. And the surprise of a cherry in the middle is very good. I will definitely make these again sometime. Since they’re not overly holiday-ey they could be made any time of the year.
 Chocolate Covered Cherry Cookies – from A Good Appetite
1 1/2 c all-purpose flour
1/2 c unsweetened cocoa powder
1/4 t baking soda
1/4 t baking powder
1/4 t salt
1/2 c unsalted butter, softened
1 c sugar
1 egg
1 1/2 t vanilla
24 maraschino cherries
1/2 c semisweet chocolate chips – I used a mix of semisweet & bittersweet
1/4 c sweetened condensed milk
Preheat oven to 350 F.
Mix the flour, cocoa, baking soda, baking powder & salt together, set aside.
In a mixer beat the butter until softened. Add the sugar & cream until like & fluffy. Beat in the egg and vanilla. Add the flour mixture & beat until well mixed.
Roll the dough into 1-inch balls & place them 2 inches apart on an ungreased cookie sheets. Use your thumb to make an indentation in the center of each cookie.
Drain the cherries reserving the juice. Remove the stems & cut the cherries in half. Place 1/2 of a cherry into the indentation in each cookie.
 Put the chocolate chips & condensed milk in a small saucepan. Stir over low heat until the chocolate is melted. Stir in 4 teaspoons of the cherry juice. Spoon 1/2 – 1 teaspoon of chocolate over the top of each cherry covering it completely. If the chocolate is too thick add a little more cherry juice.
Bake for 10 minutes & cool on a rack.
These cookies will freeze well. Individually freeze them on a cookie sheet. Once frozen place them in a box with wax paper between layers then back into the freezer.
 My 12 Days of Cookies:Day 1: Lumberjacks
Day 2: Peppermint Sandies
Day 3: The great Sugar Cookie Debate
Day 4: Fudge
Day 5: Cranberry Orange Cookies
Day 6: Chocolate Chip Snowballs
Day 7: Peppermint Chocolate Cookies
Day 8: Snickerdoodles
Day 9: Candy Cane & Mint Kiss Cookies
Day 10: Chocolate Peppermint Meringue Cookies
Day 11: Butter Ball Cookies


 I am Jen the Beantown Baker. Engineer by day and baking maven by night. Hubby serves as my #1 fan and official taste tester. We got hitched back in 2006. Barefoot. In the sand. With the waves crashing behind us. It was one of the best decisions we’ve ever made.


What a great idea for a cookie! I love the pictures, and that you thought the add pomegranate to cookies…will have to give these a try, great post!
I made TPATP’s pom cookies, too! Delicious! Yours look awesome.
These never fail to make me think “What a great idea”…Pomegranate in a cookie is so unique and pretty! (and tasty!)
love,
cathy b.
I love the pairing of pomegranate and white chocolate. I’ve never eaten that flavor combination before but I can how imagine how good it tastes!
Looks delicious!!
cute blog name! this combo sounds amazing!
Maria has such a great blog… and those cookies sound so good. I kind of want to make a chocolate cookie with pomegranate seeds now.
Thanks again for having me! This was fun:) I hope your readers like the cookies, we sure do:)
I love little “experiments” that go so right! Can’t wait to try these cookies!