


Rum Punch Cupcakes
Hubby and I got married in St Thomas with 23 of our closest friends and family members (we HIGHLY recommend beach weddings!) We had a morning ceremony with lunch immediately after at a restaurant on the beach. After the meal, over half of the bill was for rum punch! Our amazing photographer (Steph Carson – check her out if you need a photographer – tell her Jen P sent you if you contact her – see some of our pics here), caught this picture of the tasty beverages coming out to the table. We love all the pictures that Steph took, but this one really takes us back.

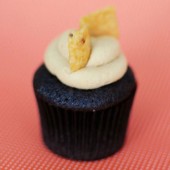
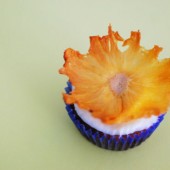
These cupcakes are inspired by our favorite tropical drink. When I make rum punch at home, I mix cranberry juice, pineapple juice, and coconut rum. So I adapted the Sea Breeze cupcake recipe in Crazy about Cupcakes to make Rum Punch cupcakes. They turned out really good, although next time I’ll put more rum in or some coconut extract.
 Rum Punch Cupcakes – makes 12 – adapted from Crazy about Cupcakes
1/4 pound (1 stick) unsalted butter, at room temperature
3/4 cup sugar
2 large eggs, separated, at room temperature
1 1/2 cups flour
1 1/2 tsp baking powder
1/4 tsp baking soda
1/4 tsp salt
1/4 cup pineapple juice
1/4 cup cranberry juice
Zest of 1 orange
Preheat oven to 350. Insert liners into a medium cupcake pan.
In a large bowl cream together the butter and sugar with an electric mixer on medium speed until fluffy 3-5 minutes. Add the egg yolks. Beat well.
In a separate bowl combine the flour, baking powder, baking soda, and salt.
Add the dry ingredients to the creamed mixture, alternating with juices. Fold in zest.
With clean beaters, whip the egg whites until stiff peaks form. Gently fold the whites with a rubber spatula into the batter.
Fill the cupcake liners 1/2 to 2/3 full. Bake for 20-25 minutes or until a toothpick inserted in the center of cupcakes comes out clean. Cool cupcakes in the pan.
 Rum Punch frosting – adapted from Crazy about Cupcakes
3 cups confectioners sugar
6 Tbsp heavy cream
1 Tbsp rum
1 Tbsp pineapple juice
1 Tbsp cranberry juice
Combine all ingredients in medium mixing bowl. Beat on low speed until smooth. Add additional liqueur or sugar if necessary to reach desired spreading consistency.
Note: This frosting was very thin. I added more sugar, but stopped adding sugar because I didn’t want it to be too sweet.

 I am Jen the Beantown Baker. Engineer by day and baking maven by night. Hubby serves as my #1 fan and official taste tester. We got hitched back in 2006. Barefoot. In the sand. With the waves crashing behind us. It was one of the best decisions we’ve ever made.


So unique and so very pretty!
Great to see another Boston area baker! I’ll definitely be stopping by in the future.
These are such pretty cupcakes! And so creative!!