


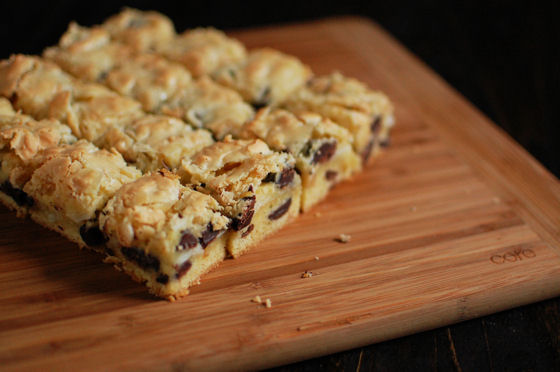
Coconut Chocolate Chip Bars
Chocolate and coconut is one of my all-time-favorite flavor combinations. When I saw this recipe, it reminded me of a coconuty combination of chocolate chip cookie bars and gooey bars, so I knew I had to try it out.
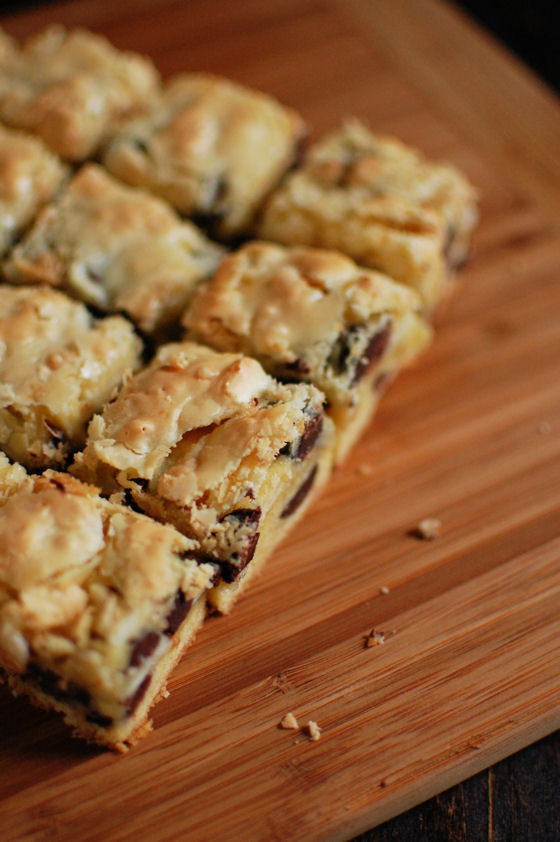
I really enjoyed the fact that the coconut was present, but not overpowering. I love the texture the flaked coconut gave to these bars. Now I know some people are not fans of coconut. It’s kind of like cilantro. Some people love it, others, not so much.
I took these bars to a friend’s house for a cookout. Luckily no one there was a coconut hater. Or if they were, they didn’t say anything about it. Store these bars in the fridge, but let them come to room temperature a bit before serving them.
One Year Ago: Patriotic Quake Cake
Two Years Ago: White Bean and Avocado Sandwich
Five Years Ago: Inside Out Stuffed Peppers


Coconut Chocolate Chip Bars
Yield: 25 bars
Ingredients:
For the Base
1 cup plus 2 tablespoons all-purpose flour
1/2 teaspoon baking powder
1/4 teaspoon baking soda
1/4 teaspoon salt
3/4 cup sugar
4 tablespoons butter, softened
1 egg
1 egg yolk
1 teaspoon vanilla
1/2 cup chocolate chips
For the Topping
4 ounces cream cheese, softened
4 tablespoons butter
1 egg
1/4 cup all-purpose flour
1/2 teaspoon vanilla
2 cups powdered sugar
1/2 cup crisp rice cereal
1/2 cup shredded coconut
1/2 cup chocolate chips
Directions:
Heat the oven to 350 F and spray an 8×8-inch baking pan with non-stick spray.
In the work bowl of a stand mixer fitted with the paddle attachment, or in a large bowl with a hand mixer, combine the flour, baking powder, baking soda, salt, sugar, butter, egg, egg yolk, and vanilla. Mix until it just forms a cohesive mass then add the chocolate chips and stir until they are evenly distributed. Press this mixture evenly into the prepared pan.
In the same bowl combine the cream cheese, butter, egg, flour, vanilla, and powdered sugar. Mix until very smooth and creamy, then stir in the crisp rice cereal, coconut, and chocolate chips until well mixed.
Spread the cream cheese mixture evenly over the base then bake for 25 to 35 minutes, or until the topping is golden brown all over, puffed, and just set at the edges while the center is still just a little wobbly. Cool completely in the pan then chill for at least two hours. Once chilled run a thin knife around the edges of the bars and turn out of the pan. Cut into squares.
Recipe from Evil Shenanigans


 I am Jen the Beantown Baker. Engineer by day and baking maven by night. Hubby serves as my #1 fan and official taste tester. We got hitched back in 2006. Barefoot. In the sand. With the waves crashing behind us. It was one of the best decisions we’ve ever made.


I love this simple recipe, and it will be a great idea for my sister-in-law’s bridal shower (both she and her fiance have M names). You mention in your other posts about using a squeeze bottle – is this any particular type of squeeze bottle? I’m not sure how to find one that would work for this purpose. What do you use? Thanks!
Awww, totally cute! It came up in my google reader and my stomach growled!!! YUM!
Yum! I’m making these this weekend for birthday treats. Can’t believe you can’t find almond bark. There are stacks of it at our small-town grocery store in Iowa.
Sarah – I use squeeze bottles from Michaels. They look like this.
Teresa – yes, it’s crazy that they don’t have almond bark out East. In the Midwest you can get it anywhere!
Thanks Jen! These are awesome. I have so many new pages bookmarked since finding your blog. P.S. I was in TJ Maxx tonight and found a jar of polka dot sprinkles, like true big polka dots, and I thought of you!
Do you have any Super WalMarts near you? I get them there all the time in Massachusetts. They are carried year round in the baking aisle. I’m not sure if regular WalMarts have them too.
These look yummy and I think that my college-age nephews would love them…how whould they travel? Have you got suggestions for things that will travel well in the mail? Thank you
mrs. c – these would travel really well. I like them straight from the fridge or freezer. I would freeze them for a few days prior to mailing. That’s what I do with anything I ship. I have great luck with cookies and brownies going in the mail.
have you tried coloring almond bark before? I tried a couple months ago and it was a disaster, so just curious
KV – I have not tried to color almond bark. The Wilton’s candy melts do come in a variety of colors though, so you could use those. They are sold at Michaels or Hobby Lobby.
Just wanted to clarify that I meant I find almond bark at Super WalMart here in MA. I went back to see if you had responded, and I realized my comment didn’t really make much sense!
Thanks. I don’t shop much at Walmart… It’s probably better that I can’t find this stuff anywhere, otherwise I’d be making these all the time!
Retirer en discernement en visitant cette d?mes plaisanteries tel cette contradictoire localité.
OBAT LUKA BAKAR