


Marshmallow Fondant Pirate Party Cupcakes
A friend of ours had her annual pirate party a couple weeks ago. This was the first year Hubby and I could make it and we were excited to go. I offered to bring some cupcakes because, well, that’s what I do.

Now we’ve all been to costume parties where only 1/2 of the people play along and wear a costume. Not this party. Everyone was in some sort of a pirate costume. Hubby and I decided to mix it up a bit and go as hidden treasure maps.

We had a blast making our costumes. First I dyed the shirts with some tea. I did all of the drawings except for the dotted lines and Hubby burned the edges with my kitchen torch. I think he had more fun than I did.
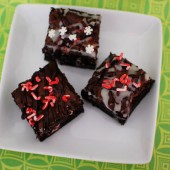
Anyways, back to the cupcakes. I was struggling to figure out how to make pirate themed cupcakes without using fondant. I’ve never used fondant before and I’ve never enjoyed the flavor, but I decided what the heck. I made my own fondant and decorated the cupcakes by using the spray on coloring that you can find at Michaels.

I used my KitchenAid mixer to do all the kneading so making the fondant wasn’t too difficult. And it actually tasted good! I just rolled it out and used one of my circle cookie cutters to cut out a circle to cover the top of the cupcake. I used a cutter that was larger than the top of the cupcake so I could completely cover it.

Then I whipped up some quick buttercream and frosting the cupcakes so the fondant would have something to stick to. Once the fondant was in place, I used a stencil and sprayed the skull and cross bones onto the fondant. Overall it was a simple process that I really enjoyed. I am definitely going to have to try some other fondant decorations!


Marshmallow Fondant
I changed the directions below to reflect what I did to use my Kitchen Aid mixer
Ingredients:
16 ounces white mini-marshmallows
2 to 5 tablespoons water
2 pounds icing sugar
1/2 cup Crisco shortening
1-2 tsp clear extract for flavoring (optional) - I used almond extract
Directions:
Grease a large microwave safe bowl. Melt marshmallows and 2 tablespoons of water in the bowl by microwaving about 2 minutes or until melted. Be sure to remove and stir every 30 seconds. Stir in your flavoring at this time.
Thoroughly grease your mixer bowl, dough hook, and a spatula. Pour 3/4 of the powdered sugar and a pinch of salt into your mixer bowl. Add the melted marshmallow on top of the sugar and turn your mixer on low.
Allow mixer to knead until it sounds like it's having a difficult time. All the sugar should be incorporated at this time. If the fondant is sticky, add more sugar a little bit at a time and continue until it is no longer sticky.
Roll fondant into a ball with your hands and cost with some Crisco. Wrap in plastic wrap and place it in a Ziploc bag. Allow the fondant to rest at room temperature about 3 hours. Once it has rested, it will be ready to use.
Recipe from Fondant 101
As a reminder, don’t forget to enter in my autographed Alton Brown cookbook giveaway by Midnight (EST) TONIGHT!
 And don’t forget about my Power of Pink Challenge going on all month.


 I am Jen the Beantown Baker. Engineer by day and baking maven by night. Hubby serves as my #1 fan and official taste tester. We got hitched back in 2006. Barefoot. In the sand. With the waves crashing behind us. It was one of the best decisions we’ve ever made.


I haven’t made these cookies yet, and suddenly I’m wondering why!
-Miriam
Make sure u add salt on top before baking!
salt before baking???
beantownbaker — January 8th, 2013 @ 8:47 pm
Oh yea – salting cookies before baking takes cookies to a whole new level!
Stumbled across this recipe 6-7 (?) years ago & have NEVER looked back! I lost count of the times that I’ve made them l-o-n-g ago. Making them now, by request, for my best friend’s birthday.
I’m glad that the internet is forever, because no matter how many times I print the recipe out – it always manages to be elusive when I need it!