


White Chocolate Layer Cake with Blueberry Curd Filling
Today wraps up a full month of Hubby-approved recipes. It’s been a fun way to honor the foods he loves. Today I’m ending on a sweet note with a cute little layer cake. Since Hubby isn’t a huge fan of chocolate desserts, I decided to go with the subtle flavor of a white chocolate cake to pair with the Blueberry Curd that I had made.

Making layer cakes is so much fun and it gives me a chance to practice my cake decorating skills. I love how this one turned out. This cake was tender but it wasn’t obvious that there was white chocolate in the batter. The white chocolate shavings on top definitely helped to boost that flavor.

I used my favorite Swiss Meringue Buttercream for this cake. Because it’s awesome. And smooth, silky, delicious, and not overly sweet. An overly sweet frosting would have over-powered the other flavors in this cake.
One Year Ago: Lemon Curd
Two Years Ago: Alton Brown’s Stovetop Macaroni and Cheese
Four Years Ago: Cinnamon Cookies
Four Years Ago: Fake Apple Pie A La Mode
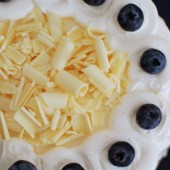


White Chocolate Layer Cake with Blueberry Curd Filling
White chocolate and blueberries are a match made in heaven
Yield: Serves 6-8
Ingredients:
For the Cake
4 oz white baking chocolate, chopped
1 cup + 2 Tbsp flour
1 tsp baking powder
1/8 tsp salt
5 Tbsp butter, softened
1/2 cup + 2 Tbsp sugar
2 eggs
3/4 tsp vanilla
1/2 cup + 2 Tbsp milk
For the decorating
1/2 batch Swiss meringue buttercream
1 cup blueberry curd
2 oz white chocolate shavings/curls for garnish
blueberries for garnish
Directions:
For the Cake
Preheat oven to 350 F.
Grease the bottoms of two 6 inch round cake pans. Line bottoms of pans with parchment paper; grease and lightly flour pans and set aside.
In a medium saucepan, cook and stir the white chocolate over low heat until melted.
In a medium bowl, combine flour, baking powder, and salt and set aside.
In a large bowl, beat the butter with an electric mixer on medium to high speed for 30 seconds. Gradually add the sugar, beating until combined. Add eggs one at a time, beating after each addition. Beat in the vanilla.
Alternately add flour mixture and milk to butter mixture, beating on low speed after each addition just until combined. Beat in melted white chocolate just until combined.
Spread batter in the prepared cake pans. Bake about 30 minutes or until a toothpick inserted in the centers comes out clean. Cool cake layers in pans on wire racks for 10 minutes. Remove layers from pans. Peel off parchment paper. Cool completely on wire racks.
Assembling the Cake
Use a long serrated knife to cut each cake layer in half horizontally. Place one layer, cut side up, on a serving plate.
Spread with one-third of the filling. Top with the second layer; spread with one-third of the filling. Top with the third layer; spread with the remaining filling. Top with the fourth layer, cut side down.
Frost cake with frosting and decorate with white chocolate shavings and blueberries.
Cake recipe from Better Homes and Gardens

 I am Jen the Beantown Baker. Engineer by day and baking maven by night. Hubby serves as my #1 fan and official taste tester. We got hitched back in 2006. Barefoot. In the sand. With the waves crashing behind us. It was one of the best decisions we’ve ever made.







Ohhh i love american cheesecake. The european one is very different. A lot less cream cheese therefore less juicy and rich. The combination of cream cheese, brownies and cherries sounds delicious
-Annika
I just rell you one thing: I want this cake ….. on my table 😀 …hugs, Flavia
This is everything i adore in one cake! I wish I can have a piece right now!