


Cannoli Cupcakes
I love being challenged in the kitchen. Making cannoli cupcakes might not seem like a huge challenge, but it ended up being harder than expected. My friend M’s bridal shower was a few weeks ago at an Italian restaurant. I had offered to bake cupcakes for the event, and it was decided that cannoli cupcakes would be a perfect fit.

So back to why this was such a challenge. First of all, I don’t really like cannolis, maybe I’m weird, but they’re just not my thing. Good thing cannolis are one of Hubby’s favorite desserts, so at least I had an expert on the matter in the house.
Second, I really can’t eat ricotta. There are some dairy-filled foods that I can handle even with my lactose intolerance. And then there are the soft cheeses like mozzarella, brie, cream cheese, and ricotta that are just too much for me.
Third, when I searched the internet for cannoli cupcakes, I didn’t see anything that really won me over. Most of them just had cannoli filling in the cupcake, then a frosting on top. The frosting seemed out of place to me.

But, I like a challenge. So I started by making a test batch. I followed a recipe I found online for some cannoli filling. I filled some yellow cupcakes that I had in the freezer with the filling, then topped them with some leftover Swiss meringue buttercream that I had from some previous cupcakes. Then I gave one to Hubby. He said they didn’t scream cannoli and the filling had the wrong consistency. I also had Aimee, Fiona, and Katie taste the test batch. You can’t believe how hard it is to develop a cupcake that you can’t taste test yourself! They agreed that the cupcake was good, but wasn’t quite cannoli-ey enough. We were able to brainstorm some ideas and I also reached out to my baking buddy, Megan.

With the input from all of these lovely bloggers and Hubby, I came up with a concept for the cannoli cupcake that I was confident would work. And boy did it work! I got tons of compliments from the shower guests about the cupcakes.
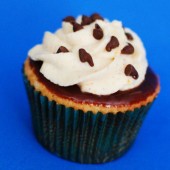
I started with my favorite yellow cupcakes. After they were completely cooled, I cut a cone out of each one. Some of these cones may or may not have been snacked on while assembling these cupcakes… The rest of the cones were thrown into a ziplock bag and put in the freezer. I like to do this so that I have little pieces of cake around for snacking whenever the craving hits.

Once the cones were cut out, I dipped the cupcakes in ganache. Last, I made a big batch of cannoli filling. Megan had told me about when she made cannolis with the Daring Bakers, so I used that filling recipe. Again, I couldn’t taste test it, so I can’t vouch to the taste myself, but everyone loved it. Instead of just filling the cupcakes with the filling, I just kept going and piped a swirl of frosting all at once to maximize the amount of ricotta filling in the cupcakes (I’ve done this before). And last, I topped with mini chocolate chips to round out the look.

I’d like to thank everyone who helped me come up with this recipe. It was a lot of fun collaborating with other people to come up with something that was really well received!
One Year Ago: Roasted Asparagus and Strawberry Cobbler
Three Years Ago: Blueberry Lemon Cookies, Stuffed Tomatoes, and Cookie Dough Chocolate Ice Cream Cupcakes


Cannoli Cupcakes
Yield: 24-27 cupcakes
Ingredients:
For the Cannoli Cupcakes
1 batch yellow cupcakes
Chocolate ganache (recipe below)
Ricotta filling (recipe below)
Mini chocolate chips, for decoration
For the Chocolate Ganache
1/2 cup heavy cream
1/2 Tbsp unsalted butter
6 oz semisweet chocolate, chopped into 1/2-ounce pieces
For the Ricotta Filling
32 ounces ricotta cheese, drained
1 2/3 cups powdered sugar
1/2 tsp cinnamon
1 tsp vanilla
2 Tbsp grated orange zest
Directions:
For the Chocolate Ganache
Heat the heavy cream and the butter in a saucepan over medium high heat. Bring to a boil.
Place the semisweet chocolate in a stainless steel bowl. Pour the boiling cream over the chocolate and allow to stand for 5 minutes. Stir until smooth.
For the Ricotta Filling
Line a strainer with cheesecloth. Place the ricotta in the strainer over a bowl, and cover with plastic wrap and a towel. Weight it down with a heavy can, and let the ricotta drain in the refrigerator for several hours to overnight.
In a bowl with electric mixer, beat ricotta until smooth and creamy. Beat in confectioners' sugar, cinnamon, and vanilla, and blend until smooth. Transfer to another bowl, and stir in zest. Chill until firm. (The filling can be made up to 24 hours prior to filling the shells. Just cover and keep refrigerated.)
To assemble the cupcakes
Make the ricotta filling in advance. Bake the cupcakes and allow to cool. While cupcakes are cooling, prepare chocolate ganache.
Once cupcakes are completely cooled, use the cone method to remove a cone from the cupcakes.
Dip the tops of each cupcake in the ganache.
Fill and frost the cupcakes with the ricotta filling. Sprinkle with mini chocolate chips.
Ricotta Filling Recipe as seen on Delicious Dishings


 I am Jen the Beantown Baker. Engineer by day and baking maven by night. Hubby serves as my #1 fan and official taste tester. We got hitched back in 2006. Barefoot. In the sand. With the waves crashing behind us. It was one of the best decisions we’ve ever made.


These sound incredible! I love the combination of strawberry and chocolate with cream cheese! Awesome!
Mmmm ice cream cupcakes… what could be more perfect for summer?! I love the layers :).
These cupcakes are super cute! 🙂 Neapolitan is such a classic flavor combo, and SO GOOD! 🙂