


Homemade Three Musketeer Candy Bars
Halloween is almost here so I’ve been in the mood for candy! Hubby claims he’s not a big fan of chocolate, but he’s never turned down anything I give him to taste. With that being said, if there was candy in the house, I’d eat about 99% of it. I can’t really control myself around candy. That’s why we never buy any.

Since we won’t get trick or treaters for Halloween because of living in a condo building, I can’t justify breaking our “No Candy in the House” rule, so I decided instead to make some candy. Because if I make it, the rule isn’t broken.
These little candy bars are pretty awesome. They taste just like a Three Musteteer’s bar. I kept them in the freezer because I like my candy frozen.
One Year Ago: Pecan Pie Cookies
Two Years Ago: Keilbasa and Kraut in the Crockpot
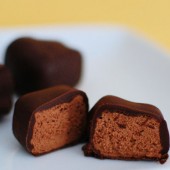


Homemade Three Musketeer Candy Bars
Ingredients:
2 cups semi-sweet chocolate chips
1 (8 oz.) tub frozen whipped topping, thawed
2 cups milk chocolate chips
2 tablespoons vegetable oil
Directions:
Line an 8 or 9-inch square pan with wax paper.
In a medium bowl, melt semi-sweet chocolate chips in the microwave at fifty percent power, or use a double boiler.
Using an electric mixer on high speed, beat melted chocolate for about 30 seconds.
Add whipped topping to melted chocolate and beat until well combined and fluffy, 30-60 seconds more.
Spread chocolate mixture evenly into prepared pan (if mixture is too stiff, press into pan with lightly dampened hands). Place in freezer for 30 minutes.
Remove pan from freezer and turn chocolate mixture onto a cutting board; cut into one-inch squares. Return squares to freezer for another 15-20 minutes.
Meanwhile, melt milk chocolate chips with 2 tablespoons of vegetable oil and stir until well combined. Dip frozen chocolate squares into melted chocolate to coat. Place on wax paper to set. Keep chocolates in an airtight container in the refrigerator.
Recipe as seen on One Ordinary Day, originally from Let's Dish

Don’t forget about my Power of Pink Challenge – make something PINK by the end of the month to raise Breast Cancer Awareness!

 I am Jen the Beantown Baker. Engineer by day and baking maven by night. Hubby serves as my #1 fan and official taste tester. We got hitched back in 2006. Barefoot. In the sand. With the waves crashing behind us. It was one of the best decisions we’ve ever made.







Peanut butter and chocolate is my most favorite combination ever! I’m so happy you love your kitchen and it’s really sweet of you to bake for your designer. Homemade treats are such a delicious way to say thank you:)
Oh wow – these look like the best brownies ever. Beautiful!
Amazing looking brownies!
Does your designer sign on for small projects? We’re looking to add some backsplash. The area behind the sink and stove is just so plain.
Megan, Our designer works at Home Depot in the kitchen department. So I think she only does projects where you order cabinets/countertops from Home Depot…
We start kitchen destruction at the end of the week! I’m so excited!! Great idea about the counter on top of the radiator!! I’d be totally excited is someone showed up to my work with those brownies 🙂
Ahhhhhhhhhhhhh!! those look sooooooo good!!
Oddly enough I don’t like chocolate or PB on their own but together it’s a whole other story! LOVE it so this is right up my alley.
~ingrid
Yours look great! I am glad you liked them. I was very pleasantly surprised when I tried this for the first time. (And fantastic pictures!)
Can’t wait to try the recipe- thanks! When do we get to see pics of the new (finished) kitchen? 🙂
Peanut butter and brownies! What could be better?
These look phenomenal, what an awesome way to spice up some brownies!
Yum, these look fabulous!
Those look Heavenly!
MMMMM I could seriously go for a whole plate full of those right now!!