


Mint Brownies
While I absolutely LOVE Ina’s Outrageous brownie recipe (especially the Oreo variation), it is a somewhat demanding recipe. It requires a over a pound of chocolate, a pound of butter, and 7 eggs. I don’t always have all of those ingredients on hand. While it’s definitely my favorite brownie recipe for special occasions, I think I’ve found a more suitable recipe to use when the craving for a great brownie hits. The recipe uses cocoa and other ingredients that I always have in the house.

I’ve actually made this recipe before. I’ve jazzed it up with some peanut butter earlier this year and more recently with a cookie dough topping. This time I decided to add a mint flavor since I had some Andes baking chips in the cabinet. I guess I’ve never actually made this brownie recipe as-is, but after making all these variations of the recipe, I can vouch that it’s a great recipe.

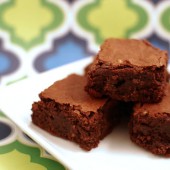


Mint Brownies
Ingredients:
1 cup (2 sticks) unsalted butter
2 1/4 cups sugar
4 large eggs
1 1/4 cups Dutch-process cocoa
1 teaspoon salt
1 teaspoon baking powder
1 teaspoon espresso powder, optional
1 tablespoon vanilla extract
1 1/2 cups all-purpose flour
2 cups Andes baking chips
Directions:
Preheat the oven to 350°F. Lightly grease a 9" x 13" pan
In a saucepan set over low heat, melt the butter, then add the sugar and stir to combine. Return the mixture to the heat briefly, just until it's hot, but not bubbling; it'll become shiny looking as you stir it. Heating this mixture a second time will dissolve more of the sugar, which will yield a shiny top crust on your brownies.
Transfer the sugar mixture to a medium-sized mixing bowl, if you've heated it in a saucepan. Stir in the cocoa, salt, baking powder, espresso powder, and vanilla.
Whisk in the eggs, stirring until smooth.
Add the flour and chips, again stirring until smooth. My chips started to melt a bit while I stirred them in. That's ok though.
Spoon the batter into a lightly greased 9" x 13" pan.
Bake the brownies for about 30 minutes, until a cake tester inserted into the center comes out clean, or with just a few moist crumbs clinging to it. The brownies should feel set on the edges, and the center should look very moist, but not uncooked. Remove them from the oven and cool completely prior to cutting.
Recipe adapted from King Arthur Flour


 I am Jen the Beantown Baker. Engineer by day and baking maven by night. Hubby serves as my #1 fan and official taste tester. We got hitched back in 2006. Barefoot. In the sand. With the waves crashing behind us. It was one of the best decisions we’ve ever made.







I too didn’t have a pan big enough for a water bath. I just cooked it for 1 hour and 30 minutes and then let it cool on a wire rack for 30 minutes. I didn’t even cool it in the oven. I haven’t tasted it yet, so I don’t know if it turned out ok…but it looks just like my other that I made.
Hey if it tastes good who cares what it looks like?!
Regardless of how it looks, it’s the taste that matters! My cheesecakes look similar when I don’t do a water bath. Another idea with cheesecake is to make cheesecake truffles with leftovers (that is, if you even have any!) 🙂
If you get an answer to your cake running over problem would you mind sharing it? I had the same problem, despite the fact my pan met Dorie’s requirements. I’m also curious where I went wrong.
I’ve had similar problems, especially with the cracking, which I believe is from cooking too long. Once I started taking cheese cakes out based on time and not appearance the problem went away. I think a lot of cooking still takes place from the internal heat…just a theory…BTW, great marble effect on your cake!
Aawwww poor little cheesecake. To be honest I am not sure why your cheesecake fell but I know when I make cheesecake mine always bakes more evenly when I use a water bath also if the internal temperature reaches 160F (don’t quote me) it starts to make the cheesecake crack. Maybe next time don’t bake it as long? Either way taste is the most important IMO. 🙂
Clara @ iheartfood4thought