


S’mores Cupcakes
 I’ve been waiting in anticipation to post these cupcakes since May! My little sister, Goob was in town to meet our nephew and spent the day over at my place for us to just hang out. I asked her what she wanted to do and she said bake! I gave her a couple recipes I had been saving up and let her pick.

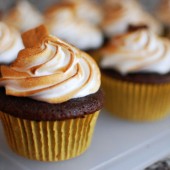
I was excited when Goob picked this one because they look amazing and, lets face it, using a kitchen torch is awesome. Don’t worry, I was the one manning the torch. Goob did the styling by putting on the garnishes and piped some of the frosting.
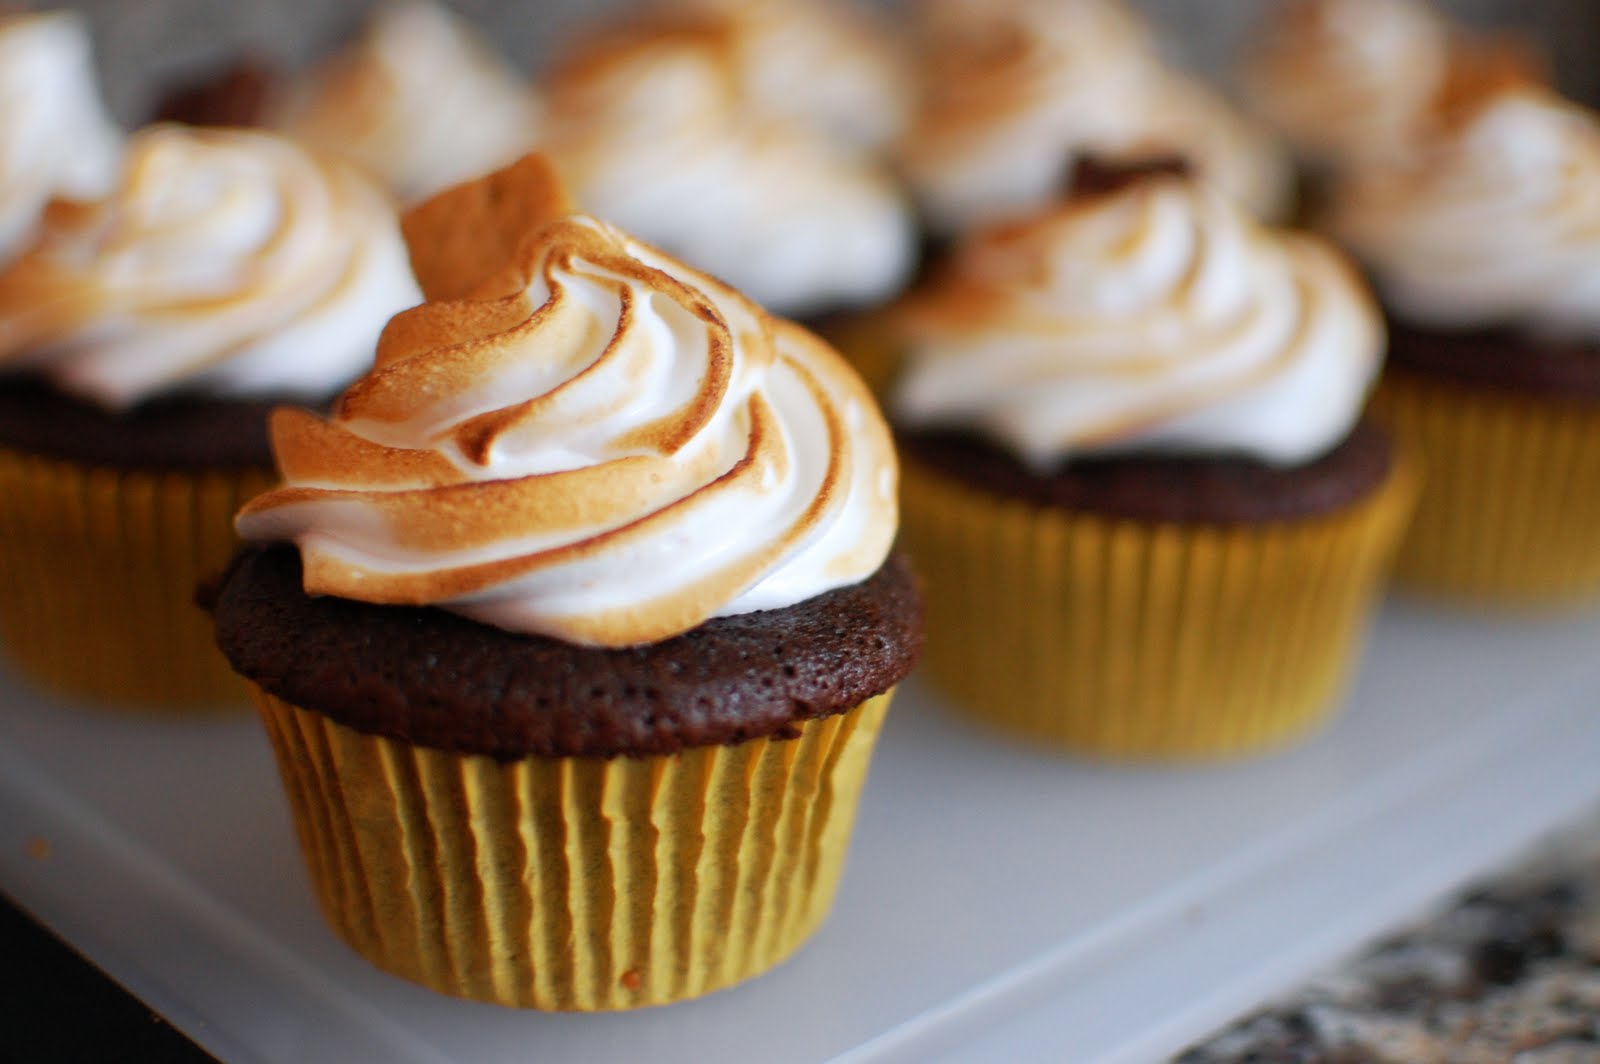
We shared these cupcakes with our family and everyone gobbled them right up. We all agreed that while they were reminiscent of s’mores, they really don’t taste like a s’mores. I think its because of the textural differences between a s’mores and a cupcake. Either way, these are really good.

I’m not sure how Goob got her nickname, but I think that’s how it goes with nicknames, right? She also responds to Goobie-Goo in case anyone was wondering. Sometimes she calls me her Jenni-poo. It’s cute, but I digress.

My favorite part of these cupcakes was the frosting. I could have just eaten it by itself. It tasted like a warm gooey marshmallow. YUM.

We did have some left over after frosting all of the cupcakes. So we piped some onto graham crackers for a little s’mores snacks. And of course, we torched the frosting!
Two Years Ago: M&M Cookies
Three Years Ago: White Chocolate and Blueberry Cupcakes


S'mores Cupcakes
Yield: 24
Ingredients:
For the Cupcakes
2 cups plus 2 Tbsp sugar
1 3/4 cups flour
3/4 cup plus 1 Tbsp cocoa powder (not Dutch-processed)
1 1/2 tsp baking powder
1 1/2 tsp baking soda
1 tsp salt
2 eggs
1 cup whole milk
1/2 cup vegetable oil
2 tsp pure vanilla extract
1 cup boiling water
1 1/2 cups graham cracker crumbs (from about 20 squares)
1/4 cup sugar
1/3 cup unsalted butter, melted
9 ounces bittersweet chocolate, finely chopped
For the Marshmallow Frosting
8 egg whites
2 cups sugar
1/2 tsp cream of tartar
2 tsp vanilla
Directions:
For the Cupcakes
Preheat oven to 350 degrees. Line 2 standard muffin tins with cupcake liners; set aside.
Sift sugar, flour, cocoa powder, baking powder, baking soda, and salt together into the bowl of an electric mixer. Using the paddle attachment, mix ingredients together on low speed.
In a large bowl, mix together eggs, milk, oil, and vanilla. Add to flour mixture and beat on medium speed for 30 seconds. Scrape down sides of bowl and continue mixing on medium speed for 2 minutes. Add boiling water and stir to combine; set cake batter aside.
Place graham cracker crumbs, remaining 1/4 cup sugar, and melted butter in a large bowl; stir until well combined.
Place 1 tablespoon graham cracker mixture into the bottom of each prepared muffin cup. Use the bottom of a small glass to pack crumbs into the bottom of each cupcake liner. Reserve remaining graham cracker mixture for topping.
Place 2 teaspoons chocolate in each muffin cup. Transfer muffin tins to oven and bake until the edges of the graham cracker mixture is golden, about 5 minutes. Remove from oven and fill each muffin cup three-quarters full with cake batter. Sprinkle each with remaining chocolate and graham cracker mixture. Return to oven and bake, rotating pans halfway through baking, until tops are firm and a cake tester inserted in the center comes out clean, 18 to 20 minutes. Transfer muffin tins to a wire rack and let cupcakes cool in pan for 10 minutes. Remove cupcakes from pan and let cool completely.
For the Marshmallow Frosting
Place egg whites, sugar, and cream of tartar in the heatproof bowl of an electric mixer. Set over a saucepan with simmering water. Whisk constantly until sugar is dissolved and whites are warm to the touch, 3 to 4 minutes.
Transfer bowl to electric mixer fitted with the whisk attachment, and beat, starting on low speed, gradually increasing to high, until stiff, glossy peaks form, 5 to 7 minutes. Add vanilla, and mix until combined. Use immediately.
Transfer frosting to a large pastry bag fitted with a large plain round or French tip. Pipe frosting in a spiral motion on each cupcake. Transfer cupcakes to a baking sheet. Using a kitchen torch, lightly brown the frosting, taking care not to burn the cupcake liners. Serve immediately or store in an airtight container, up to 2 days.
Recipe from Lovin in the Oven, frosting from Martha Stewart

Don’t forget about my Power of Pink Challenge – make something PINK by the end of the month to raise Breast Cancer Awareness!


 I am Jen the Beantown Baker. Engineer by day and baking maven by night. Hubby serves as my #1 fan and official taste tester. We got hitched back in 2006. Barefoot. In the sand. With the waves crashing behind us. It was one of the best decisions we’ve ever made.


I LOVE LOVE LOVE brownies!!! Will definitely try out this recipe… soon.
(Just can’t let my husband know, who is a personal trainer, lol!)
These were seriously the best brownies ever! I can’t wait to re-use this recipe!
Those look outrageously delicious!!!
I love me a good brownie – but can you believe that I haven’t actually made homemade brownies. I really must change that!!
Who doesn’t love brownies?! I don’t know if I could wait a whole night and not devour these immediately out of the oven!
Yum! I love brownies! I’m thinking I actually might make some right now 🙂
You have way more willpower than I do. I rarely let brownies cool. I love when they’re warm and gooey… and yes, then throw some vanilla ice cream and hot fudge and whipped cream on top!
I was good, and I let my KAF brownies rest overnight though.
I added myself to follow your blog. You are more than welcome to visit mine and become a follower if you want to.
God Bless You ~Ron
HAHA, I totally cracked up at this post for two reasons: I love that you used the expression “Get outta town!” and that you posted the pic of our brownies that were, the best brownies ever. See? We just knew..
Great post, as always!
These look sinfully delicious 🙂