


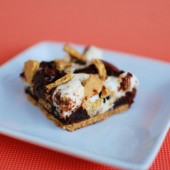
S’mores Brownies
 Imagine what a s’mores would taste like if you used a fudgey brownie instead of a small piece of chocolate. That’s what these little guys taste like. You get a nice crunch from the graham cracker on the bottom, then a fudge like brownie layer, topped with more chocolate, chunks of graham crackers, and mini marshmallows.

As I mentioned the other day, I like my marshmallows to be charred when I make s’mores. So when I made these brownies, I had to toast the marshmallows. I busted out my kitchen torch and charred the toppings. It was a lot of fun to come up with another excuse to use my kitchen torch. It’s just so fun!

I read some reviews that the brownie layer was a bit dry, so I was extra careful not to let that happen. In the end I think my brownies were a bit underbaked, but that gave them a gooey fudge like consistency that was perfect for these brownies.

Everyone at work LOVED these guys. And they were so easy to throw together. If you’re in the mood for smores, give these a shot!


S'mores Brownies
Yield: 36
Ingredients:
10 graham crackers, broken in half (20 squares), divided
3/4 cup butter
4 oz unsweetened Chocolate
2 cups sugar
3 eggs
1 tsp vanilla
1 cup flour
2-1/2 cups miniature marshmallows
1 cup semi-sweet chocolate chunks
Directions:
Heat oven to 350°F.
Line 13x9-inch pan with foil; spray with cooking spray. Place 15 grahams in pan, with sides overlapping slightly. Break remaining grahams into pieces.
Microwave butter and chocolate squares in large microwaveable bowl on high 2 min.; stir until chocolate is completely melted. Add sugar, eggs and vanilla; mix well. Stir in flour. Pour over grahams in pan.
Bake 30 to 32 minutes or until toothpick inserted in center comes out with fudgy crumbs. Do not overbake.
Sprinkle with marshmallows and chocolate chunks. Bake 3 to 5 min. or until marshmallows begin to puff. Press reserved graham pieces gently into marshmallows.
(Optional) Using your kitchen torch, toast the marshmallows.
Cool. Use foil to lift brownies from pan before cutting to serve.
Recipe from Kraft

Don’t forget about my Power of Pink Challenge – make something PINK by the end of the month to raise Breast Cancer Awareness!


 I am Jen the Beantown Baker. Engineer by day and baking maven by night. Hubby serves as my #1 fan and official taste tester. We got hitched back in 2006. Barefoot. In the sand. With the waves crashing behind us. It was one of the best decisions we’ve ever made.


I am OBSESSED with French macarons. I want little bakeries all over Boston selling them. I promise to be a good customer 😉
Both of your version sound (and look) absolutely delicious!!
Looking forward to seeing what you and Megan bake next.
I am OBSESSED with French macarons. I want little bakeries all over Boston selling them. I promise to be a good customer 😉
Both of your version sound (and look) absolutely delicious!!
Looking forward to seeing what you and Megan bake next.
You should definitely get her cookbook. I’ve had mine for a few months now and it’s very drool-worthy.
That could be. It was a bit nerve-wracking to tell when they were mixed enough…
Let me know how it turns out for you.