


Homemade Peeps
Whenever Megan and I get together for our baking dates, there are always emails flying back and forth about what we’re going to be baking. After our first baking date, we agreed that we could handle three recipes this time around. We talked about all sorts of ideas and at one point had a list of about 12 things we might be interested in doing. With Easter and Mother’s Day coming up, we decided it would be fun to do a couple spring recipes. Today we’re both posting the first of the three recipes we decided on – Homemade Peeps!

I LOVE Peeps. They have to be my favorite Easter candy. I always let mine get a little stale before eating them. When we decided to make homemade peeps, we actually had a hard time finding details about how to shape them. I thought I remembered Alton Brown making them in his marshmallow episode, but after going back and watching it (I have about 50 episodes of Good Eats stored on my DVR), I realized that he actually used a tin mold to make his peeps.

Luckily, Martha Stewart had a recipe and instructions for making “Homemade Easter Treats”. She had instructions for bunnies and chicks. We were wishing for some step by step photos, and found then on Serious Eats.

We were originally going to use the AB recipe that I use for marshmallows, but then we noticed that Martha’s recipe didn’t have corn syrup. Since the AB recipe gives marshmallows that are very fluffy, we were worried they wouldn’t hold their shape, so in the end we went with Martha’s recipe. We did add a pinch of salt and some vanilla to make sure the flavor was still delicious.
Megan and I have both made marshmallows before so we knew it would be a race against the clock to get our Peeps piped before the marshmallow became too difficult to work with. So during the last couple minutes in the mixer, we got our work station set up. I chose to use pink sprinkles, and Megan chose yellow.

We spread some sprinkles directly onto the counter. This serves as a buffer so the peeps don’t stick to the countertop. We both reread the instructions one more time, filled up our piping bags and went to town. We both used #12 tips to pipe our Peeps.
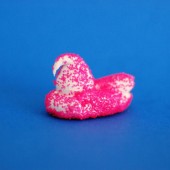
Piping Peeps is actually really hard. Once we started we understood why step by step photos were so hard to find. It would be really hard to do that… We definitely had some that looked nothing like chicks and more like just a mound of sugary goodness…

At one point, I got confident that I had come up with a process that worked for me, so I had Megan take this video. As you can see, I started by making a tear-drop shaped base. Then I added the neck and the beak. You can also see that the marshmallow was starting to get difficult to work with.
Once you pipe your shape, you then sprinkle colored decorating sugar over the entire animal. I am still finding pink and yellow sprinkles in the most random places! Making Peeps was definitely something fun to do, but I’m not sure that I’d do it again… They did taste amazing and everyone was impressed that I made homemade Peeps. If you’re ever feeling adventuresome, I recommend giving it a shot, but be ready to be a little frustrated and covered in sprinkles.
Three Years Ago: Plum Rolls (Zwetschgenschnecken)


Marshmallows for Piping
Yield: 1 1/2 cups
Ingredients:
1 unflavored gelatin (2 1/2 tsp)
1/3 cup cold water, for gelatin, plus 1/4 cup for syrup
1 cup sugar
Directions:
In the bowl of an electric mixer, sprinkle gelatin over 1/3 cup cold water. Allow gelatin to soften, about 5 minutes.
In a small saucepan, combine 1/4 cup water and sugar, and stir over medium-high heat until sugar is dissolved. Stop stirring, and place a candy thermometer into sugar water; wipe sides of pan with a wet brush if sugar crystals have splattered up. Boil sugar until temperature reaches the soft-ball stage (238 degrees). Remove syrup from heat; add to softened gelatin. Using the whisk attachment of an electric mixer, hand-stir the mixture a few minutes to cool; place bowl on the mixer stand. Beat on medium high with the whisk attachment until soft peaks form and the marshmallow mixture holds shape, 8 to 10 minutes.
Transfer marshmallow mixture to a large (14-inch) pastry bag fitted with a 1/2 inch (No. 12 Ateco) tip, and use immediately.
Recipe from Martha Stewart

Don’t forget about Bloggers Bake for Hope – Bloggers Bake. You Bid. 100% of proceeds go to Komen for a Cure. Register to bake by April 30th, come back for bidding May 4-6.


 I am Jen the Beantown Baker. Engineer by day and baking maven by night. Hubby serves as my #1 fan and official taste tester. We got hitched back in 2006. Barefoot. In the sand. With the waves crashing behind us. It was one of the best decisions we’ve ever made.


Hi my loved one! I wish to say that this article is amazing, great written and come with approximately all important infos.
I’d like to see extra posts like this .
This cranberry sauce sounds great! I love, love, love cranberry sauce (so much I make it all November and December as a side for dinner). Definitely may be giving this one a try soon
beantownbaker — November 24th, 2013 @ 5:42 pm
Glad to hear I’m not the only one who eats cranberry sauce on days that aren’t holidays!
This cranberry sauce sounds so perfect 🙂 I love it!
This looks lovely! When you say to add everything except the sugar are you referring to the white sugar only? So the brown sugar would still go in with the port, balsamic, figs, herbs, etc.? Thanks!
beantownbaker — November 24th, 2013 @ 5:44 pm
Sorry about the confusion. I updated the recipe. Yes, add the brown sugar, but not the white sugar.
Hello, made this cranberry sauce and it was great. Loved the flavors in it. We also made traditional cranberry sauce (with OJ) so I do have both kinds leftover. Can’t wait to bake with both of them in some muffins. Thanks
beantownbaker — December 4th, 2013 @ 11:53 am
Glad you enjoyed it. I have some leftover too. I think I’m going to make some bars out of the leftovers…