


Peppermint Fudge Brownies
Does anyone else remember those York Peppermint Patty commercials from when we were younger? Where people would “feel the sensation” during random activities?

I’ve been feeling the sensation for the past couple of weeks thanks to some mini York Peppermint Patties that I’ve been storing in the fridge. They have been really hitting the spot as the temperature increases in Boston.

When I was brainstorming ideas of what to bring to our friends for a cookout last week, I reached into the fridge to grab one of these cool minty treats and it hit me. Brownies with York Peppermint Patties had to be an amazing treat.

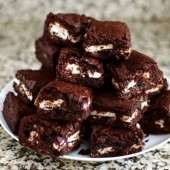
So I whipped up a batch of my favorite brownies, and added a layer of York Peppermint Patties in the middle. I packed as many of those little York Peppermint Patties into the pan as I could. The resulting brownie was minty, fudgey, and indulgent. They were a big hit at the cookout and taste even better slightly chilled.


Peppermint Fudge Brownies
Mint and chocolate make such a great pair, it's no wonder these brownies were such a big hit!
Yield: 24 brownies
Ingredients:
1 cup (2 sticks) unsalted butter
2 1/4 cups sugar
1 1/4 cups cocoa
1 tsp salt
1 tsp baking powder
1 tsp espresso powder, optional
1 Tbsp vanilla
4 eggs
1 1/2 cups flour
2 cups chocolate chips
~1.5 lbs Mini York Peppermint Patties (~45 patties)
Directions:
Preheat the oven to 350°F. Lightly grease a 9" x 13" pan
In a saucepan set over low heat, melt the butter, then add the sugar and stir to combine. Return the mixture to the heat briefly, just until it's hot, but not bubbling; it'll become shiny looking as you stir it. Heating this mixture a second time will dissolve more of the sugar, which will yield a shiny top crust on your brownies.
Transfer the sugar mixture to a medium-sized mixing bowl, if you've heated it in a saucepan. Stir in the cocoa, salt, baking powder, espresso powder, and vanilla.
Whisk in the eggs, stirring until smooth.
Add the flour and chips, again stirring until smooth.
Spoon 1/2 of the batter into a lightly greased 9" x 13" pan. Top with peppermint patties - be sure to place the candies as close together as possible to ensure each bite has a bit of candy in it. Spoon remaining batter on top of candy.
Bake the brownies for about 30 minutes, until a cake tester inserted into the center comes out clean, or with just a few moist crumbs clinging to it. The brownies should feel set on the edges, and the center should look very moist, but not uncooked. Remove them from the oven and cool completely prior to cutting.
Recipe adapted from My Go-To Brownie Recipe

 I am Jen the Beantown Baker. Engineer by day and baking maven by night. Hubby serves as my #1 fan and official taste tester. We got hitched back in 2006. Barefoot. In the sand. With the waves crashing behind us. It was one of the best decisions we’ve ever made.


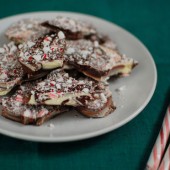
I love the red swirl in these. They look so festive! Homemade marshmallows are seriously so much better than store-bought.
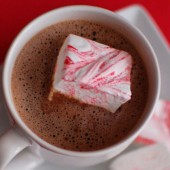
Completely agree Megan. And the best part is they melt and get all gooey in the hot chocolate!
gorgeous! and so festive. what a great idea.
These are awesome! I’m sure your friends and family will love this thoughtful gift!
these are the prettiest marshmellows I have ever seen. you could make them for every winter season (throw some sparkles in for news years, green for st pattys. pastels for easter!) oh the possibilities.
So pretty! I hear people talk about how easy it is to make homemade marshmallows all of the time – I’ve really got to make some.
Peppermint marshmallows? I think this is the first time I am hearing about it. Anyway it sounds fun and looks yummy.
Looks great!
I bought all the ingredients for marshmallows but haven’t made them yet.. this peppermint variety sounds awesome though!
I really need to get off my butt and make some homemade marshmallows! No excuses!
-Amanda
These are so darned pretty, and festive! Happy holidays!
holy clever. these look so yummy.
Those look so professional. It’s amazing what a little red food coloring can do.
These are beautiful! I have made marshmallows a few times, and only once have I had a problem with them.. I put them into an airtight container and came back about an hour later to find that they had been – at least what it looked like to me – weeping. I’m not sure what happened, I dusted them with powdered sugar after cutting, and thought I did everyting right. I was curious if anything like that has that happened to you before? These marshmallows look like perfection!
those would be great in a cup of hot cocoa!
Jen…these are GORGEOUS!! I keep meaning to try my hand at marshmallow making. These look divine!
Caroline,
I have never had that problem myself. It sounds like there may have been a lot of humidity in the air? Was it during the summer? I haven’t made marshmallows during the summer yet, but that’s the first thing that pops to mind.
I found your site from Pioneer Woman’s Group 3 photography assignment. Congrats on being selected!!
I love the photo and am looking forward to trying your marshmallow recipe.
I’m looking forward to looking at your other posts, too. 😉
Stef at TooMuchToDoSoLittleTime.com
Where can one buy a marshmellow make/machine??
I cannot wait to make these peppermint marshmallows at the holidays. They are so pretty and looks so nice in that hot chocolate!
Your pictures look soooo amazing 🙂 I did a blog recently about marshmallows (If you are interested – http://joandsue.blogspot.com/2011/07/great-marshmallow-debate.html ) Homemade marshmallows are rediculously addictive!
Important pre-holiday question: how big are the gift bags you use for your marshmallows &/or hot cocoa mix? I’m looking at the “smalls” from KA (14.5″ x 6″), but I really have zero intuition for how that size translates to volume of, e.g, marshmallows. =) thanks!
beantownbaker — November 8th, 2011 @ 8:26 am
Great question. I will have to go home and check the size of the bags. I know I got them at Michaels. The marshmallows went into small bags that were almost a smidge too small and the hot cocoa went into larger bags. I’m sure that isn’t very helpful… Let me get back to you on that.
beantownbaker — December 19th, 2011 @ 9:00 pm
Ok I didn’t have any of the bags left. Both of them were Wilton brand from Michaels craft store. Based on what I see online, it looks like the marshmallows were in a bag that was 3″x4″. They were a smidge small. The cocoa mix was in a bigger bag, looks like 4″x6″ and those were just the right size.
I’m not sure what I did wrong but these were a total disaster! The marshmallow wouldn’t pour out of the bowl and seemed like it had already begun to set by the time I was taking it out (even though I only kept it in the mixer for about 13 minutes). Do you think they were in the mixer for too long? I was going by timing as well as thick/lukewarm but maybe it was still too long. The bit of them that I could get into the pan wouldn’t spread so I couldn’t even use what I had because they would have been horribly shaped and not gift-worthy. I ended up having to just dump everything in the trash. I’m so disappointed because I was really looking forward to an easy homemade gift for co-workers.
beantownbaker — December 19th, 2011 @ 8:59 pm
So sorry to hear that they didn’t turn out for you 🙁
LadyPerson — January 1st, 2012 @ 12:58 am
You probably cooked the sugar syrup too long. I bet if you’d let them fully set, you’d have ended up with harder than normal marshmallows. Check your candy thermometer to make sure it’s accurate.
Sounds like you didn’t cook the sugar syrup long enough. They MUST get to the proper temperature, or the marshmallows won’t set properly. If the syrup didn’t cook enough, the resulting marshmallow will be too soft and won’t hold it’s shape properly. Cook it too long, and the marshmallows will be too hard when you want fluffy.
Jenny K., Colorado — November 29th, 2012 @ 3:04 pm
I would like to add that when cooking candy to a certain temperature, you must take into account your altitude. I have not made these yet, but will adjust to my own 6,000 feet in altitude. For example, when making English Toffee, I adjust 8 degrees LOWER for the target temperature. Otherwise, it overcooks.You can Google “altitude adjustments for candy making” .
Would a hand mixer work or would the marshmallows burn out the motor?
beantownbaker — December 1st, 2012 @ 9:38 pm
I’ve never done it with a hand mixer, but I do know that my stand mixer gets pretty hot while it’s whipping up the marshmallows…
Mary Christmas — December 21st, 2012 @ 2:08 pm
I made these last night with a simple handmixer & whisk attachment (Hamilton Beach® 6-Speed Hand Mixer)…worked great! It has a “bowl rest” so your arm doesn’t get too tired 🙂
beantownbaker — December 21st, 2012 @ 9:12 pm
So glad it worked out for you!
Anyone know if an alternative syrup would work (like light brown rice syrup)? I want to make these but my son is allergic to corn. Thanks!
beantownbaker — December 15th, 2012 @ 9:40 am
I have never tried a substitute. Maybe another reader will know. If you experiment and find something that works, let me know!
Delicious, and they look just like the picture!!
To save your pan, lay down foil first, and then spray with cooking spray and the powder mixture as instructed. At the end, lift the foil out to dump the marshmallows on the cutting board.
beantownbaker — December 21st, 2012 @ 9:11 pm
Great tip!