


Neapolitan Cheesecake Cake
Remember the cake from my first fondant adventure? I promised I’d provide details about the inside, so here we are. And, I have the winner of the giveaway. But first, let’s talk cake.

I came up with the idea for this cake a couple months ago. After the Carrot Cake Cheesecake Cake got posted, I started thinking about other cakes that would go well with cheesecake. I brainstormed a bunch of ideas – the possibilities are endless!

Hubby and I really enjoyed this cake, although it probably wasn’t the best choice for my first fondant adventure. Since I was making the layers for my cake and Megan’s cake, I made these layers about a week early and wrapped them up and put them in the freezer. As my layers were defrosting, there was moisture on the outside of the fondant, which made things a bit sticky.

You can also see in the pictures that my cheesecake wasn’t firm enough to hold up the top layer. As the cheesecake layer came to room temperature, it kind of flattened out a bit. I think this happened because it was a bit undercooked. Lesson learned. Even with the imperfections in my execution of this cake, I highly recommend giving it a shot.
I almost forgot. I had Random.org choose a number for the fondant giveaway. Congratulations Angela Wilkinson!! Please email me to claim your prize!
One Year Ago: Caramelized Apple Grilled Cheese
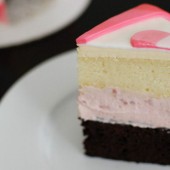


Neapolitan Cheesecake Cake
Ingredients:
1 layer chocolate cake
1 raspberry cheesecake, recipe below
1 layer yellow cake
For the Raspberry Cheesecake
1 1/4 pounds bar cream cheese (20 oz), room temperature
3/4 cups sugar
1/2 tsp finely grated lemon zest, plus 1/2 tablespoon fresh lemon juice
1/4 tsp coarse salt
2 eggs
1/2 cup sour cream
1 cup raspberries, mashed or pureed
Directions:
Bake the cake layers. Remember that one 9" round layer uses the same amount of batter as 12 cupcakes. One 6" round layer uses the same amount of batter as 6 cupcakes. Be sure to scale your recipes accordingly.
The layers can be made in advance and frozen if necessary.
Plate the chocolate layer on a cake round. Add the raspberry cheesecake layer. Top with the yellow cake. Frost with your favorite frosting. I would recommend a cream cheese frosting for this cake.
For the Raspberry Cheesecake
Preheat oven to 325 degrees. Set a kettle of water to boil. Using an electric mixer, beat cream cheese on medium until fluffy, scraping down side of bowl. Gradually add sugar, beating until fluffy. Beat in lemon zest and juice, and salt. Beat in eggs, one at a time, scraping down side of bowl after each addition. Beat in sour cream. Stir in pureed raspberries.
Cut parchment paper in a circle and line the bottom of the cheesecake pan. Wrap bottom half of pan in foil. Pour in filling; place in a roasting pan. Pour in boiling water to come halfway up side of springform. Bake until just set in center, about 45 minutes. Remove pan from water; let cool 20 minutes. Run a paring knife around edge; let cool completely. Cover; chill overnight, then wrap in plastic wrap and freeze.
Raspberry Cheesecake recipe adapted from Martha Stewart


 I am Jen the Beantown Baker. Engineer by day and baking maven by night. Hubby serves as my #1 fan and official taste tester. We got hitched back in 2006. Barefoot. In the sand. With the waves crashing behind us. It was one of the best decisions we’ve ever made.







OH MY GOSH – THOSE LOOK AMAZING.
Seeing those pictures again reminds me just how tasty they were. I’m all about you making another batch, they were amazing the first time!!
Haha those are good. I could inhale a whole batch myself I’m pretty sure… I just had a thought… Rerack finals? I’m adding them to my baking list 🙂
These look great! I’m sure your guests loved them
Thanks for sending this into bookmarked recipes
Ruth
I have a whole packet of miniature marshmallows I had brought to make rocky road…however plans are just “plans” as of now…guess will try these instead.
thanks for sharing this wonderful recipe 🙂
these just look too delicious not to try. 🙂
WOW, this looks so good! I definitely have to try it…I love rice krispie treats and this looks like an awesome version.
We call these crack brownies here at our house 🙂
That’s a very good name for these!!
I made these for food day at the office and they were a huge hit. I used the 9 x 13 pan and an entire bag of mini-marshmallows. Everyone agreed they got better each day.