


Apple Cranberry Cake-Pie

I had so much fun doing my Week of Cupcakes back in August and my Week of Pumpkin in October, that I’m back for another Week of… This time I’m featuring cranberries! Until last year, I had never eaten a cranberry. Fresh or dried. Now I eat them all the time.
I remember seeing this recipe show up when TWD did it. I looked amazing so I had it bookmarked. Then we decided to have friends over to check out the new kitchen (yes, I realize I promised updated pictures a long time ago, I’ll get on that…)

Since we were hosting friends for dinner, I wanted to make a special dessert. I love the flavor combo of the apple and cranberries in this and the dough is great. It’s just like it sounds, somewhere between a cake and a pie.

I made a 1/2 batch and used an 8×8 pan. I also served this with ice cream. Then Hubby and I ate leftovers for breakfast for a couple days. If you like apple pie and cranberries, I highly recommend making this!

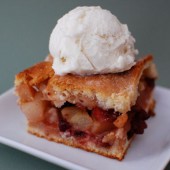


Russian Grandmothers' Apple Pie-Cake
Ingredients:
For The Dough
2 sticks (8 ounces) unsalted butter, at room temperature
1 cup sugar
2 large eggs
1 tablespoon baking powder
1/2 teaspoon salt
Juice of 1 lemon
3 1/4 - 3 1/2 cups all-purpose flour
For The Apples
10 medium apples, all one kind or a mix
Squirt of fresh lemon juice
1 cup moist, plump raisins - I used dried cranberries
1/4 cup sugar
1 1/4 teaspoons ground cinnamon
Sugar, preferably decorating (coarse) sugar, for dusting
Directions:
To Make The Dough
Working with a stand mixer, preferably fitted with a paddle attachment, or with a hand mixer in a large bowl, beat the butter and sugar together on medium speed until smooth, about 2 minutes. Add the eggs and continue to beat until the mixture is light and fluffy, about 3 minutes more. Reduce the mixer speed to low, add the baking powder and salt and mix just to combine. Add the lemon juice - the dough will probably curdle, but don't worry about it. Still working on low speed, slowly but steadily add 3 1/4 cups of the flour, mixing to incorporate it and scraping down the bowl as needed. The dough is meant to be soft, but if you think it looks more like a batter than a dough at this point, add the extra 1/4 cup flour. (The dough usually needs the extra flour.) When properly combined, the dough should almost clean the sides of the bowl.
Turn the dough out onto a work surface, gather it into a ball and divide it in half. Shape each half into a rectangle. Wrap the dough in plastic wrap and refrigerate for at least 2 hours, or for up to 3 days. (The dough can be wrapped airtight and frozen for up to 2 months; defrost overnight in the refrigerator.)
To Make The Apples
Peel and core the apples and cut into slices about 1/4 inch thick; cut the slices in half crosswise if you want. Toss the slices in a bowl with a little lemon juice - even with the juice, the apples may turn brown, but that's fine - and add the raisins. Mix the sugar and cinnamon together, sprinkle over the apples and stir to coat evenly. Taste an apple and add more sugar, cinnamon, and/or lemon juice if you like.
Getting Ready to Bake
Center a rack in the oven and preheat the oven to 375 degrees F. Generously butter a 9x12-inch baking pan (Pyrex is good) and place it on a baking shee tlined with parchment or a silicone mat.
Remove the dough from the fridge. If it is too hard to roll and it cracks, either let it sit at room temperature for about 15 minutes or give it a few bashes with your rolling pin to get it moving. Once it's a little more malleable, you've got a few choices. You can roll it on a well-floured work surface or roll it between sheets of plastic wrap or wax paper. You can even press or roll out pieces of the dough and patch them together in the pan - because of the baking powder in the dough, it will puff and self-heal under the oven's heat. Roll the dough out until it is just a little larger all around than your pan and about 1/4 inch thick - you don't want the dough to be too thin, because you really want to taste it. Transfer the dough to the pan. If the dough comes up the sides of the pan, that's fine; if it doesn't that's fine too.
Give the apples another toss in the bowl, then turn them into the pan and, using your hands, spread them evenely across the bottom.
Roll out the second piece of dough and position it over the apples. Cut the dough so you've got a 1/4 to 1/2 inch overhang and tuck the excess into the sides of the pan, as though you were making a bed. (If you don't have that much overhang, just press what you've got against the sides of the pan.)
Brush the top of the dough lightly with water and sprinkle sugar over the dough. Using a small sharp knife, cut 6 to 8 evenly spaced slits in the dough.
Bake for 65 to 80 minutes, or until the dough is a nice golden brown and the juices from the apples are bubbling up through the slits. Transfer the baking pan to a cooling rack and cool to just warm or to room temperature. You'll be tempted to taste it sooner, but I think the dough needs a little time to rest.
Recipe from Dorie Greenspan, as seen on A Whisk and A Spoon
Check out my week of Cranberries here.

 I am Jen the Beantown Baker. Engineer by day and baking maven by night. Hubby serves as my #1 fan and official taste tester. We got hitched back in 2006. Barefoot. In the sand. With the waves crashing behind us. It was one of the best decisions we’ve ever made.







Yum yum YUM! I love blueberry anything. I love cheesecake anything. Heaven!
I think Katrina’a blog is Baking and Boys!
Yum. The chewy oat crust sound great. Good pick!
I want to smoosh a whole batch of them in my mouth! Yummers!
I have been admiring these crumb bars for quite some time! Great pick for the SRC – fun to participate in this event with you 🙂
These are amazing. I make them for everything, bake sales, holidays and potlucks, and you can easily substitute whatever berries you have on hand. I’ve done mixed berries, raspberry and blackberry with this recipe! Thanks so much for sharing!
Best cheese ball in the world! I’ve been coming back to this recipe for years- so good!
There are lots of food blogger like this But the best food recipe “Fudgey Banana Brownies” is yours. Thanks for giving me this wonderful blog. I will try to make it like you. Best car Detailing services in delhi.