


Blondies
Hubby and I decided to send baked goods to our moms on Mother’s Day this year. Of course I was happy to help. I wanted to make something that would travel well and (of course) something I’ve never made. Since we were preparing for our kitchen renovation at the time, I also wanted to use up some of the random half bags of cookie mix ins.
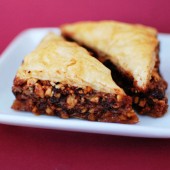
 Blondies fit my requirements perfectly. This blondie recipe is pretty well known. I made one batch with just dark chocolate M&Ms and another batch with some white chocolate chips, toffee bits, and chopped walnuts. Both batches turned out great and the one with the white chips turned out better than I expected. That combination of mix-ins tasted like butterscotch.
 Blondies – from Blonde Ambition in the Kitchen
6-7 TBS butter, melted
1 cup brown sugar
1 egg
1 tsp. vanilla extract
1/4 tsp salt
1 cup flour
1/4 tsp baking powder (optional, creates lighter blondie texture)
“Add in” (see below)
Preheat oven to 350.
Line an 8×8 pan with foil and lightly spray with PAM.
In a large microwave safe mixing bowl melt the butter. Allow to cool for 5 mintues. Mix the brown sugar with the melted butter and beat until smooth. Beat in egg and then vanilla. Add salt, stir in flour and baking powder (if using). Mix in any additions (some ideas below).
Pour into prepared pan and use a greased spatula to evenly spread mixture in pan and level the top. Bake for 20-25 minutes or until set in the middle. (I baked for 22 minutes)Cool on rack before cutting.
Add in ideas:
1/2 to 1 cup chocolate chips, peanut butter chips, white chocolate or butterscotch chips
1/2 cup chopped pecans, walnuts, almonds
1/2 cup M&M candies1/2 chopped Reese’s PB cups
1/4 cup toffee pieces
1/2 tsp mint extract in addition to, or in the place of vanilla extract


 I am Jen the Beantown Baker. Engineer by day and baking maven by night. Hubby serves as my #1 fan and official taste tester. We got hitched back in 2006. Barefoot. In the sand. With the waves crashing behind us. It was one of the best decisions we’ve ever made.


Helpful article. Reminds me of something I read on my site: Interwetten-at.De.
What do you think?