


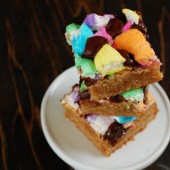
Fauxstess Cupcakes
I’ve had my eyes on these cupcakes for a long time now. They’ve been popping up everywhere and they’re just so darn cute. I kept waiting for a special occasion to make these for when I finally decided just to make them for the heck of it.

Since I had seen these everywhere, I had a few choices to make when it comes to the recipes. I liked the filling recipe that Heather used because I didn’t want to use marshmallow fluff and I’ve never made 7-minute frosting. But I decided to make the cupcake recipe from Food and Wine since I am all about trying new recipes.

I’ve never really worked with ganache before and I fell in love with it. The ganache provided a smooth finish to these cupcakes. I doubled the ganache recipe so that I would have enough to dip all the cupcakes. I don’t think there would have been enough if I hadn’t doubled the recipe. I even used the leftover ganache for some double chocolate roll out cookies for St Patty’s Day. I also ate some with a spoon straight from the fridge, dipped strawberries in some, and spread some onto toast… Ganache is a dangerous thing to have in our house…

I ended up using the cone method to fill these cupcakes. In the past I have piped filling into cupcakes, but haven’t been satisfied with the amount of filling it provides. You have much more control using the cone method.

Everyone enjoyed these cupcakes – they definitely taste better than the Hostess version. I only put three swirls (instead of the 7 that Hostess puts on their cupcakes), but everyone still made the connection. These cupcakes taste delicious and bring back memories of lunchtime in the middle school cafeteria.

You might be wondering about those brown cupcake liners. I had them on my Christmas list this year and since no one got them for me, I decided to treat myself to some brown and other solid colored cupcake liners. I love how bold the colors are and can’t wait to use them all. I ordered these liners (variety pack and brown) from Confectionary House.


Fauxstess (aka Fake Hostess) Cupcakes
Make Hostess cupcakes in your own kitchen!
Yield: 24 cupcakes
Ingredients:
For the cupcakes
1/2 cup plus 2 Tbsp cake flour
1/3 cup Dutch-process cocoa
1/2 tsp baking powder
1/4 tsp baking soda
1/8 tsp salt
2 large eggs, separated and at room temperature
1/3 cup canola oil
1/2 cup plus 2 Tbsp sugar
2 Tbsp water
For the cream filling (Seven Minute Frosting)
2 egg whites
1/2 cup sugar
1/4 cup light corn syrup
2 Tbsp water
1 1/2 tsp vanilla
For the ganache
1/4 cup cream
4 ounces bittersweet chocolate, finely chopped
1 Tbsp unsalted butter, softened
Directions:
For the cupcakes
Preheat the oven to 350 F
In a medium bowl, whisk together flour, cocoa, baking powder, baking soda and salt.
In a large mixing bowl, beat together egg yolks, canola oil, 1/2 cup sugar and water until well combined. Add the dry ingredients and stir by hand just until combined.
In a clean medium bowl, beat egg whites at high speed until soft peaks form. Gradually add remaining 2 tablespoons sugar and beat until stiff and glossy. Beat one quarter of the whites into the batter to lighten the mixture. Add remaining whites and gently fold the mixture together until no streaks remain.
Evenly divide the batter between the wells of a 12 cup muffin tin prepared with cupcake liners (they will be about one-half full). Bake until the cupcakes spring back when lightly touched in the center, about 13 to 16 minutes. Remove and let the cupcakes cool slightly before turning them out onto a wire rack to cool completely.
For the filling
While waiting for cupcakes to cool, combine filling ingredients with a pinch of salt in a metal bowl set over a saucepan of simmering water and beat with a handheld electric mixer at high speed until frosting is thick and fluffy, 6 to 7 minutes.
Remove bowl from heat and continue to beat until slightly cooled. Reserve 1/2 cup of the filling to use for piping the swirls on top of the cupcakes at the end.
Once cupcakes are completely cooled, use the cone method to fill with filling.
For the ganache
In a small saucepan, heat cream until steaming. Remove from the heat, add chocolate and let stand for 5 minutes. Add the butter and stir until smooth.
Transfer the frosting to a small bowl and dip the top of each cupcake to thoroughly coat.
For the final decorations
Spoon the reserved filling into a pastry bag fitted with a very small plain tip and pipe swirls across the center of each cupcake. Refrigerate the cupcakes for 10 minutes to set the frosting.
Cupcakes inspired from Heather Drive, filling recipe from Smitten Kitchen and cupcake and ganache recipe from Culinary in the Desert


 I am Jen the Beantown Baker. Engineer by day and baking maven by night. Hubby serves as my #1 fan and official taste tester. We got hitched back in 2006. Barefoot. In the sand. With the waves crashing behind us. It was one of the best decisions we’ve ever made.


I made one of these once and it was grainy because I screwed up on the butter or something, your looks perfect! Must give it a try, thanks!
That looks SO good. French Silk pie is one of my favorites too, but I have never tried making it.
French Silk Pie is one of my favorites.. and it’s also one of my favorite blizzard’s at Dairy Queen! I’m going to have to give this a try..
I think I’ve had only one French Silk Pie in my lifetime. I must change that statistic haha. Your photos look fantastic.
Wow, that looks delicious! I’ve never made it before either, but I’ll have to give it a shot! And I feel your pain about the “big” sister thing…my little bro calls me shorty which took some getting used to : )
What a wonderful pie! It’s strange how I have no problem with the raw eggs in this pie, but they gross me out in spaghetti carbonara 🙂
I too love french silk pie, but have never made one. You did such a good job and made it sound simple, I will have to try making one.
This looks divine! I’m not much of a baker, which is why I love heading over to your site for inspiration!
Awww that’s so nice you baked it together 🙂 It looks amazing and so, so beautiful!
Sues
that looks so delicious!
Ive tried this pie and it was perfect. I didn’t make the crust because I needed it in a hurry so I just baked off a pie shell instead. It was breath taking. I so love this recipe.
This comment has been removed by the author.