


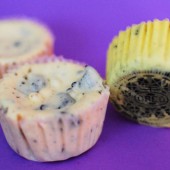
Oreo Cheesecake Cupcakes
 Oreo cheesecake = YUM! These little cupcakes are perfect because they’re cheesecake with Oreo chunks in them and even an extra Oreo at the bottom. I love that you can actually see the Oreo at the bottom through these cupcake liners.
This recipe comes from Martha Stewart’s cupcake cookbook and it doesn’t disappoint. These were a big hit which is no surprise. I left my chunks fairly large in the cheesecake batter because that’s how I roll. Feel free to chop yours up smaller if you want. (Sorry for the lack of photos, these were so good we started gobbling them up as soon as they were chilled).

One Year Ago: Brownie Pops
See all of my Week Of Oreo Recipes here.


Yield: 30
Ingredients:
42 cream-filled sandwich cookies, such as Oreos, 30 left whole, and 12 coarsely chopped
2 pounds cream cheese, room temperature
1 cup sugar
1 tsp vanilla extract
4 eggs, room temperature, lightly beaten
1 cup sour cream
Pinch of salt
Directions:
Preheat oven to 275 degrees. Line standard muffin tins with paper liners. Place 1 whole cookie in the bottom of each lined cup.
With an electric mixer on medium high speed, beat cream cheese until smooth, scraping down sides of bowl as needed. Gradually add sugar, and beat until combined. Beat in vanilla.
Drizzle in eggs, a bit at a time, beating to combine and scraping down the sides of the bowl as needed. Beat in sour cream and salt. Stir in chopped cookies by hand.
Divide batter evenly among cookie-lined cups, filling each almost to the top. Bake, rotating pan halfway through, until filling is set, about 22 minutes. Transfer to wire racks to cool completely. Refrigerate at least 4 hours (or up to overnight). Remove from tins just before serving.
Recipe from Martha Stewart's Cupcake Cookbook


 I am Jen the Beantown Baker. Engineer by day and baking maven by night. Hubby serves as my #1 fan and official taste tester. We got hitched back in 2006. Barefoot. In the sand. With the waves crashing behind us. It was one of the best decisions we’ve ever made.


Oh my! These look fabulous!!!
I love vegan chocolate cupcakes – and these look delicious. I can’t wait to try them!
These just made me so excited!!! They sound amazing and better yet…VEGAN! Thank you for posting this!
I saw these on Tastespotting and want to try, but — for the mousse what type of chocolate chips are you using? All of the ones I’ve seen in the store have milk fat in them. I’m new to vegan cooking, so maybe this is still non-dairy? My son is allergic which is why I’ve been trying many new vegan recipes!
Wow, those look over-the-moon good!
I’m totally making these tonight! I dont have the fancy caramel sauce, but hopefully they’ll still be edible with regular caramel. 🙂 Yum!
Jodi- Gihrardelli semisweet chocolate chips do not have any milkfat in them.
These look fantastic-I am allergic to dairy, and have been finding it sooo hard to sate my sweet tooth and not pay for it later.
They look fab! Thanks for sharing. I have included your site in our Vegan cupcake feature at http://www.partycupcakeideas.com