


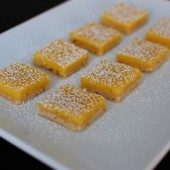
Lemon Bars
 Can you believe it’s the end of a week of bars. It makes me sad, but I have no doubt there will be more bars posted here in the future…
Spring has been teasing us here in Boston the past couple of weeks. It’s been warm, then rainy, then cool, then rainy, then warm again and so on. I really can’t wait for the cold weather to be behind us until next winter (although I have to admit, we had a pretty mild winter this year). These bars sure did brighten the day! Lemon is such a classic spring flavor. It just makes you forget about all the cold rainy nastiness that’s going on outside.

I won a new cookbook in a giveaway from Brandy at Nutmeg Nanny. Have you seen her blog? it’s one of my favs. I was instantly drawn to it because of the name. Nutmeg is BY FAR my favorite spice, freshly ground, of course! I don’t keep a whole nutmeg in my pocket, but it sure would be handy… Anyways, Brandy let me choose either the Cook’s Illustrated, Baking Illustarted Hardcover Cookbook or Cook’s Illustrated, The New Best Recipe: All New Edition Hardcover Cookbook. Obviously, I chose the baking cookbook. It came in the mail with a special surprise – a lime green spatula that I love!

I haven’t had enough time to really read through the cookbook yet, but I saw the picture for these lemon bars and knew I needed to add them to my Week of Bars. As I posted on my Facebook Fan page, I always forget how much I love lemon curd until I make it again. Man, I could eat a whole bowl of it with a spoon! This curd is perfectly sweet and tart without being overly tart.

I cut these bars pretty small so that they’d go further (the original recipe says to cut into 12 bars). I think it they were the perfect size (although Hubby did mention that one coworker may have eaten 5 of these, so I assume he thinks I cut them too small!). On a side note, I just realized as I was looking at the recipe tonight that I used the wrong sized pan. I used a 9×13 pan instead of a 9×9 pan. No wonder they said to cut int 12 bars and no wonder my bars looked so thin! Ha! Either way they’re delicious, but I’ll definitely be making these again with the correct sized pan. The recipe below shows the steps I took to make these bars (except for using the wrong sized pan).

One Year Ago: March Madness Crinkle Sugar Cookies
Check out my entire week of bars and brownies here.


Lemon Bars
Yield: 12
Ingredients:
For the crust
1 1/4 cups flour
1/2 cup powdered sugar, plus more to decorate the finished bars
1/2 tsp salt
8 Tbsp butter, softened but still cool, cut into 1-inch pieces
For the lemon filling
7 egg yolks, plus 2 eggs
1 cup plus 2 Tbsp granulated sugar
2/3 cup from 4 or 5 medium lemons, plus 1/4 cup finely grated zest
4 Tbsp butter, cut into 4 pieces
3 Tbsp heavy cream
Confectioners’ sugar, optional
Directions:
Make the crust
Spray a 9-inch square baking pan with nonstick cooking spray.
Place the flour, confectioners’ sugar, and salt in a mixer and mix on low until combined. Add the butter and mix until the mixture is pale yellow and resembles coarse meal. Sprinkle the mixture into the prepared pan and press firmly with your fingers into an even layer over the entire pan bottom. Refrigerate for 30 minutes.
Preheat oven to 350. Bake the crust until golden brown, about 20 minutes. Make the filling while the crust is baking.
Make the filling
In a medium bowl, whisk together the yolks and whole eggs until combined. Add the sugar and whisk until just combined. Add the lemon juice, zest, and salt; whisk until combined. Transfer the mixture to a medium saucepan, add the butter pieces, and cook over medium-low heat, stirring constantly, until the curd thickens to a thin sauce-like consistency, about 5 minutes. Immediately pour the curd through a single-mesh stainless steel strainer set over a clean bowl. Stir in the heavy cream; pour the curd into the warm crust immediately.
Bake until the filling is shiny and opaque and the center 3 inches jiggle slightly when shaken, 10 to 15 minutes. Cool on a wire rack to room temperature, about 45 minutes. Remove the bars from the pan and transfer to a cutting board. Cut into 2 1/2 inch squares, wiping the knife clean between cuts as necessary. Sieve confectioners’ sugar over the bars, if desired.
Recipe adapted from Baking Illustrated


 I am Jen the Beantown Baker. Engineer by day and baking maven by night. Hubby serves as my #1 fan and official taste tester. We got hitched back in 2006. Barefoot. In the sand. With the waves crashing behind us. It was one of the best decisions we’ve ever made.


These are so cute and perfect for Valentine’s Day!
They’re so pretty!! I love meringues, I love raspberry, and I love chocolate… I might have to try this recipe. Thanks for posting!
Those looks absolutely lovely! Great job!
How pretty, pink & perfect!
Not only are they SO pretty but they look delicious! I love that flavor combination.
I bet those would be great for a wedding or baby shower! They look lovely! And I bet the raspberry/dark chocolate combo tasted great!
These are BEAUTIFUL!
These would be perfect for a baby shower. You could probably use any flavor jello in them.
gorgeous pic and the flavor of raspberry and chocolate is wonderful!
Those look amazing. I love that first photo, nicely done!
Just looking at the picture makes me feel like i need to go to the gyms in Boston.
Oh my gosh, these look INSANELY awesome!! I want one right now!!
These looks simply gorgeous! and… I have a cookie tray to make for a baby shower… my yet to born grandson. Wonder how these would look in a light blue????
You could definitely use blue jello.
These are so pretty! Im having a baby shower this weekend for a baby girl and these would be perfect. Which tip did you use for the star?
I used the really big star tip. Not sure what # it is, but it’s the same one that I used for my peppermint meringues (there’s a picture in that post).
I saw this on tastespotting and wanted to comment on how gorgeous your photo is. I’ve bookmarked your recipe too – these are beautiful and I bet delicious with that flavor combination.
Thanks,
Michelle
http://oneordinaryday.wordpress.com/
Thanks for the compliments!
Those are so cute!!!!!!!!
Ok, you’ve inspired me…
http://erinsfoodfiles.blogspot.com/2009/03/vanilla-bean-meringues.html
Very good meringues… have made them several times for church since I found this recipe… they evaporate instantly ! Great also for a non wheat gluten item.
beantownbaker — March 9th, 2013 @ 3:01 pm
Glad you enjoy them!
I feel useful from the sharing you bring. Thank you for the value you bring to the reader