


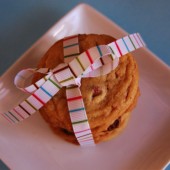
New York Times Chocolate Chip Cookies
As many of you know, I love Alton Brown’s Chewy chocolate chip cookie. It’s perfect. Another chocolate chip cookie recipe that gets a lot of buzz on the net is this NY Times chocolate chip cookie recipe.

Similar to AB’s recipe, this recipe uses cake flour, and it is recommended that you chill the dough. I chilled my dough for over 24 hours. Again, this wasn’t on purpose, but it just worked out that way. This recipe has salt sprinkled on the top prior to baking. I liked that extra hint of salt to counter the sweetness.

Overall, this is a great chocolate chip cookie recipe, but I still prefer Alton Brown’s recipe. I think I might even try sprinkling some salt on the AB recipe next time I make it.


Chocolate Chip Cookies
Ingredients:
2 cups minus 2 tablespoons (8 1/2 ounces) cake flour
1 2/3 cups (8 1/2 ounces) bread flour
1 1/4 teaspoons baking soda
1 1/2 teaspoons baking powder
1 1/2 teaspoons coarse salt
2 1/2 sticks (1 1/4 cups) unsalted butter
1 1/4 cups (10 ounces) light brown sugar
1 cup plus 2 tablespoons (8 ounces) granulated sugar
2 large eggs
2 teaspoons natural vanilla extract
1/2 pound each of bittersweet (70% cocoa content) and milk chocolate (41%) disks or fèves, at least 60 percent cacao content - I used Ghirardelli chips
Sea salt - I used Kosher salt
Directions:
Sift flours, baking soda, baking powder and salt into a bowl. Set aside.
Using a mixer fitted with paddle attachment, cream butter and sugars together until very light, about 5 minutes. Add eggs, one at a time, mixing well after each addition. Stir in the vanilla.
Reduce speed to low, add dry ingredients and mix until just combined, 5 to 10 seconds. Drop chocolate pieces in and incorporate them without breaking them. Press plastic wrap against dough and refrigerate for 24 to 36 hours. Dough may be used in batches, and can be refrigerated for up to 72 hours.
When ready to bake, preheat oven to 350F degrees. Line a baking sheet with parchment paper or a nonstick baking mat. Set aside.
Scoop 12 1-ounce mounds of dough onto baking sheet, making sure to turn horizontally any chocolate pieces that are poking up; it will make for a more attractive cookie. Sprinkle lightly with sea salt and bake until golden brown but still soft in the middle, 9 to 11 minutes. **They will continue to bake after you take them out of the oven. If they look slightly shiny in the center of the cookie, but slightly brown on the edges, they are done. Be careful not to over bake them!** Transfer sheet to a wire rack for 10 minutes, then slip cookies onto another rack to cool a bit more. Repeat with remaining dough, or reserve dough, refrigerated, for baking remaining batches the next day.
Recipe from The New York Times, as seen on Dozen Flours

 I am Jen the Beantown Baker. Engineer by day and baking maven by night. Hubby serves as my #1 fan and official taste tester. We got hitched back in 2006. Barefoot. In the sand. With the waves crashing behind us. It was one of the best decisions we’ve ever made.


those look good too. Are homemade butterfingers next? I have a recipe I’m going to try out soon.
Butterfingers would be tasty, but I’ve got something else coming on Friday…
OH YUM! I really want to try these but I’m horrible at dipping things too.
This is exactly what my son’s been asking me to do. You’re making it hard to say no – they look perfect!
Why do you tempt me so? Milky Ways are my favorites. This is so worth trying 🙂
Yum these look delicious! I love Milky ways
Well they look pretty perfect to me! And super delicious too.
I’m so intrigued by the cool whip/chocolate mixture for the filling! These look so yummy and addicting!
These look so cute and much easier than the milky ways and snickers I made a few months ago. I made mine in muffin wrappers so I didn’t dip them, just layered the chocolate, nougat, caramel, and chocolate! They came out pretty tasty but was a lot of work!
I just tried these and they didn’t come out as I’d hoped. The chocolate and whipped cream mix was too sticky and wouldn’t harden. Did I do something wrong? Also what if you can’t find kraft caramel?
Rachael – Sorry to hear they didn’t turn out for you. The center part was a bit sticky while dipping and wasn’t super hard… Any caramel would work for this recipe, I just use the Kraft kind that comes individually wrapped.
I would put melted chocolate in the pan first, freeze, then the chocolate mixture, then the caramel. Then you can spoon melted chocolate on top. Would this work? (It solves the dipping problem too!)
beantownbaker — November 3rd, 2013 @ 12:36 pm
That could definitely work… The caramel might ooze out when you gut them though… Let me know how it goes if you try it.
I hope you are not using Cool Whip which is all trans-fat and high fructose corn syrup. I’m looking for a healthier alternative to the store bought Milky Way. Perhaps a recipe for homemade whip ?
These were a DISASTER. I wasted my morning and a lot of ingredients. The chocolate mixture was so sticky when cutting into squares. The directions did not state whether to add water to the caramels when melting so I didn’t…the caramels ended up thick and so sticky, I had trouble putting it on the chocolate layer. Dumped the whole mess out since I didn’t want to waste a bag of milk chocolate chips to coat them. I have been baking my entire life (60 +) and never had a recipe go like that.
Very rapidly this website will be famous amid all
blog visitors, due to it’s good articles or reviews