


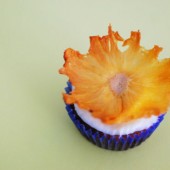
Hummingbird Cupcakes with Pineapple Flowers
Today I’m bringing you the final recipe that Megan and I baked together at our last baking date. If you remember, we made Homemade Peeps and Hot Cross Buns for Easter and we also wanted to make something appropriate for Mother’s Day. I was flipping through my Martha Stewart Cupcakes Cookbook when I saw these cupcakes and asked Megan if she was interested in making them.

The pineapple flowers on top did cause us some problems. We ended up baking them twice as long as the recipe said and they still weren’t fully dried out. Next time I make these, I’ll definitely do the pineapple flowers a day in advance so that I’m not in a rush to get them out of the oven. A few of the slices that were thinned did completely dry out, but it’s really hard to cut a pineapple very thin so some definitely were still a bit gooey.

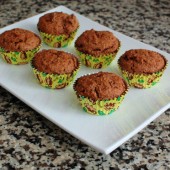
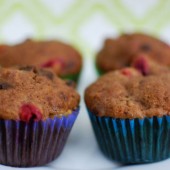
Even with the frustrations of the pineapple flowers, these cupcakes were a huge hit. The flavors in the cupcake reminded me of a Caribbean vacation. And of course, everyone loves cream cheese frosting! If you wanted to make these but not deal with the pineapple flowers, you could top them with candied pineapple, or just leave the garnish off all together.

Megan and I had a great time baking together again and I can’t wait until we can do it again! We’re thinking of making ice cream since she’ll be hosting next time and she has an ice cream maker! If you have any ideas of something you’d like to see us bake, let either one of us know.

One Year Ago: Fresh Strawberry Cupcakes with Cream Cheese Frosting
Two Years Ago: Roasted Red Pepper Dip


Hummingbird Cupcakes
Yield: 36 cupcakes
Ingredients:
For the Hummingbird Cupcakes
3 cups flour
3/4 tsp baking soda
1 tsp salt
1 tsp cinnamon
1 cup unsalted butter, melted and cooled
2 tsp vanilla
2 cups sugar
3 eggs
2 cups mashed ripe banana
2 cans (8 oz each) crushed pineapple, drained
1 cup walnuts, toasted and coarsely chopped
1 cup unsweetened coconut
For the Cream Cheese Frosting
2/3 cup unsalted butter, at room temperature
8 oz cream cheese, at room temperature
2 2/3 cups powdered sugar
1/2 tsp vanilla
For the Dried Pineapple Flowers
2 large or 4 small pineapples, peeled
Directions:
For the Hummingbird Cupcakes
Preheat oven to 350. Line muffin tins with cupcake liners.
Whisk together flour, baking soda, salt, and cinnamon.
Beat butter, vanilla, and sugar until combined. Add eggs, one at a time, beating until incorporated. Scrape sides of bowl as needed. Continue to beat until mixture is pale and fluffy.
In another bowl, stir together the banana, pineapple, walnuts, and coconut. Add to egg mixture and beat until combined. Stir in flour mixture.
Fill cupcake liners 3/4 full and bake for 25-28 minutes. Cool completely before frosting.
For the Cream Cheese Frosting
Beat butter and cream cheese until fluffy, about 2-3 minutes on medium-high.
Reduce to low and add sugar, 1/2 cup at a time. Add vanilla and mix until smooth, scraping sides of bowl as needed.
For the Dried Pineapple Flowers
Preheat oven to 225. Line 2 baking sheets with a silpat or parchment paper.
Using a small melon baller (or a spoon), remove and discard pineapple "eyes".
Use a sharp knife to cut pineapple into very thin slices. Place slices on baking sheets.
Bake until tops look dried, about 30 minutes. Flip slices and bake until completely dried, 25-30 more minutes (or longer as needed).
Pinch center of each pineapple slice and shape into a cone. Let cool in a clean muffin tin to form flower shape. Once cool, flowers can be stored stacked for up to 3 days at room temp in an air-tight container.
Hummingbird Cupcake Recipe from Martha Stewart Cupcakes
Cream Cheese Frosting Recipe from Martha Stewart Cupcakes
Dried Pineapple Flower Recipe from Martha Stewart Cupcakes
 I’m using this cake as my monthly What’s Baking challenge. The theme this month is Something for Mother’s Day. Be sure to check out The Boys Made Me Do It for the roundup later this month.

Don’t forget about Bloggers Bake for Hope – Bloggers Bake. You Bid. 100% of proceeds go to Komen for a Cure. Register to bake by April 30th, come back for bidding May 4-6.

 I am Jen the Beantown Baker. Engineer by day and baking maven by night. Hubby serves as my #1 fan and official taste tester. We got hitched back in 2006. Barefoot. In the sand. With the waves crashing behind us. It was one of the best decisions we’ve ever made.


this cake screams a lot of things!
eat me comes to my mind!
lol
beantownbaker — February 8th, 2014 @ 11:57 am
It does definitely scream that 🙂
Gorgeous Bundt, Jen! It looks amazing. Love the butter and cocoa tip and the raspberries!
beantownbaker — February 9th, 2014 @ 8:58 pm
Thanks 🙂
Who needs a tunnel of love when you have a tunnel of fudge! This looks fantastic!!
beantownbaker — February 11th, 2014 @ 12:14 pm
So true!
This cake looks glorious 🙂 I am dying to get a slice, maybe two 😉
The original recipe called for a box of Pillsbury’s frosting mix and was much, much better than the current recipes. There was a tunnel of gooey soft fudge in the middle that you just can’t get with today’s recipes for this cake. But it’s still a great cake!
For most up-to-date information you have to visit tthe webb and oon web I
found this site as a most excellent web page for latest updates.
One of my favorites! Thanks for the reminder..I need to make this – soon!
I just tried this yummy recipe from your blog and it has come out really yummy!! 🙂
This is my first tunnel of fudge cake and I am quite happy with the outcome…
Thanks for sharing this easy recipe 🙂
Gorgeous!!! I’d love to try to make it for my family soon. Your recipe is so detailed, but to a clumsy person like me, Hopefully I won’t mess everything up haha.
Looking at the picture of your cake I just wanna try it immediately. It looks really good. It is good to make it at home and serve on some special occasions like birthday parties or a party with friends on weekends. Thanks Jen for sharing this recipe with us!
Nice recipe Jen! Hope that I can do it the way you make your cake. Always love chocolate. Thank you for sharing it!
oh my god, I fell in love with it at the first sight. So yummy and nice at the look. Thanks Jen for sharing wonderful recipe!
Awesome, you make it like an artist. It looks so delicious, I will try your recipe to make it for my kids. Thank you so much for sharing this!
This cake recipe looks very sweet and delicous. I will try it soon. Thank for share this great post.
This looks amazing, I will try this out tomorrow, thank you for sharing!