


Red Velvet Cheesecake Cake
Have you ever had a cake that is just downright amazing? So good that you instantly want another piece even though you really shouldn’t? This cake is one of those cakes.

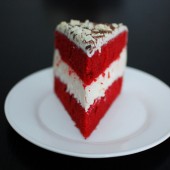
How could it not be? It’s got two layers of tangy moist red velvet cake. Sandwiched between those vibrant red layers is a layer of creamy fluffy cheesecake. And of course the entire thing is enrobed in a layer of frosting.

I set out to make this cake because my sister B and her boyfriend Z were coming to visit. Turns out that Z really really likes cheesecake. Since I always like to bake something special for out of town guests, I wanted to make something with cheesecake. (And, today just happens to be Z’s birthday. So Happy Birthday Z!)

I had been eying this cake ever since I saw it in my Google Reader. The effort was well worth it. This cake is everything you could ever imagine. Z even had a piece around 4am before heading to the airport to head back home!

I love the festive colors of the slice of cake. The red and white makes me think of peppermint even though there isn’t any peppermint in the recipe. You could definitely add peppermint to the cheesecake recipe and the frosting if you wanted to.

I did have an issue with my cheesecake being a little bit wider than the cake layers. I just let the cheesecake layer warm up a bit and then used a sarated knife to even it out.

And while I didn’t frost between the layers of cake and cheesecake, I did pipe an edge just to make the sides flush.

I left the decorating pretty simple. I just topped the cake with some shaved white and bittersweet chocolate.

If you’re looking for an impressive dessert to make for the holidays, look no further!
One Year Ago: Pecan Pie and Biscuits and Sausage Gravy
Two Years Ago: Carrot Cake Cupcakes
Three Years Ago: Butternut Squash Bisque


Red Velvet Cheesecake Cake
Two layers of red velvet cake are sandwiched around a layer of cheesecake. The whole thing is covered in cream cheese frosting and chocolate shavings.
Yield: Serves 12-16
Ingredients:
For The Cheesecake
1 1/4 pounds bar cream cheese (20 oz), room temperature
3/4 cups sugar
1/2 tsp finely grated lemon zest, plus 1/2 tablespoon fresh lemon juice
1/4 tsp coarse salt
2 eggs
1/2 cup sour cream
For The Cake
2 1/2 cup cake flour
1 1/2 cup sugar
1 tsp. baking soda
1 Tbsp cocoa powder
1 tsp salt
2 eggs
1 1/2 cup vegetable oil
1 cup buttermilk
2 Tbsp (1 oz.) red food coloring
1 tsp vanilla extract
1 tsp white distilled vinegar
For The Frosting
12 oz. cream cheese, softened
12 oz. butter, softened
1 1/2 tsp vanilla extract
3 cup confectioners' sugar
Decorations
1 bar white or dark chocolate (Optional for decoration)
Directions:
Make the cheesecake
Preheat oven to 325 degrees. Set a kettle of water to boil. Using an electric mixer, beat cream cheese on medium until fluffy, scraping down side of bowl. Gradually add sugar, beating until fluffy. Beat in lemon zest and juice, and salt. Beat in eggs, one at a time, scraping down side of bowl after each addition. Beat in sour cream.
Cut parchment paper in a circle and line the bottom of the cheesecake pan. Wrap bottom half of pan in foil. Pour in filling; place in a roasting pan. Pour in boiling water to come halfway up side of springform. Bake until just set in center, about 45 minutes. Remove pan from water; let cool 20 minutes. Run a paring knife around edge; let cool completely. Cover; chill overnight, then wrap in plastic wrap and freeze.
Make the cake
Preheat oven to 350°. Sift together flour, sugar, baking soda, cocoa, and salt into a medium bowl.
Beat eggs, oil, buttermilk, food coloring, vanilla, and vinegar in a large bowl with an electric mixer until well combined. Add dry ingredients and beat until smooth, about 2 minutes.
Divide batter evenly between 2 greased and floured 9" round cake pans and bake 25-30 minutes, rotating halfway through, until a toothpick inserted in the center of each cake comes out clean. Let cakes cool 5 minutes, then invert each onto a plate, then invert again onto a cooling rack. Let cakes cool completely, then level.
Make the Frosting
Beat cream cheese, butter, and vanilla together in a large bowl with an electric mixer until combined. Add sugar and beat until frosting is light and fluffy, 5–7 minutes.
Assembly
Place bottom layer on cake stand. Remove cheesecake from freezer, unwrap, and remove from metal bottom, then peel off parchment paper. Place cheesecake layer on top of the bottom layer of the red velvet cake.
If the cheesecake is wider than the cake, and it is necessary to to trim it, wait approximately 10 minutes for the cheesecake to soften, then trim it with a knife. Place top layer of cake on top of the cheesecake, and coat with a generous layer of the cream cheese frosting to act as the crumb coat. Be careful not to get any red velvet crumbs in the bowl of frosting!
Refrigerate approximately 30 minutes, then frost with as much of the remaining frosting as necessary.
Top with shaved white chocolate and/or shaved dark chocolate. Refrigerate until ready to serve. (This cake doesn't have to stay in the fridge until IMMEDIATELY before serving, so don't worry if you have a 30 minute lapse between the refrigerator and serving.)
Recipe from Erin's Food Files, cake and frosting adapted from Apple A Day, originally adapted from Saveur
cheesecake adapted from Martha Stewart

 I am Jen the Beantown Baker. Engineer by day and baking maven by night. Hubby serves as my #1 fan and official taste tester. We got hitched back in 2006. Barefoot. In the sand. With the waves crashing behind us. It was one of the best decisions we’ve ever made.


