


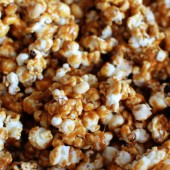
Caramel Corn
I absolutely love popcorn. It’s such a great little snack. Caramel corn is even better. And I love every excuse I can come up with to use my candy thermometer (now that I have one).

I made this caramel corn for a football party over at a friend’s house. I popped the popcorn at home and then made it into caramel corn once we got there. It smelled amazing while it was baking and I’m not the only one who burnt my tongue because I was too impatient to wait for it to cool down after it came out of the oven.

I went ahead and threw in the optional peanuts. I liked the additional saltiness and crunch that they provided. When I make this again, I’ll probably even throw a bit more in.

This caramel corn would also make a great homemade gift since it keeps very well. How excited would you be if you got some homemade caramel corn for the holidays?

One Year Ago: Chocolate Mousse and Eggplant Parmesan
Two Years Ago: Chocolate Chip Snowballs and Peppermint Chocolate Cookies


Caramel Corn
Yield: 8-12
Ingredients:
15 cups popped corn (9 tablespoons kernels, popped)
2 Tbsp molasses
1 cup brown sugar, packed
1/2 cup salted butter
1/4 cup light corn syrup
1/2 tsp baking soda
Directions:
Preheat your oven to 200°F and line a half-sheet pan (18" x 13" pan) with parchment paper. Pour the popped corn into a large bowl, at least 6 quarts, and set aside.
In a large saucepan over medium-high heat bring the molasses, brown sugar, butter, and corn syrup to a boil. Boil, stirring occasionally, for 5 minutes.
Remove the pan from the heat and add the baking soda. Stir well as the mixture turns foamy.
Immediately (and carefully) pour the hot syrup over the popped corn and stir until the corn is well coated.
Spread the hot caramel corn into the parchment-lined pan. Bake at 200°F for one hour. Stir the corn every 15 minutes during this time.
Remove from the oven. This caramel corn is a warm, sticky, sweet and crunchy treat straight from the oven. It can also be cooled and stored airtight for several days. This recipe doubles and triples very well.
Recipe from King Arthur Flour

 I am Jen the Beantown Baker. Engineer by day and baking maven by night. Hubby serves as my #1 fan and official taste tester. We got hitched back in 2006. Barefoot. In the sand. With the waves crashing behind us. It was one of the best decisions we’ve ever made.


How did the parchment lining work out? Did the caramel stick very much? I’m thinking of making another batch of caramels tonight.
What a unique idea- love it!
Between you and Megan, I’m craving caramels!
Eek. I love gingerbread-flavored things, and love making caramel. This is genius.
aah, you’re doing everything that’s still on my list! marshmallows, caramels… i’ll get to it. someday! these sound amazing 🙂
Yum! I wonder if I could use this recipe in my microwave caramel recipe?
One day I will have enough patience to try caramels. One day!
-Amanda
oh goodness girl i just made some molasses-peanut chews and they were fabulous.
but now seeing gingerbread caramel? wow. love this. great idea!
Mira, I’ve never made microwave caramel, but I’m sure you could add the spices and some molasses to make your recipe taste like gingerbread.