


Lemon Raspberry Layer Cake
Remember that raspberry curd I posted about last week? First of all, did anyone try a fruity breakfast sandwich? You really should! And now on to the cake I kept mentioning in that post about the raspberry curd.

I made this cake a couple weeks ago for a springtime dinner that our good friends N&L hosted. I offered to bring a dessert and got very excited because I rarely have the chance to make layer cakes. Layer cakes are only doable when there are enough people to put a dent in it, and they’re people who don’t mind me taking some pictures after the first slice has been cut.

In fact, this January was the first time I had ever made a layer cake (the Chocolate Overdose Cake turned out pretty awesome!). So this was my second. I was nervous about frosting it since last time I just poured ganache over the cake and topped it with chocolate covered strawberries for a no-fuss decorating job.
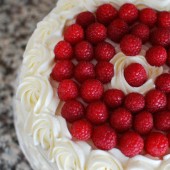
This time, I wanted to test out my piping skills. I can pipe a mean rosette on a cupcake or a nice fat swirl, but I’ve never piped a border or even coated a layer cake. I think I impressed even myself on this one. Not to brag, but I think the cake turned out very pretty.

Obviously, a cake looking pretty is only half the battle. The taste is the other half. This is a great spring cake because it combines the flavors of lemon and raspberry. Nothing screams spring like lemon and raspberry is such a great complimenting flavor.
I used my newly-discovered go-to white cake recipe as a base. As Bridget mentioned in the comments, while domes are great on cupcakes, they’re not so great on cakes. I was glad this recipe didn’t dome up in this instance because then I didn’t have to worry about leveling off the cake layers.

I used a technique from Dorie Greenspan’s Perfect Party Cake to make this recipe into a lemon cake. Rubbing fresh lemon zest into sugar releases such a fragrant aroma, it makes you want to just eat the lemony sugar right then an there. The lemon zest is really all you need to make the white cake into a lemon cake.
I also used my newly-found go-to buttercream recipe. I added lemon juice to the frosting but it didn’t really carry through. I didn’t want to put zest in because I wanted a really smooth frosting. I think next time I might use some lemon extract to give it more of a lemony boost.

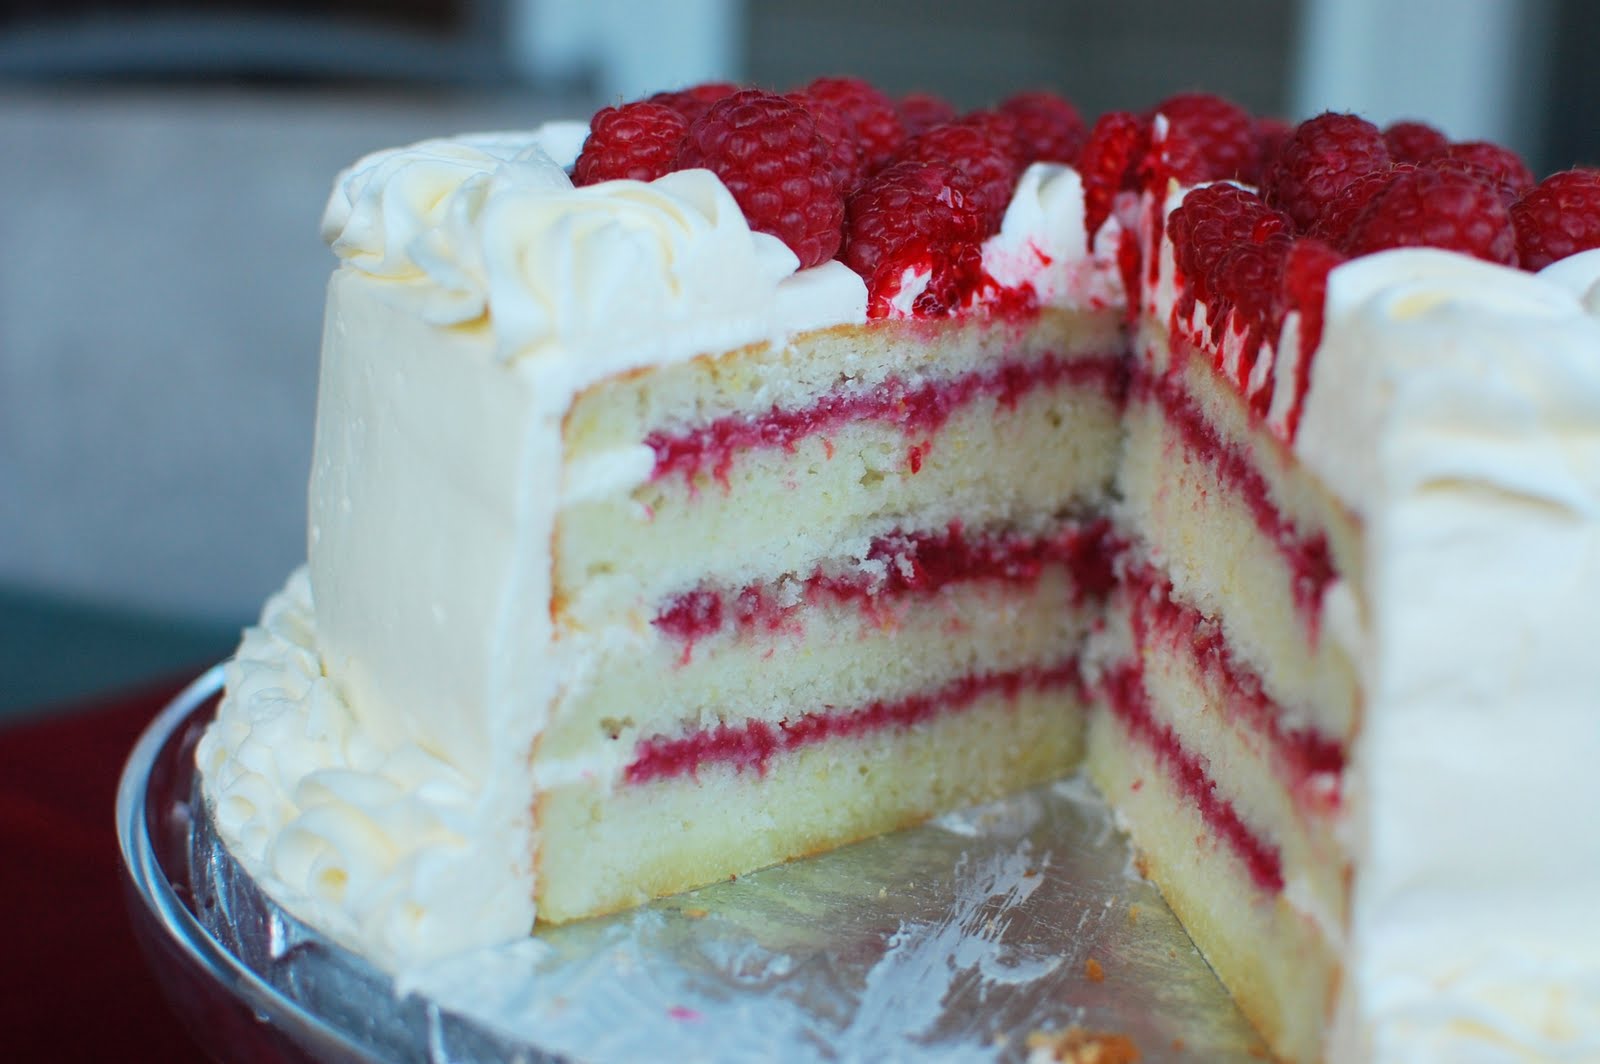
I sliced the cakes in half to make a 4-layer cake. The filling is the previously mentioned raspberry curd. I used about a 1/3 of a cup between each layer. I brought along some of the extra raspberry curd and some people poured more onto their slice of cake.
Overall this cake turned out amazing. It was perfectly lemony without being overpowering. It made a great springtime cake and would be perfect for a Mother’s day dinner or even for Easter next year.

I made the cake and filling ahead of time. The raspberry curd was refrigerated and the cake layers were wrapped in plastic wrap and refrigerated. The frosting can also be made in advance. Just be sure to let it come to room temperature prior to using.
Two Years Ago: Perfect Summer Salsa


Lemon Raspberry Layer Cake
Yield: Serves 12
Ingredients:
Nonstick cooking spray
1 1/2 cups + 2 Tbsp granulated sugar
zest of 1 lemon
2 1/4 cups cake flour, plus more for dusting the pans
1 cup + 2 tablespoons whole milk, at room temperature
6 large egg whites (3/4 cup), at room temperature
2 tsp almond extract
1 tsp vanilla extract
4 tsp baking powder
1 tsp table salt
12 Tbsp unsalted butter (1 1/2 sticks), softened but still cool
Double batch vanilla buttercream
Batch of raspberry curd, cooled completely
Directions:
Set oven rack in middle position. Heat oven to 350 degrees. Spray two 9-inch round cake pans with nonstick cooking spray; line the bottoms with parchment or waxed paper rounds. Spray the paper rounds, dust the pans with flour, and invert pans and rap sharply to remove excess flour.
Pour milk, egg whites, and extracts into 2-cup glass measure, and mix with fork until blended.
Put the sugar and lemon zest in a mixer bowl and rub them together with your fingers until the sugar is moist and fragrant. Add cake flour, baking powder, and salt to mixer bowl and mix at slow speed. Add butter; continue beating at slow speed until mixture resembles moist crumbs, with no powdery streaks remaining.
Add all but 1/2 cup of milk mixture to crumbs and beat at medium speed for 1 1/2 minutes. Add remaining 1/2 cup of milk mixture and beat 30 seconds more. Stop mixer and scrape sides of bowl. Return mixer to medium speed and beat 20 seconds longer.
Divide batter evenly between two prepared cake pans; using rubber spatula, spread batter to pan walls and smooth tops. Arrange pans at least 3 inches from the oven walls and 3 inches apart. Bake until thin skewer or toothpick inserted in the center comes out clean, 23 to 25 minutes.
Let cakes rest in pans for 3 minutes. Loosen from sides of pans with a knife, if necessary, and invert onto wire racks. Reinvert onto additional wire racks. Let cool completely, about 1 1/2 hours.
Assembling the cake
Once cake layers have completely cooled, use a large serated knife to slice each layer in half horizontally.
Scoop about a cup of frosting into a piping bag with a large round tip (you can also use a ziplock bag and snip off the corner. I wouldn't recommend doing that if you are piping swirls on top of cupcakes, but in this situation, it's ok. No one will see what you're piping).
Place strips of waxes paper around the plate or cake disk that you will be using for the cake. Pipe a small amount of frosting onto the center of your cake disk. This will serve as glue to hold the cake in place.
Place your first layer of cake, cut side up, on the disk. Pipe a thick ring around the edge of the cake. This will serve as a dam to keep the filling in the cake and prevent the layers from sliding around.
Spread ~1/3 to 1/2 cup of raspberry curd onto the cake. Add the top half of that cake and repeat. Add the bottom half of the other cake, cut side up again, and repeat. Place the top layer on the cake.
Apply a very thin layer of frosting on the cake. This will serve as a crumb coat and will help the final frosting to be smooth. Chill the cake for at least 30 minutes in the refrigerator.
Next, coat the cake with frosting and smooth it out. I watched this youtube video to get a better idea of how to do it. Then decorate as you prefer. I went back to youtube to get ideas for the border. This video was helpful for me. You can see that the piping on the bottom of the cake wasn't as pretty as on the top where I had more room to make my swirls. I think my tip might have been too big for the bottom (I used a 1M tip).
Cake recipe adapted from The Way the Cookie Crumbles


 I am Jen the Beantown Baker. Engineer by day and baking maven by night. Hubby serves as my #1 fan and official taste tester. We got hitched back in 2006. Barefoot. In the sand. With the waves crashing behind us. It was one of the best decisions we’ve ever made.


Oh my goodness these look so yummy!!
Can’t wait to make these, I will let you know how they turn out 🙂
Awesome muffins! Here’s how they turned out. thanks again!
http://www.flickr.com/photos/37464109@N00/
did you used unsweeted applesauce or sweeted for this recipe?
I made them, and they don’t look the same. They’re still pretty tasty!!