


Maple Syrup and Birthday Cupcakes
This past weekend a good friend from high school was visiting Boston. K had a conference here last week and stayed to hang out this weekend. On top of hanging out with friends, Butler made it to the Final Four! K went to Butler and is the president of his local alumni club!

On Saturday we decided to partake in some local fun by heading up to New Hampshire to go to a maple house where they boil maple syrup. We had beautiful weather on Saturday. It was a bit chilly but sunny and not a cloud in the sky. After arriving at the Grant Family Maple House, we had some food and got in line to learn all about how maple syrup is made.

What we learned is that the sap from the trees has about 2-3% sugar in it straight from the tree. At that percentage, it would take 40 gallons of sap to make 1 gallon of maple syrup!! So they first condense the sap until it reaches about 8% sugar. The sap is then boiled to evaporate off the water.

Once the temperature reads 7 degrees above the boiling point of water, you have syrup! The guy in the maple house even explained how they use a baraometer on the wall to get the barometric pressure so they know the exact boiling temperature of water for that given day. It was all very scientific and extremely interesting.

The small bottles of maple syrup were a sample from each batch they had made at the maple house this season. The guy explained that as the season goes on, the syrup tends to get darker due to the change in the amount of sugar in the sap.

Of course, we had to get some maple products while we were there. Obviously, maple syrup. We also got some maple candies, some maple sugar, and some maple pepper. Can’t wait to find creative ways to use the sugar and pepper. If anyone has suggestions, please let me know!

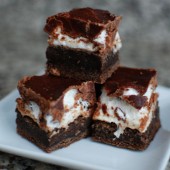
Also, since K’s birthday was last week, I made him some cupcakes to celebrate. I went with my go-to chocolate cupcake recipe. I love that you can whip these up by dirtying only one bowl and using a whisk! I dipped them in some ganache and topped with festive sprinkles. Aren’t they pretty?


 I am Jen the Beantown Baker. Engineer by day and baking maven by night. Hubby serves as my #1 fan and official taste tester. We got hitched back in 2006. Barefoot. In the sand. With the waves crashing behind us. It was one of the best decisions we’ve ever made.


Oh these look so yummy! Love the crackly looking top.
They look soooo good! Thanks for the tip about the sweetness factor…I love having a little bite of something completely decadent!
AH…these look heavenly….mmm…thanks for sharing! 🙂
Wow, those look great! I love those
I’m not sure it is possible to be “too sweet” but these look very good!
These looks so good! Can’t wait to try!
I’m not crazy about marshmallows, but these brownies look amazing!!
“nice and thick”… wow, you aren’t kidding. that was a bold move switching the pan though. glad it worked out in the end.
MMMMMMM those sound awesome!!
oh my word! those look delicious!
I can’t stop looking at your picture. I think that means I need to make these brownies. I’m not sure if I should thank you for shake my fist at you 😛
Blaspemy!! Nothing is TOO sweet 🙂
I love these! Might give em a go when a occasion comes up 😀
This comment has been removed by the author.
These look awesome! I would love to have one of these sitting in my kitchen right now 🙂
These look AMAZING! I feel like I need to go to the gym just looking at them. 🙂
These look delicious! I love anything with marshmallows!
I wish I could reach through the computer and grab these! They look awesome!!
I make something similar but cheat and use a boxed brownie mix. The frosting I use doesn’t have marshmallows in it which helps with the sweet factor.
That’s a great idea baking these in a smaller pan. I would prefer the brownie part a bit thicker.
~ingrid
Um…I guess I didn’t let my icing cool enough and it melted the marshmallow completely…it looked like Mt. Vesuvius erupted on my counter ha ha! I wish I could post a picture! They still tasted yummy though =)
I made these, but the chocolate topping turned out not great, not dissolved and gritty. – I think you mean “icing sugar” don’t you, when you say sugar for the frosting?
beantownbaker — April 18th, 2013 @ 11:28 am
I used granulated sugar for the frosting. When it is cooking on the stove, it should completely dissolve the sugar.