


Merry Christmas and Peppermint Brownies with Chocolate Ganache
First of all, I want to say Merry Christmas Everybody! I hope everyone is having a great holiday. I wanted to show off a picture of our tree. This is the first year we’ve done a tree in Boston because there isn’t a whole lot of room for one. Last year I didn’t even decorate because we were traveling so much with the holidays. But this year, we got a real tree! I was very excited. It’s about 5’8″ tall and it fits on top of our end table since we have really high ceilings.

Once we got it into the stand, we realized that our box of ornaments had been stored at Hubby’s mom’s house since we had never planned on needing ornaments here in Boston. So we went to the dollar store with $20 in our hands and came out with the decorations you see here. It’s just red and silver bulbs with white lights. And, Hubby fashioned a star out of a coat hanger that I wrapped in foil. Ta-Da! Here’s what our tree-on-a-budget looks like. I love it!

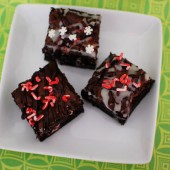
Peppermint is by far my favorite holiday flavor. Something about it just makes me feel like it’s wintertime. It reminds me of snow. It’s well known that I love fun sprinkles. When I saw these at the store, I had to have them. Not only are they shaped like candy canes, they have a peppermint flavor to them. I also have some fun snowflake sprinkles that are obviously only useful in the wintertime. Hubby and I were trying to figure out what to take to a holiday potluck and I knew I wanted to build a dessert around these festive sprinkles.

So I knew there would be peppermint involved, and I wanted to pair it with chocolate. I’ve been doing a lot of bars recently so I thought I’d make peppermint brownies, drizzle them in some ganache and highlight the fun candy cane and snowflake sprinkles. I also added a bit of peppermint extract to the white chocolate and bittersweet chocolate ganache.

To kick things up even more, I was thinking about another of my favorite peppermint treats. The Trader Joe’s Candy Cane Joe Joe’s. They’re dangerous to have in the house because I tend to pop one or two when the box catches my eye. So I combined all of these things together by adding the candy cane Joe Joe’s to the brownie batter prior to baking the brownies.

I cut these into small brownies so they are more like little bites of peppermint brownie deliciousness. These little brownies were a huge success at the party. If you’re looking for a festive wintery dessert to make, definitely give these a shot.


Peppermint Brownies with Chocolate Ganache
Ingredients:
For the White and Bittersweet Chocolate Peppermint Ganache
3 oz bittersweet chocolate
3 oz white chocolate
1/2 tsp peppermint extract
6 Tbsp heavy cream
For the Peppermint Brownies
1 cup (2 sticks) unsalted butter
2 1/4 cups sugar
1 1/4 cups Dutch-process cocoa
1 tspsalt
1 tspbaking powder
1 tspespresso powder, optional
1 tsp peppermint extract
2 tsp vanilla extract
4 large eggs, beaten
1 1/2 cups all-purpose flour
~25 peppermint sandwich cookies, such as Trader Joe's Candy Cane Joe Joe's, cut into chunks
Directions:
For the White and Bittersweet Chocolate Peppermint Ganache
Break white chocolate into chunks and place in a bowl. Break bittersweet chocolate into chunks and place in another bowl.
Bring heavy cream and peppermint to a boil.
Pour half of the cream over the white chocolate and half over the bittersweet chocolate. Let set for a minute then whisk each until smooth.
For the Peppermint Brownies
Preheat the oven to 350°F. Lightly grease a 9" x 13" pan
In a saucepan set over low heat, melt the butter, then add the sugar and stir to combine. Return the mixture to the heat briefly, just until it's hot, but not bubbling; it'll become shiny looking as you stir it. Heating this mixture a second time will dissolve more of the sugar, which will yield a shiny top crust on your brownies.
Transfer the sugar mixture to a medium-sized mixing bowl, if you've heated it in a saucepan. Stir in the cocoa, salt, baking powder, espresso powder, peppermint, and vanilla.
Whisk in the eggs, stirring until smooth.
Add the flour and cookie chunks. Spoon the batter into a lightly greased 9" x 13" pan.
Bake the brownies for about 30 minutes, until a cake tester inserted into the center comes out clean, or with just a few moist crumbs clinging to it. The brownies should feel set on the edges, and the center should look very moist, but not uncooked. Remove them from the oven and cool completely prior to cutting.
Recipe adapted from King Arthur Flour


 I am Jen the Beantown Baker. Engineer by day and baking maven by night. Hubby serves as my #1 fan and official taste tester. We got hitched back in 2006. Barefoot. In the sand. With the waves crashing behind us. It was one of the best decisions we’ve ever made.


These are so festive – love them!
beantownbaker — March 4th, 2013 @ 1:51 pm
Sprinkles make everything festive 🙂
What festive looking cookies! Looks fantastic!
beantownbaker — March 4th, 2013 @ 1:51 pm
Thanks! Love your new picture!
Love that you were able to adapt them from an already favorite cookie
beantownbaker — March 4th, 2013 @ 1:52 pm
I can’t even tell you how many times I’ve adapted those cookies to fit my needs. They’re awesome.
Mixed the dough last night, can’t wait to get home and bake these tonight!
beantownbaker — March 6th, 2013 @ 8:38 pm
Yay! I hope you love them 🙂
I’m a huge fan of all sorts of cookies, I am always glad to find new,creative recipe.
I love making Funfetti cookies, but have never added chocolate/white chocolate chips. The more the merrier!! 🙂 And they’re super pretty!
beantownbaker — March 9th, 2013 @ 3:02 pm
Thanks! Funfetti makes everything better.
Can this dough be frozen?
Wonderful write-up… This is very insightful.
Keep up the good work