


Tasty Tools: Lemon & Key Lime Curd
 I just found out in January that I love lemon curd. Who knew!?! I had never eaten it let alone made it prior to the DB Lemon Meringue Pie. When Joelen announced her new blogging event, Tasty Tools, I instantly thought of lemon curd. This event encourages you to use the specified tool to create anything you want. Then when the round-up occurs, you can learn some new recipes to make using your various kitchen tools. Very creative event Joelen! The inaugural tool is the microplane/zester.
I love my microplane. Right now the only things I really use it for is to zest citrus fruit. I can’t wait to see the round-up to learn all the creative things that other food bloggers do with their microplanes.
 I decided to make lemon curd again, but I didn’t want to cheat the event by just recreating a recipe I’ve already tried. So I decided to try a new recipe. I also decided to make lemon curd and key lime curd this time around. I made a 1/2 batch of lemon curd and a 1/4 batch of the key lime curd.
I used this calculator to get my grams to cups conversion.
 Lemon Curd – from Cherrapeño – originally from Delia Smith
grated zest and juice 4 large juicy lemons
4 large eggs
12 oz (350 g or 1 3/4 cup) golden caster sugar
8 oz (225 g or 16 Tbsp) unsalted butter, at room temperature, cut into small lumps
1 level dessertspoon (2 tsp) cornflour
Begin by lightly whisking the eggs in a medium-sized saucepan, then add the rest of the ingredients and place the saucepan over a medium heat. Now whisk continuously using a balloon whisk until the mixture thickens – about 7-8 minutes. Next, lower the heat to its minimum setting and let the curd gently simmer for a further minute, continuing to whisk. After that, remove it from the heat.
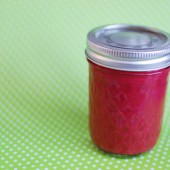
 Now pour the lemon curd into the hot, sterilised jars, filling them as full as possible, cover straightaway with waxed discs, seal while it is still hot and label when it is cold. It will keep for several weeks, but it must be stored in a cool place.


 I am Jen the Beantown Baker. Engineer by day and baking maven by night. Hubby serves as my #1 fan and official taste tester. We got hitched back in 2006. Barefoot. In the sand. With the waves crashing behind us. It was one of the best decisions we’ve ever made.


Thank God for the weird flavors and for not making em the only weirdo foodie out there. This sounds heavenly, and I can’t wait to try my hand at the curd this weekend.
I am practically addicted to lemon curd, and since raspberries are by far my favorite berry I would be scared to make this, have so much left over, and pour it over everything I could eat! The breakfast sandwich also looks good, never had sweet with the eggs, but its worth a shot! Would be great with french toast, and I love cream cheese with sweet jam 🙂
Jen, that curd looks just wonderful! I LOVE raspberry!
it’s okay to have a weird tastebud. it all matters if you like it (: i think flutternutters are weird in comparison 😛 no offense, people!
Mmm, this sounds fantastic! I’m so used to curd being citrus – this would be a nice change of pace.
You’re not the only one! Growing up, when we didn’t have tomato soup with our grilled cheese, there was usually jam spread on it after it was grilled. It’s a weird combo that one of my parents inroduced, but it’s surprisingly good.
Ooh, raspberry curd sounds fantastic.
Your sandwich seems like the breakfast version of a monte cristo sandwich, and I really like monte cristos.
i have never had raspberry curd and it sounds yummy. I think it would taste great on french toast. i might just have to try this!
I actually love egg and jam sandwiches! I think it’s pretty weird…but oh so delicious. that curd looks fantastic! Gorgeous color.
Wow, this could totally solve my problem with breakfast sandwiches. I just REALLY like sweetness in my breakfast but I want to like breakfast sandwiches because egg is so filling and good for you…I am definitely going to try this!
I bet the sweet/savory combo is yummy! I’ve never made curd for a cake before but hope to soon – it sounds so delicious and versatile.
I’ve heard of this combo before and I have to say – it grosses me out and intrigues me at the same time. Maybe I’ll get the guts to try it some day. You do make it sound delicious 🙂
Oh wow, the curd looks so beautiful! The consistency looks perfect!
Funny this should come up b/c I just had a ham & egg sandwich last night and I almost always have to add strawberry jam to that! Adding raspberry curd is sure to be just as good.
🙂 Kimberly @ Poor Girl Eats Well
PS – that curd is simply gorgeous!
ooo i think i know which cake you’ll be posting soon…if it’s the one i’m thinking of, i have to say, this curd was the best filling i could imagine for that cake. this curd was just awesome (and i’m not a raspberry fan) and yours looks gorgeous!!
Wow that is the most beautiful thing I’ve ever seen!
This certainly sounds like an interesting combination. I suppose it’s similar to a monte cristo, no? I’d love to give it a try!
I saw this recipe yesterday and immediately printed it. I made Vanilla raspberry cupcakes for a friend’s birthday and wanted to make them a little extra special. This curd is amazing. Its a little thinner than lemon curd but that was perfect for what I wanted. I didn’t want that thicker consistency. I will link to your blog when I post the cupcakes with pics and recipes to mine!
Shanna
http://acupfullofcake.blogspot.com/
I believe you when you say it tastes great with eggs. I’m not a ketchup fan, but I do like it on scrambled eggs – completely changes the flavor of both!
I’m surprised your curd didn’t thicken after being chilled.
Btw, tell you hubby that it’s true cheese and jelly seem like a strange combo, but well prepared cheese platters always include fruit selections (pears, grapes, etc) – they compliment one another beautifully.
🙂
ButterYum
(1) Raspberry curd rocks, but I’ve never had a recipe for it, so thank you!
(2) Berries are gerat on savory dishes! Every had a berry sauce on grilled rare venison meat? YUM!!!!
(3) When I make over easy eggs, I always use toast covered in butter and raspberry preserves to sop up the yolk. So good!!!
So you are in good company my dear!
I’m glad to hear I’m not the only “weirdo” that likes the jam/egg/cheese combo.
I’m also surprised it didn’t thicken up more. Even this morning, it was still the same consistency and it’s been in the fridge since I made it.
This comment has been removed by the author.
Your raspberry curd recipe is amazing!! I made it and used it for some cupcakes. I credited and linked to your blog in my blog! Thanks for an awesome recipe
Shanna
http://acupfullofcake.blogspot.com/2010/04/vanilla-bean-cupcakes-with-raspberry.html
This certainly looks addictive, and the colour is just DIVINE! Will have to try it ….. Am curioius to see what it tastes like with egg..
I don’t know if I’m brave enough to try this one on an egg sandwich, but I did pin it 🙂
beantownbaker — March 18th, 2013 @ 8:18 am
Thanks for the pin! I hope you try it some time.
Jen, are the amounts above written the way that you made it (doubled)? Can’t wait to try it!
beantownbaker — April 1st, 2013 @ 8:36 am
I’ve never doubled this recipe before, but I don’t see why you couldn’t. Let me know how it works out for you.
I have been searching for a recipe just like this for a cake filling! Thank you so much 🙂
beantownbaker — May 12th, 2014 @ 4:55 pm
Glad to help! I hope you enjoy it 🙂
Is it possible to make this without the added sugar? I’m trying to find recipes that are good for a cancer diet. Thanks