


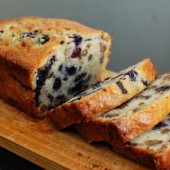
Dorie’s Perfect Party Cake
This month’s Daring Bakers challenge was, as usual, a challenge. Morven of Food Art and Random Thoughts chose Dorie Greenspan’s Perfect Party Cake from Baking: From my Home to Yours. And let me tell you, it is perfect for a party. I’ve never made a layer cake. I decided to make mini-cakes. You might think this is cheating, but I think it was harder than just frosting 1 layer cake. I had 9 little cakes to frost! I was going to be taking the cake to a friend’s house and didn’t want everyone to think I was weird snapping photos of the cake once the first piece was cut. And this way, hubby could have some for himself.
 I followed the directions almost exactly. I know some other DBers got daring in their flavor combinations, but I love lemon and raspberry so I stuck with it.
 Here are my ingredients ready to be beaten, stirred, and shaken into a wonderful cake. I forgot to get the buttermilk out of the fridge prior to the photo shoot. Don’t worry, I did use the buttermilk in the cake!
 This is what happened when I added the 2nd part of the dry ingredients. I wasn’t careful enough and flour flew everywhere. I know this picture is not the best, but it was funny. I have always been a messy baker and probably always will be.
 As you can see, my cakes didn’t rise very much during their time in the oven. They were definitely done since the sides were pulling away from the pan. Based on what other DBers have said throughout the month, it seems like a lot of other people’s cakes didn’t rise much either.
 To make my mini-cakes, I baked the cake as directed in two 9″ cake pans. I then used a 3″ round cookie cutter (biscuit cutter would also work here) to cut 7 three-inch rounds out of each 9″ pan. So I had 14 mini-cakes.
 Then I cut each one in half horizontally with a serrated knife. I didn’t want to have 4 layers for my mini-cakes because they would have been out of proportion. And I wouldn’t have had enough for hubby to have one! So I decided to make them with 3 layers each. Thus, I got 9 mini-layer-cakes with one layer leftover to taste-test. I also got to taste-test all the scraps from cutting out the rounds. This cake is amazing. I love the texture of this cake.
 I’ve recently fallen in love with Swiss buttercream. The DB Yule Log that we made in December was the first time I had ever made it and I’m in love! Don’t be intimidated by the eggs. The frosting is worth the extra effort.
 As I mentioned, I used the lemon buttercream and raspberry preserves for my filling.
 I definitely underestimated the amount of time it would take to decorate my mini-cakes. I found that the buttercream and preserves were very slippery and the layers slid around when I tried to frost the sides. So I decided to apply a crumb-coat of frosting first and throw them into the freezer for about 5 minutes. Then it was easier to apply the final layer of frosting. I didn’t worry about making it pretty because I knew I wanted to put coconut on the outside.
 Everyone at the get together I went to loved these little guys. The texture of the cake was AMAZING. So soft and smooth. I will definitely be making this cake again.
Thanks to Morven for hosting this month. Click here for the entire recipe.


 I am Jen the Beantown Baker. Engineer by day and baking maven by night. Hubby serves as my #1 fan and official taste tester. We got hitched back in 2006. Barefoot. In the sand. With the waves crashing behind us. It was one of the best decisions we’ve ever made.


I don’t eat strawberries but Alex does so I am looking forward to all the great recipes you’ll be sharing with us this week!
Btw, I gave you a blog award 🙂
This looks like the perfect little summer dessert 🙂 I, too, am happy just popping strawberries in my mouth, but always welcome a more desserty type option. I love your little dessert cups, too!
Sues
I CAN’T WAIT TO TRY THESE, THE LOOK WONDERFUL!
I love love love strawberries and love your idea of doing a whole week of recipes featuring them. I must stop by the farmers market on Friday to pick some up!
I LOVE individually sized desserts! And strawberries! Looks amazing 🙂
My husband goes Strawberry picking every year and my mom makes him Jam, I think I might have to make these for him this year too.
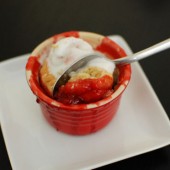
I hate to be negative, but this recipe was a little disappointing for me.
I loved! the cobbler topping. But the filling was way too sweet. It was like eating strawberry jam straight from the jar. And I even cut the sugar down to 1/3 cup and used about 3 cups of strawberries.
Thanks so much for sharing it though. I look forward to trying the cobbler topping with other fruit fillings.
alexandjess – sorry to hear you didn’t like the fruit filling in this recipe. I wasn’t using the ripest berries when I made it. Maybe that’s why it was too sweet for you? Bummer either way 🙁
What a beautiful cobbler! The filling looks pretty and bright.
Wow, great job here. Awesome picture too! You should really consider submitting this to Recipe4Living’s Fall Cobbler Recipe Contest! It looks delicious!