


Daring Bakers take on the Yule Log
While the tradition of the Yule Log is most closely associated with Christmas, the practice of burning a Yule Log dates back to celebrations of the Winter Solstice in Scandinavia.
The burning of the Yule Log became part of the celebrations of Midwinter. The Yule Log came to represent life, prosperity, warmth, protection and light during the dark winter.
Over the centuries, this tradition was carried on in some form by virtually ever European culture. At some point in the 18th or 19th century, the French transformed the tradition into an edible version with the Buche de Noel.
 In High School I actually made a couple Buche de Noels for French class. They were nothing like this one. I never made meringue mushrooms or “real” buttercream. Those would definitely be a challenge for me!
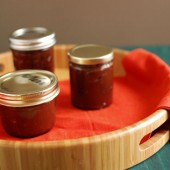
I set out to make my Yule Log the afternoon of a holiday party we were going to attend. I decided to make the genoise chocolate and to fill it with raspberry preserves and buttercream. I wasn’t crazy about the coffee flavored buttercream frosting, but everyone else really liked the combination of flavors.
Overall, the Yule log was not overly difficult to make or assembly, but again, I wasn’t crazy about the exterior frosting, so if I made it again, I’d definitely make a chocolate frosting.
 Yule Log(from Perfect Cakes by Nick Malgieri and The Williams-Sonoma Collection: Dessert)
Hosts: Daring Baker Founders Ivonne (Cream Puffs in Venice) and Lisa (La Mia Cucina)
Recipe Quantity: Serves 12
Cake should be stored in a cool, dry place. Leftovers should be refrigerated
Recipes:
Plain Genoise:
3 large eggs
3 large egg yolks
pinch of salt
¾ cup of sugar
½ cup cake flour
¼ cup cornstarchone
(1) 10 x 15 inch jelly-roll pan that has been buttered and lined with parchment paper and then buttered again
1.Set a rack in the middle of the oven and preheat to 400 degrees F.
2.Half-fill a medium saucepan with water and bring it to a boil over high heat. Lower the heat so the water is simmering.
3.Whisk the eggs, egg yolks, salt and sugar together in the bowl of a heavy-duty mixer. Place over the pan of simmering water and whisk gently until the mixture is just lukewarm, about 100 degrees if you have a thermometer (or test with your finger – it should be warm to the touch).
4.Attach the bowl to the mixer and, with the whisk attachment, whip on medium-high speed until the egg mixture is cooled (touch the outside of the bowl to tell) and tripled in volume. The egg foam will be thick and will form a slowly dissolving ribbon falling back onto the bowl of whipped eggs when the whisk is lifted.
5.While the eggs are whipping, stir together the flour and cornstarch.
6.Sift one-third of the flour mixture over the beaten eggs. Use a rubber spatula to fold in the flour mixture, making sure to scrape all the way to the bottom of the bowl on every pass through the batter to prevent the flour mixture from accumulating there and making lumps. Repeat with another third of the flour mixture and finally with the remainder.
7.Scrape the batter into the prepared pan and smooth the top.
8.Bake the genoise for about 10 to 12 minutes. Make sure the cake doesn’t overbake and become too dry or it will not roll properly.
9.While the cake is baking, begin making the buttercream.
10.Once the cake is done (a tester will come out clean and if you press the cake lightly it will spring back), remove it from the oven and let it cool on a rack.
 Coffee Buttercream:
4 large egg whites
1 cup sugar
24 tablespoons (3 sticks or 1-1/2 cups) unsalted butter, softened
2 tablespoons instant espresso powder
2 tablespoons rum or brandy
1.Whisk the egg whites and sugar together in the bowl of an electric mixer. Set the bowl over simmering water and whisk gently until the sugar is dissolved and the egg whites are hot.
2.Attach the bowl to the mixer and whip with the whisk on medium speed until cooled. Switch to the paddle and beat in the softened butter and continue beating until the buttercream is smooth. Dissolve the instant coffee in the liquor and beat into the buttercream.
 Meringue Mushrooms:
3 large egg whites, at room temperature
¼ teaspoon cream of tartar
½ cup (3-1/2 ounces/105 g.) granulated sugar
1/3 cup (1-1/3 ounces/40 g.) icing sugar
Unsweetened cocoa powder for dusting
1.Preheat the oven to 225 degrees F. Line 2 baking sheets with parchment. Have ready a pastry bag fitted with a small (no. 6) plain tip. In a bowl, using a mixer on medium-low speed, beat together the egg whites and cream of tartar until very foamy. Slowly add the granulated sugar while beating. Increase the speed to high and beat until soft peaks form when the beaters are lifted. Continue until the whites hold stiff, shiny peaks. Sift the icing sugar over the whites and, using a rubber spatula, fold in until well blended.
2.Scoop the mixture into the bag. On one baking sheet, pipe 48 stems, each ½ inch (12 mm.) wide at the base and tapering off to a point at the top, ¾ inch (2 cm.) tall, and spaced about ½ inch (12 mm.) apart. On the other sheet, pipe 48 mounds for the tops, each about 1-1/4 inches (3 cm.) wide and ¾ inch (2 cm.) high, also spaced ½ inch (12 mm.) apart. With a damp fingertip, gently smooth any pointy tips. Dust with cocoa. Reserve the remaining meringue.
3.Bake until dry and firm enough to lift off the paper, 50-55 minutes. Set the pans on the counter and turn the mounds flat side up. With the tip of a knife, carefully make a small hole in the flat side of each mound. Pipe small dabs of the remaining meringue into the holes and insert the stems tip first. Return to the oven until completely dry, about 15 minutes longer. Let cool completely on the sheets.
 Assembling the Yule Log:
1.Run a sharp knife around the edges of the genoise to loosen it from the pan.
2.Turn the genoise layer over (unmolding it from the sheet pan onto a flat surface) and peel away the paper.
3.Carefully invert your genoise onto a fresh piece of parchment paper.
4.Spread with half the coffee buttercream (or whatever filling you’re using).
5.Use the parchment paper to help you roll the cake into a tight cylinder.
6.Transfer back to the baking sheet and refrigerate for several hours.
7.Unwrap the cake. Trim the ends on the diagonal, starting the cuts about 2 inches away from each end.
8.Position the larger cut piece on each log about 2/3 across the top.
9.Cover the log with the reserved buttercream, making sure to curve around the protruding stump.
10.Streak the buttercream with a fork or decorating comb to resemble bark.
11.Transfer the log to a platter and decorate with your mushrooms and whatever other decorations you’ve chosen.


 I am Jen the Beantown Baker. Engineer by day and baking maven by night. Hubby serves as my #1 fan and official taste tester. We got hitched back in 2006. Barefoot. In the sand. With the waves crashing behind us. It was one of the best decisions we’ve ever made.


Yum that looks delicious and welcome back to my hometown! Cincinnati’s actually a great town that grows on you and has been evolving quite a bit in the time that you’ve been away. I suspect given your profession and work location history that we probably work for the same company as our day jobs ;).
beantownbaker — January 23rd, 2013 @ 8:30 am
Yes, Cincinnati has changed a LOT since we moved away in 2007.
I would suspect you’re right. There’s enough info to know where I work, especially if you work here too 😉 Going to go check out your blog now. I would love to meet some other Cincinnati area bloggers!
beantownbaker — January 23rd, 2013 @ 8:31 am
Ok I work for the *other* big company in town (just checked your About page).
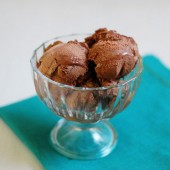
Isn’t the KA ice cream attachment the best thing ever? I am always making ice cream, even in the wintertime, but I never thought of using canned coconut milk as the base. I’ll have to try this out soon!
beantownbaker — January 23rd, 2013 @ 11:37 am
Absolutely. I didn’t think I could love my KAM any more than I already did. The ice cream attachment proved that I can.
I have lots of cans of coconut milk laying around and I know they make a good ice cream! Adding this one to my list 🙂
I bought myself KA ice creamer maker for my birthday this summer and I adore it! I’ve been thinking about making non-dairy ice creams, but the recipes all sounded strange. It’s great to see a recipe from a trusted source. Can’t wait to try.
beantownbaker — January 23rd, 2013 @ 10:28 pm
Let me know what you think if you try it. I am going to be experimenting with different milks since I can’t have cow’s milk…
love coconut milk based ice creams!! this one looks fabulous, and good call throwing in those oreos 😉
beantownbaker — January 24th, 2013 @ 12:05 pm
It’s ALWAYS a good idea to throw oreos in 🙂
My brother’s favorite thing to get at Coldstone is chocolate oreo ice cream. Too bad I don’t have an ice cream maker, or I would definitely try this!
beantownbaker — January 29th, 2013 @ 7:51 am
I’ve been told you can make ice cream without an ice cream maker. I never tried it before I got mine though…
I just made your recipe and luckily I tasted it before I cooled it. The ratio of sugar to cocoa powder is off. You should use at least twice the amount of sugar to cocoa powder in order for it not to have a horribly bitter taste. After adding more sugar it had a nice sweet to chocolately balance. Thanks for the recipe, my daughter is lactose intolerant and she will enjoy it.
beantownbaker — January 31st, 2013 @ 2:03 pm
I am glad you were able to adjust this recipe to suit your needs. Hubby and I both enjoyed the sweetness level of this recipe. I’m sure different cocoa powders have different levels of sweetness. I plan to try this recipe without the cocoa powder to make vanilla ice cream too. We loved the creaminess of it!
This look yummy and chocolate ice cream is one of my favorite. Thanks for sharing the directions and ingredients.
I just opened a can of coconut milk and it looked extremely curdled. I shook it a lot but it was still completely curdled. Is that how coconut milk is supposed to be out of the can? Are there any brands that you specifically like to use?
beantownbaker — April 24th, 2013 @ 1:44 pm
Hm. It doesn’t usually look curdled, more just separated. Did you try shaking it up? I use Native Forest since that’s what they sell in my grocery store. It looks like this: http://www.amazon.com/Native-Forest-Organic-Classic-13-5-Ounce/dp/B001HTJ2BQ/ref=sr_1_1?ie=UTF8&qid=1366829034&sr=8-1&keywords=coconut+milk
Oh how I wish I could try this.. I am currently gluten and dairy free.. However this being dairy free is is not gluten free with the oreo’s… Bummer!!
beantownbaker — October 23rd, 2013 @ 12:28 am
I’ve made this recipe again without the Oreos and it’s really good. Not quite as good as with the Oreos, but if you wanted to make it gluten free, just leave them out.
Enjoy the Best Movie of All Time
What video do you want to be able to watch today? Sniper
videos may be required on your list. This will be the most exciting shooting fight, where every sniper activity is always interesting to watch.